[QEC Tutorial]
For the full tutorial, see EtherCAT Library Example: QEC Digital Input/Output.
Digital Output
First, we will start with the EtherCAT digital output module, QEC-R11D0F, to make the external LEDs blink.
Hardware
- QEC-M-01
- QEC-R11D0F: EtherCAT 16 Channel Digital Output Slave Module
- Others: 24V LED
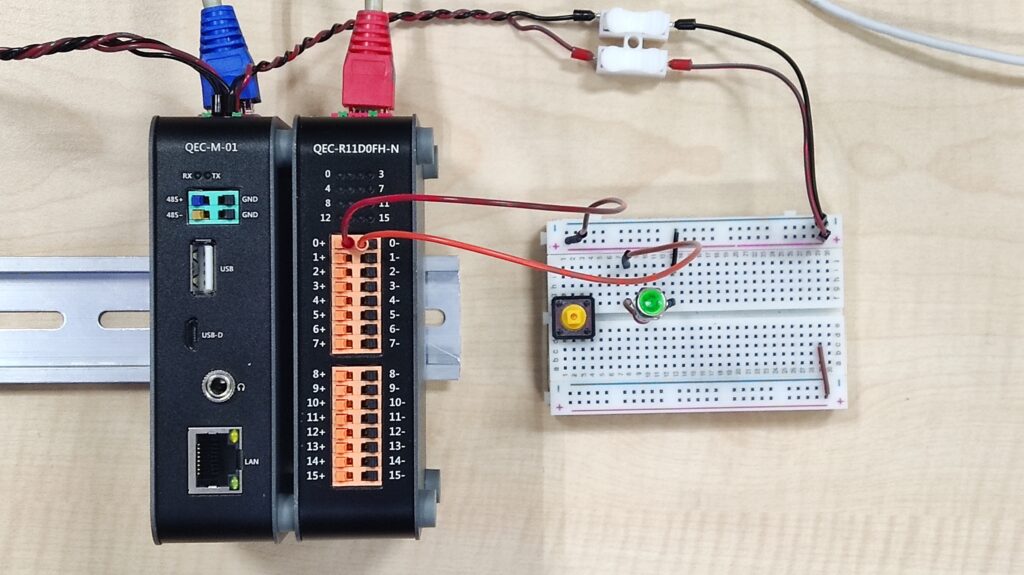
Circuit
Before constructing the circuit, connect the EtherCAT Out network on the QEC-M to the EtherCAT In network of the QEC-R11D0F.
This example uses the Vp power supply of the QEC-R11D0F as the power supply for QEC-R11D0F Pin0.
- Vp power supply is connected to QEC-R11D0F Pin0+
- The positive pole of LED is connected to the QEC-R11D0F Pin0-
- The negative pole of LED is connected back to the GND of the Vp power supply
As shown in the figure.
Code
After constructing the circuit, connect the EtherCAT master, QEC-M-01, to your PC, start the 86Duino IDE and enter the following code. You can also load the example on File / Examples / Ethercat / Blink in the example menu.
The first thing you need to do is to reference the EtherCAT library.
#include "Ethercat.h"
Set the EtherCAT master and slave object names.
EthercatMaster master;
EthercatDevice_QECR11D0FH slave; // Depend on your QEC device name
Next, the EtherCAT master and slave are initialized and the slave is mounted to EtherCAT.
Note that when using the slave attach(), it needs to be placed after the master begin() and needs to be in front of the master start().
master.begin();
slave.attach(0, master);
master.start();
In the main loop, you need to supply 24V voltage (extension from Vp power) to the LED via QEC-R11D0F Pin0 using the following command.
slave.digitalWrite(0, HIGH);
Then, you close it by using the below command.
slave.digitalWrite(0, LOW);
This restores QEC-R11D0F Pin0 to low volts and turns the LED off.
There needs to be enough blinking time between on and off, so the delay() command needs to be used to turn on for 4000ms and off for 1000ms without performing any other operation.
Example
#include "Ethercat.h"

EthercatMaster master;
EthercatDevice_QECR11D0FH slave; // Depend on your QEC device name

void setup(void) {
    master.begin();
    slave.attach(0, master);
    master.start();
}

void loop() {
    slave.digitalWrite(0, HIGH);
    delay(4000);
    slave.digitalWrite(0, LOW);
    delay(1000);
}
Learn More
You can find more information about the basic QEC applications in the EtherCAT application.
You can also explore Language or Libraries for a more detailed collection of 86Duino IDE programming.