2024.08.13, ArduBlock 1.0.
You can download the ArduBlock User Manual file here.
1. Introduction of ArduBlock
1.1 What is ArduBlock?
ArduBlock is a visual programming language that lowers the barrier to entry for writing Arduino programs by dragging and dropping building blocks. Even if you have never learned to code, you can easily write powerful Arduino programs. ArduBlock was developed by third-party developer David Li and other creators as a plug-in for the Arduino IDE, and was released in 2014 until October 2017. Its source code is open source for download and use on GitHub. (GitHub download: https://github.com/taweili/ardublock).
ArduBlock was developed with the goal of making it possible for users with no programming background to get started with Arduino quickly. With an intuitive block interface, users can simply drag and splice blocks with different functions to complete the program, each corresponding to a specific function or instruction in Arduino, so that users can easily understand and use it.

This document will provide an in-depth look at this powerful tool so that you can understand its various functions and features.
It mainly has the following functions:
- Control
- Pins
- Test
- Math Operators
- Variables/Constants
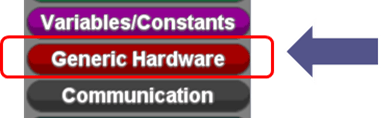
- Generic Hardware
- Communication
- Storage
- 86HMI
- EtherCAT
- MySQL
- Scoop
- Code Blocks
1.2 What is the difference between Scratch and ArduBlock?
Scratch is a visual programming language released in 2006 by the MIT Media Lab’s Lifelong Kindergarten Group to help children learn to code. It is also an open-source project, and users can complete the programming of animations or games by dragging and dropping pre-set building blocks and stacking commands.

However, Scratch is not directly related to Arduino and does not contain Arduino blocks. Although there are enthusiastic players who revamp Scratch and add Arduino blocks to write Arduino programs, such as S4A, S2A, and other unofficial software, these are not still different from ArduBlock.
Wikipedia Introduction: https://en.scratch-wiki.info/
Comparison table of the differences between ArduBlock and Scratch:
| ArduBlock | Scratch | |
| author | David Li with the players | MIT |
| Target group | Arduino players without programming experience | Children who do not have the programming experience. |
| publish | Year 2014 | Year 2006 |
| Arduino IDE plug-in | Yes | No |
| Target platform | Arduino | PC |
| Creation result | A variety of interactive installations | Animation or games |
| source | Open | Open |
| Programming methods | Drag and drop | Drag and drop |
1.3 Why use ArduBlock?
ArduBlock is designed specifically for Arduino and comes with a variety of dedicated blocks built-in. Users only need to complete the building block assembly, and the code can be automatically generated, compiled, and uploaded to Arduino in one step. This is friendly for beginners who don’t have a basic experience but want to create. Many teachers use ArduBlock in their teaching to help students quickly understand the basics of Arduino programming.
In summary, ArduBlock is a powerful and easy-to-use visual programming tool for beginners with no programming background. With an intuitive block interface and powerful features, ArduBlock makes it easy for everyone to create their own Arduino projects.
For example, an example of CiA402 control for EtherCAT:

Code generated:

2. Install and launch ArduBlock
2.1 Install the 86Duino IDE
Download the 86duino IDE from https://www.qec.tw/software/

After downloading, please unzip the zip file, no need to install additional software, double-click the 86duino.exe to start.

*Note: If Windows shows the warning message, click Other Information and then click the Continue button.


When the 86Duino Coding IDE 500 is opened, it shown as below.

2.2 Start the ArduBlock
There are two ways to start the ArduBlock
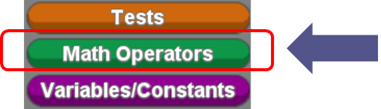
Go to Tools -> ArduBlock or Click the icon as shown below.

Once clicked, the ArduBlock will start.

2.3 Finished, code generation and upload
After the finished ArduBlock programming, use the “Code Generation & Upload” button to generate and upload the code to the QEC master.

Example: CiA402 control example for EtherCAT:

The generated code is as follows:
3. ArduBlock blocks
3.1 Interface introduction

In Blocks Area, the building blocks including the types as below:
- Control
- Pins
- Test
- Math Operators
- Variables/Constants
- Generic Hardware
- Communication
- Storage
- 86HMI
- EtherCAT
- MySQL
- Scoop
- Code Blocks
3.2 Types of Blocks
ArduBlock building blocks mainly has 3 kinds of functions:
- Starting blocks
- General script building blocks
- Value blocks

3.2.1 Starting blocks

Starting block is the block which main or sub-program starts to execute.
The upper and lower edges are flat and both edges cannot be joined by any other block.
The Program and Loop block are both starting block.

Corresponds to the starting point of the main Arduino program:
- Setup
- Executes before the loop
- Execute only once
- Can be empty
- Loop
- Repeat the script inside
Program block

Corresponding to the setup() and loop() of the Arduino IDE.

- Setup:
When the 86Duino hardware starts to execute sketch code (Note 1), it will first call the setup( ) function, and use it to initialize variables, pin patterns, start announced libraries, etc. The 86Duino hardware will only be executed once after power-on or reset.
- Loop:
The loop() function is executed immediately after a setup() function that performs initialization and sets the initial value of the variable. loop( ). It executes continuously and repeatedly, causing your program to behave and respond; Use it to control your 86Duino hardware action.
Loop block

Only write the program in loop(), no setup() content.
Loop and Program block are both starting block, and both generated the setup and loop program, either Loop or Program can be used at the same time, otherwise an error will be reported.
3.2.2 General script blocks

The upper and lower edges are concave and convex.
Can joint together with other script blocks.

Script block with input value. (as red circled below).

Some blocks can join other script block internally, such as if block.

3.2.3 Value blocks
There are 5 types:
- integer
- FP, Floating-point number with decimal point.
- string
- characters (a, A, B).
- Boolean (True, False).
The shapes and colors are as follows:

3.3 Introduction for basic blocks

In this chapter, we will focus on 9 types of building blocks:
- Control
- Pins
- Tests
- Math Operators
- Variables/Constants
- Generic Hardware
- Communication
- Storage
- Scoop (Multitasks)
3.3.1 Control Blocks

The control block will be placed on the top, it is the very basic building block in programming.
These blocks determine the basic program statements, such as if, loop, and so on.

If block

If the test condition is true, will do the then script.
Example: If the digit pin 2 reads HIGH, print the string “Pin 2 is HIGH” in PC Serial Monitor and go next step.

Output code :

if/else block

The if/else is similar to if block, but with else script area than if. We can add a new script in else
based on above example of if block, as follows:

In above example, if the digit pin D2 reads HIGH, print the string “Pin 2 is HIGH” in the PC Serial Monitor and go the next step ; if it is not HIGH, print the string “Pin 2 is LOW” in PC Serial Monitor and go to next step.
While block

Check whether the condition of test is true, do the script in command when it is true, and leave the while block until the condition is not true. If the test condition is not true at the beginning, the script will not be executed.
Example 1:

Example 2: Endless loop. test is always true, the script is always executed in the while. Please not to writing like this unless it is necessary.

do while block

do while will directly execute the script once before judging whether the test condition is true, if the condition is true, then execute the script again, and leave do while if it is not true.
Example:

repeat block

Repeat the script for N times, and N is determined by the input integer value.
Here’s an example of doing 5 times of serial prints “Hello”:

repeat and count block

In addition to repeat the script for N times, you can get how many times you’ve done from the defined name variables. For example, the following example prints 1, 2, 3, 4, 5.

repeat between block

In addition to repeating the script for N times, you can customize the start value(start), end value(stop), and value interval(steps of).

Example 1: Print 1, 2, 3, 4, 5.

Example 2: Print 10, 8, 6, 4, 2, 0, -2.

break block

Put break in while and repeat to jump out of the current loop, usually use with if block.
Example 1: Put break in the repeat and count block and print 1 and 2 only.

Example 2: Put break in while block.

delay block

This time-delay block is often used in Arduino, the program keeps waiting and do nothing.
There are two types:
- Delay Millis: Delay N milliseconds, enter 1000 for 1 second.
- Delay Micros: Delay N microseconds, enter 1000 for 1 millisecond.

Milliseconds block

The value of time (in milliseconds) since booting up, it can be printed out with Serial print. Here’s an example:

With Milliseconds block, you can use that to show the message not just waiting.
Below “go through 3 sec …” is the example to print “go through 3 sec …” every 3 seconds.

subroutine block

subroutine block is not a multitasking block, it will do only one time when it is called.
How to Use:
- Place the script inside commands
- Give the script a meaningful name
- Call the script with that meaningful name

Note: When the program is large, the subroutine block can make the program looks more organized and easier to understand, easier for the next person who take over the job or the years later when review the same program (one of the key points is the name must meaningful when you name it).
3.3.2 Pins Blocks

These blocks are to make use of the pins in QEC-M-070T/090T/150T.
The pins include digital IO and analog IO.


digital pin block

The digital pin block will read the specified digital IO pin and returns either HIGH or LOW.
There are digital IO pins on different QEC Master, as follows:
1. There are 3 external digital IO pins on QEC-M-043. (marked as red square below)

2. There are 25 external digital IO pins on QEC-M-070T/090T/150T. (marked as red square below)

3. There is no external digital IO pin on QEC-M01.
Example :

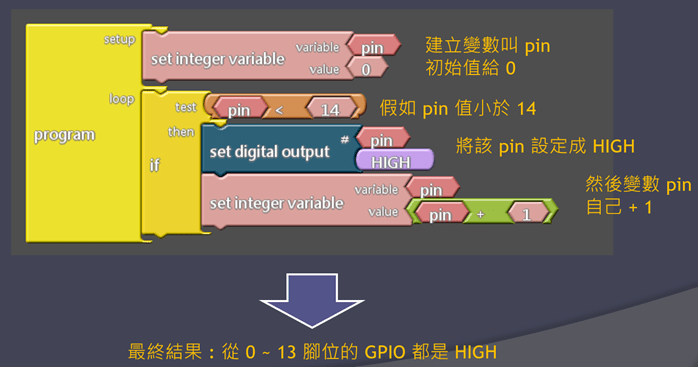
set digital output block

The set digital output block is to setup the HIGH or LOW of digital output pin.
1. There are 3 external digital IO pins on QEC-M-043. (marked as red square below)
2. There are 25 external digital IO pins on QEC-M-070T/090T/150T. (marked as red square below)
3. There is no external digital IO pin on QEC-M01.
Example: Blink the LED on D13 pin every 1 second.

analog input block

Read the state of the analog pin N, measure the voltage (between 0 ~ 3.3V), resolution of 0 ~ 4095 (3.3 / 4096 = 0.0008 V = 0.8 mV per div).
The following analog pins can be used from QEC Master:
- No analog IO pin on QEC-M-043.
- There are 6 external analog IO pins on QEC-M-070T/090T/150T.

3. No analog IO pin on QEC-M01.
Analog input read example: Detects the voltage of A0 pin, prints the warning message if the value is too low or too high.

set analog output block

Set analog output block is to use the PWM pin to simulate the analog signal, you can set a number of the Nth PWM pin between 0 ~ 1024, corresponding to 0 % ~ 100% 。
This can only use for the pins with PWM output function, as shown following:

The write example for set analog output: Pin D13 is a digital pin also a PWM pin, we can use that to minor adjust the brightness of the LED.

input pullup block

The input pullup block is similar to digital pin block, the difference is that this pin will link to the internal pull-up resistor in the CPU. In other words, if the pin is not connected (tri-state), the read value will be HIGH (because of internal pull-up).
toggle digital pin block

The toggle digital pin block is similar to digital output block, the difference is the state of that digital pin is set in reverse. It will read the state first, reverse it, and then set it back.
For example :
- If the pin is LOW, it will become HIGH after using toggle digital pin block.
- If the pin is HIGH, it will become LOW after using toggle digital pin block.
tone block

The first tone block above can be used to generate Do, Re, Mi…..sounds if that digital pin is connected to a Buzzer.
The second tone block above with extra milliseconds can setup the duration of sound.
Example 1: Pin 8 continuously generates a 440 Hz tone.

Example 3: What if I want to compose a song which needs to use more than two tone blocks?
Wrong :

Correct :

Note: Using delay blocks will freeze the program, using SCoop (Multitask) block is the solution and will explain later in another chapter.
Example 4: Use the built-in buzzer to generate the tone.
The pin 250 is the built-in Buzzer, as shown in the following example

Note: In QEC, when use the build-in Buzzer to generate the tone, the same tone will output to the Audio-out at the same time.
no tone block

The no Tone block will immediately stop the sound from the Buzzer pin.
no tone block example: The built-in Buzzer will generate a 440 Hz tone for 500 milliseconds and then stop.

cpuTemperature block

The cpuTemperature block can read the temperature of the Vortex86EX2 CPU.
Example of a cpuTemperature block: Prints out the CPU temperature.

3.3.3 Logic blocks

Logic building blocks are used to compare the calculation, integers, floating-point numbers, character strings and characters. In the programs, it is common to use for and , or, not logic calculation.

There are 5 types of value blocks, and the corresponding shapes and colors are as follows:
- integer
- Floating-point number (decimal point).
- string
- character
- Boolean

Numerical comparison blocks

Red circled above in order as below:
- Greater than
- Less than
- Equal to
- Greater than or equal to
- Less than or equal to
- Not equal
Example of numerical comparison:

Boolean comparison blocks

Red circled above in order as below:
- Equal to
- Not equal
Boolean comparison example:

Character comparison blocks

Red circled above in order as below:
- Equal to
- Not equal
Example: If the button pressed by the EtherCAT keypad is A, print the “get A” string.


Strings comparison blocks

Red circled above in order as below:
- The left string is equal to right string
- The left string is not equal to the right string
Note: Uppercase and Lowercase are different.
Example: Judge if the input from get TextInput is “Text” ; and if yes, print “is same”.

Logical calculation – and block

The and block has 2 inputs and 1 output, and the Boolean values for the input/output are shown in the following table:

Example: If “Pin 2 is HIGH” and “Serial has data to receive” are both true, then print “OK”.

Logical calculation – or block

The or block has 2 inputs and 1 output, and the Boolean values of the input/output are shown in the table below:

Example: If either “Pin 2 is HIGH” or “Serial has data to receive” is true, then print “OK”.

Logical calculation – not block

The not block has 1 input and 1 output, the Boolean values for the input/output are as follows:

Example: If no data in serial data available, print out the “Empty” string.

Logical calculation – is empty block

is empty block is to judge whether the string is empty or not. Empty string is called True, otherwise false is returned.
Example: Determine whether the TextInput input is an empty string; if yes, print “This is empty string”.

Logical calculation – toInt block
The toInt block is to compare the result after the string convert to number, there are 2 input and 1 output.
- Input 1 : The string to be compared, this string will convert to number.
- Input 2 : Number to be compared
- Output : True / False
Example : Judge whether the TextInput string from HMI is equal to the number of the NumberInput after the text is converted to a number ; and if yes, print “is same”.

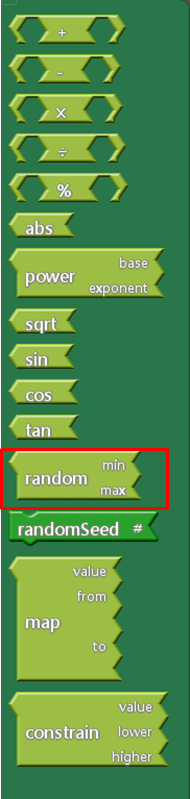
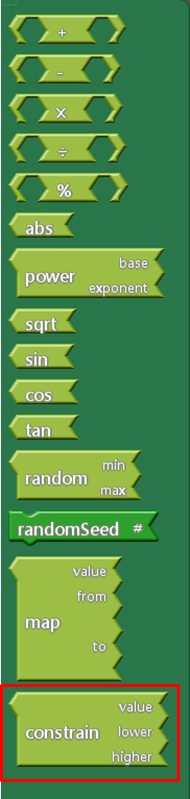
3.3.4 Math blocks
Math blocks are commonly used for basic calculations, such as arithmetic, trigonometric functions, value mapping, and so on.

Addition +, subtraction -, multiplication x and division ÷ blocks

The basic arithmetic blocks are for both integers and floating-point numbers.
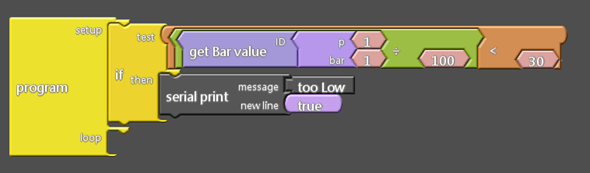
Example: If the value of the Bar is less than 30 after dividing by 100, it will print “too low”.
Take the remainder % block
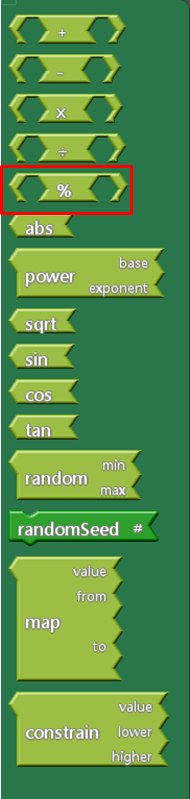
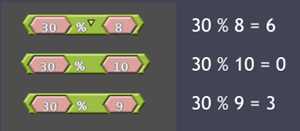
The take the remainder block %, is to take the remainder after the number is divided, as example below 30 % 8 means 30 divided by 8 equal to 3 times and remainder is 6.
As below; 30=(8×3)+6 , 30=(10×3)+0, 30=(9×3)+3, the remainders are 6, 0 and 3.
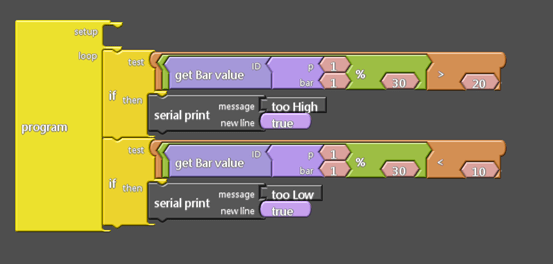
Example: If the Bar divided by 30 and the remainder is larger than 20, it will print “too high”, and if less than 10 will print “too low”.
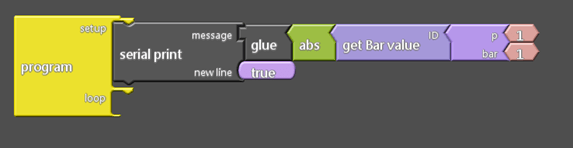
ABS block
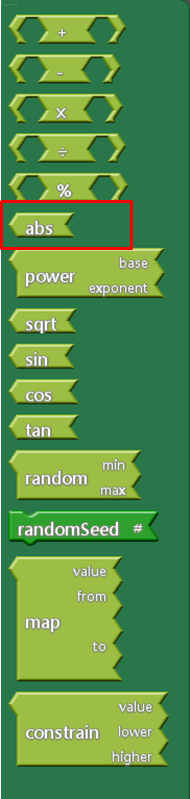
ABS block takes an absolute value, turn a negative value into a positive value, and maintain a positive value.
Example: Print out the absolute value of the Bar.
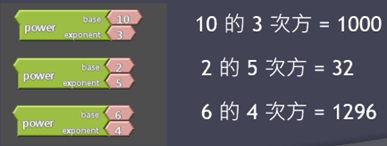
Power block
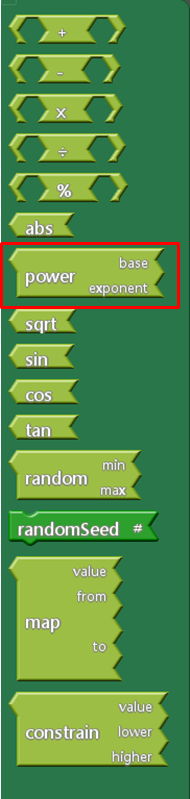
Power block is to make X raised to the power of Y which X is the Base and Y is the exponent.

For example:
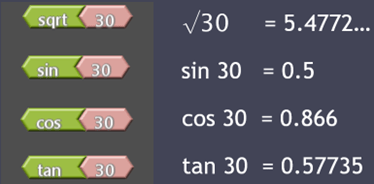
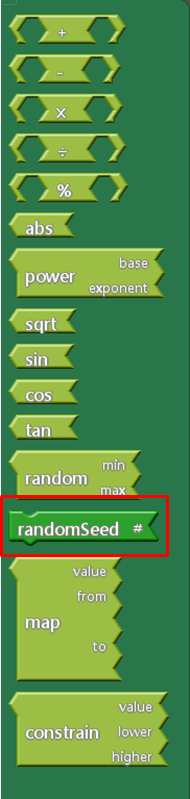
Square roots (Sqrt) and trigonometric (sin, cos, tan) blocks

For example:
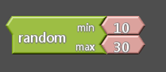
random block
The random block is to obtain a random number within a specified range.
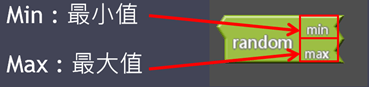
Example: Get a random number between 10 ~ 30.
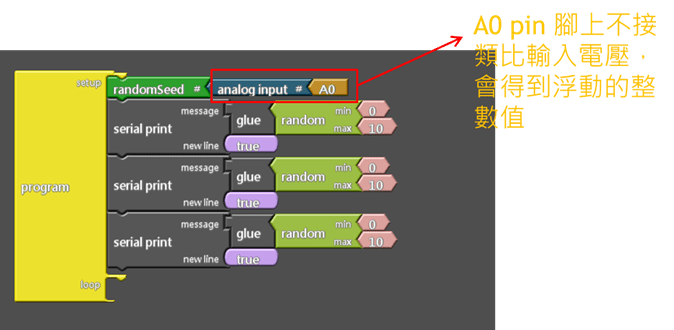
randomSeed block
According to the example of random number block, the generated random number sequence is assumed to be 11, 25, 22, 18, 12, 29….; You will find that if you reboot the hardware and let the program run again, you will still get 11, 25, 22, 18, 12, 29… (same sequence), it is because the resulting sequence is made by a “pseudorandom number generator”. If the value of the seed does not change, the sequence will be the same.
Random Seed Example: In order to get a different sequence every time you boot up, give randomSeed a different value each time.
map block
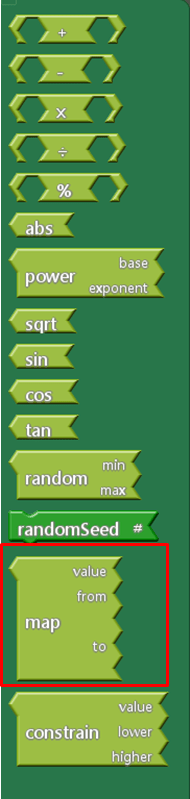
The map block is a numerical mapping, which can map the current input value from the current range to another range, and obtain the corresponding value in that range in equal proportions.
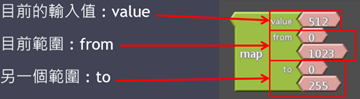
512 is 50% in 0 ~ 1023, and 50% in 0 ~ 255 is 127.
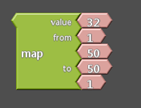
The lower limit of the map block range can be higher or lower than the upper limit of the range, so it can also be used to reverse the value in a range, for example in the following example we get 18.
Negative numbers can also be handled, e.g. the following example gives -18.
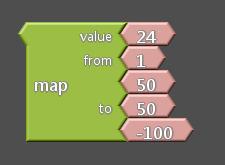
Note: Internally, integer arithmetic is used, there will be no decimal point, and the decimal part will be abandoned rather than rounded.
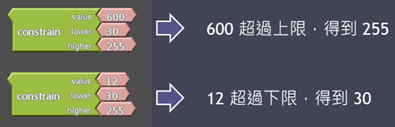
constrain block
constrain block is limited to a certain value, for example
3.3.5 Variables/Constants blocks
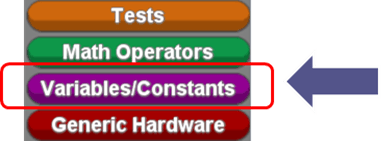
Variables/Constants are commonly used for variable and constant settings, such as Boolean values, numeric values, floating-point numbers, and so on.
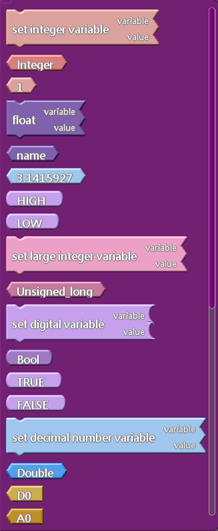

Integer variable block
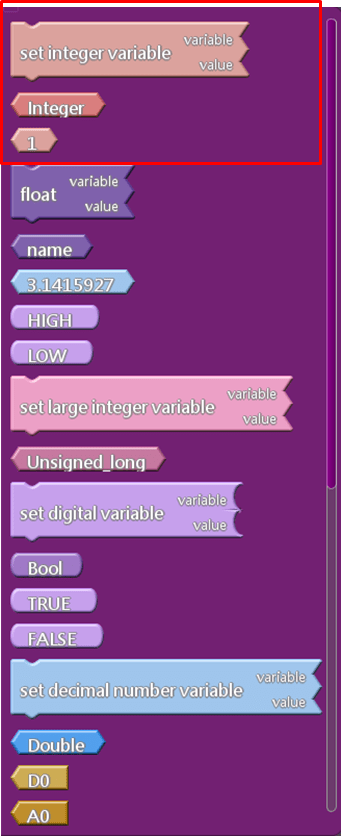
Use variables to store values, as follows:
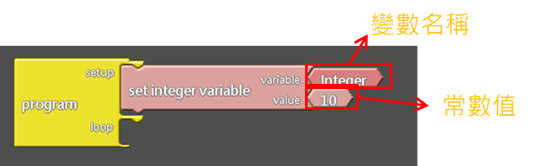
Create a variable which the name is “Integer” and an initial value is “10”.
The first block in the script will automatically create variables and assignments, and the second one will only assign values and not create variables.
Example:
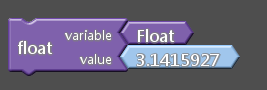
32-bit floating-point variable block
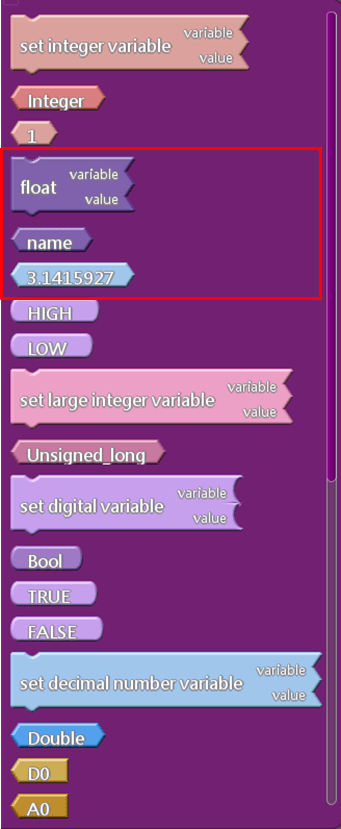
The 32-bit floating-point variable block is used in the same way as the integer block.
Unsigned_long block
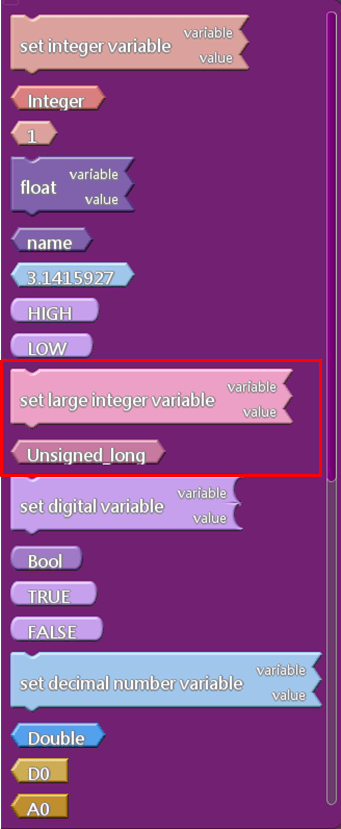
The range of integer variable block is -2147483648 ~ 2147483647.
The unsigned_long range is 0 ~ 4294967295.
The rest of the usage is the same as integer variable block.
Boolean (Bool) block
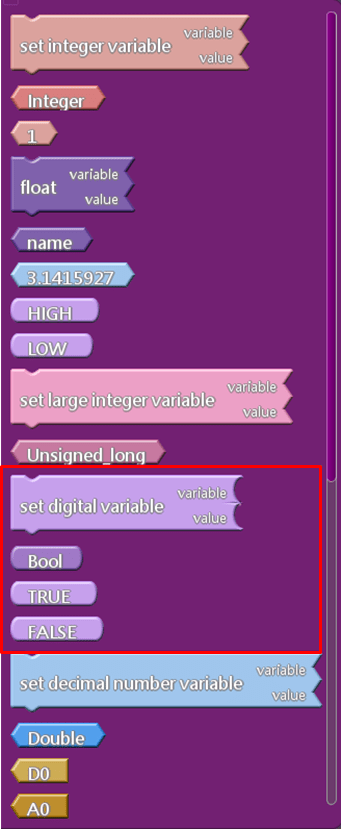
Bool block is used in the same way as integer block.

64-bit floating-point variable block
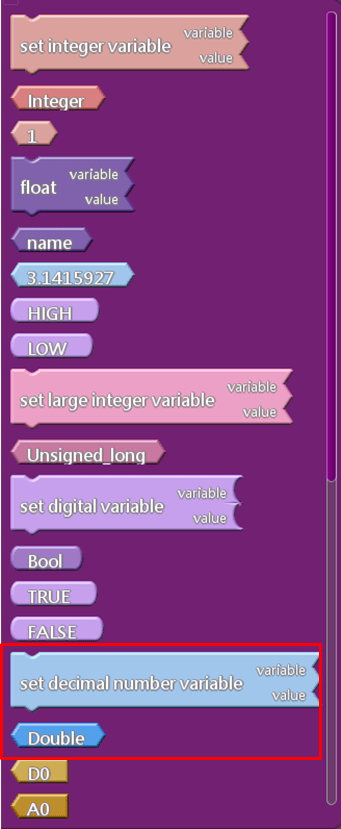
The 64-bit floating-point variable block is a floating-point arithmetic that achieves higher accuracy. The usage is the same as integer block.

set char variable block
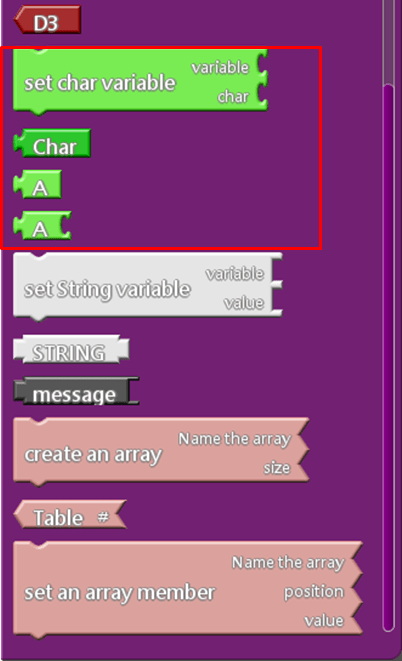
set character variable block is used in the same way as integer block.

set String variable block
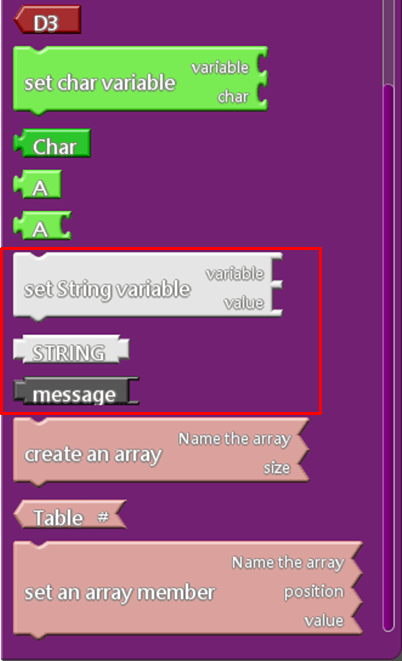
set String variable blocks is used in the same way as integer block.

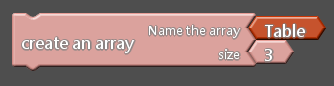
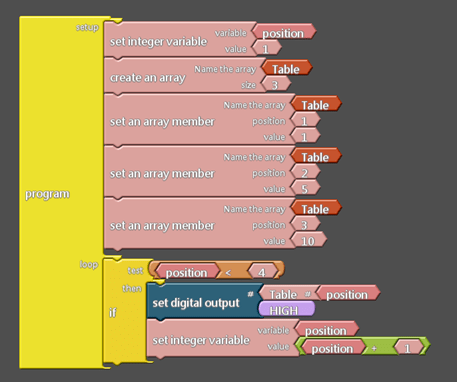
create an array block
create an array block is a combination values, below is the example to create and name the array called “Table” with a size of 3.
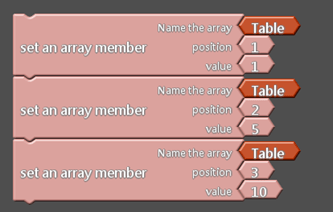
Given the “Table” array in order of position 1,2, 3, the initial values are 1, 5, 10.
Takes the values from the array.
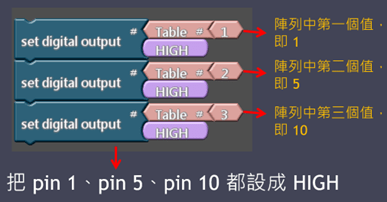
Example of the array variable block.
Constant block
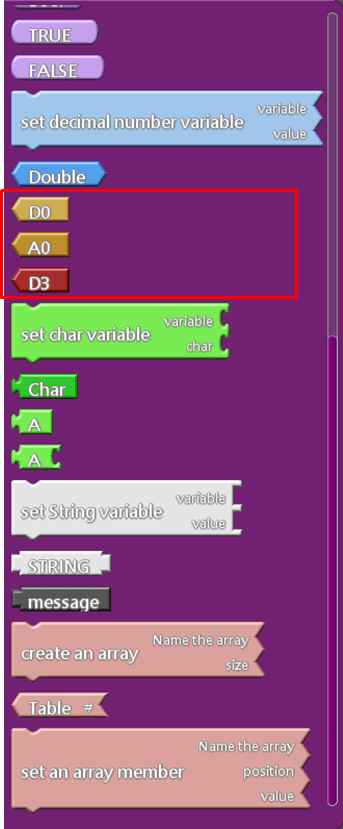
- D0 block: digital pin, optional from 0 ~ 31
- A0 block: analog pin, optional from 0 ~ 11
- D3 block: PWM pin, optional from 3, 5, 6, 9, 10, 11, 13
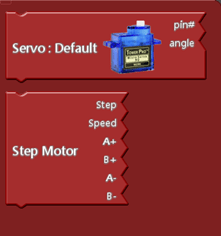
3.3.6 General Hardware block
General Hardware block is common for general hardware setups, such as servo motors and stepper motors.
There are the following types of blocks:
- Servo: Default
- Step Motor
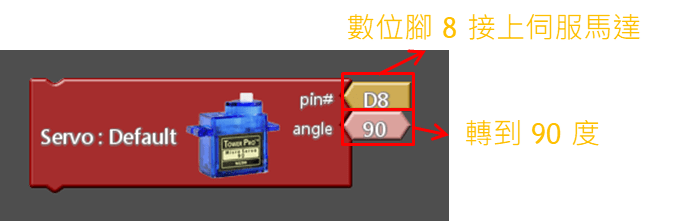
Servo motor (default, SG90,MG996GR)block
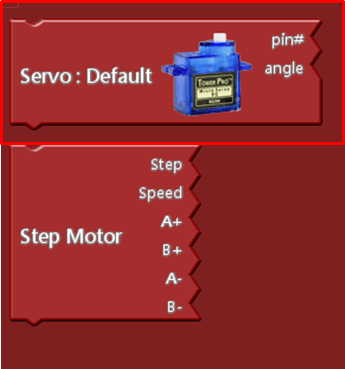
The Servo Moter (Servo :Default) block can rotate the RC servo motor between 0 ~180 degrees.
For example:
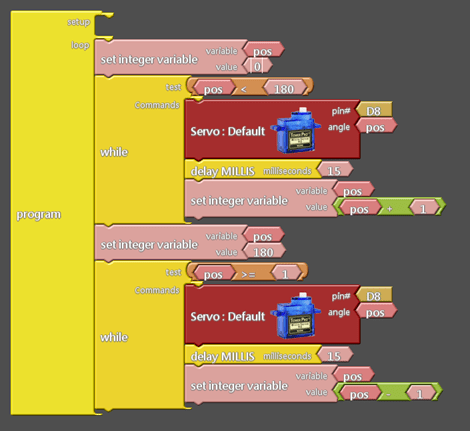
The Servo block also supports SG-90 and MG996R servo motors.

Example : The servo motor rotates from 0 to 180 degree and then from 180 to 0 degree.
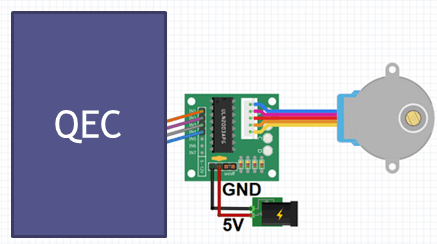
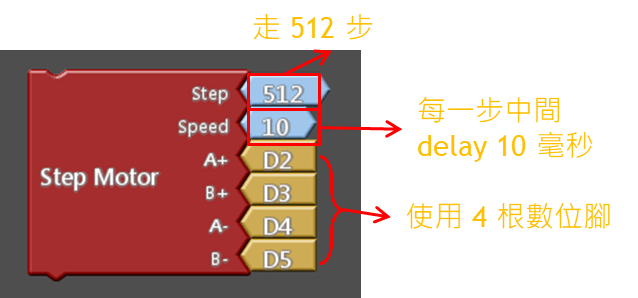
Step Motor block

The external driver is needed when use Step Motor block. The specifications are as follows:
- Driver : ULN2003
- Stepper motor : 28BYJ-48
Wiring examples:
For example:
3.3.7 Communication Block
Communication blocks are commonly used for communication functions, such as Serial, glue, I2C, etc.
There are the following types of building blocks:
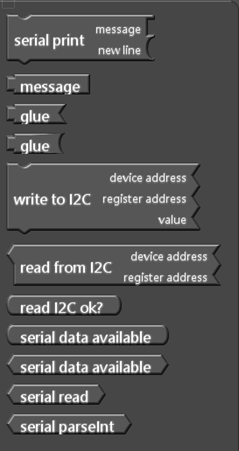
Serial communication blocks – Serial print, message, glue
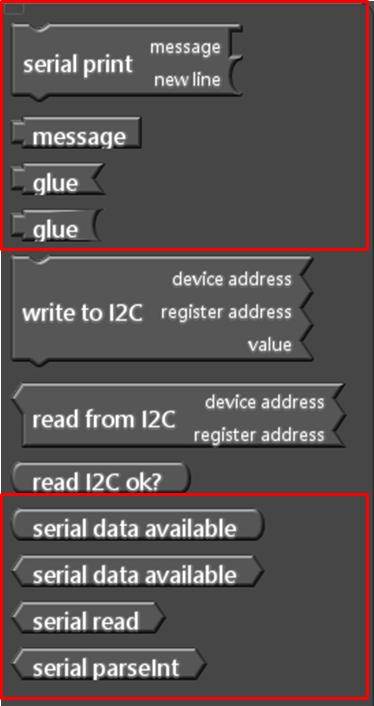
Those blocks are to create the communication from QEC to the USB port of PC, including:
- The upper red circled is the data transferring block.
- The lower red circled is the data receiving block.
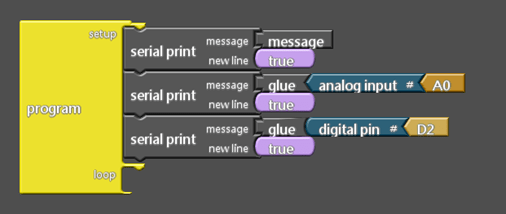
Example 1: Transferring data, print out “message” also the value of A0 and D2 pin.
Serial communication blocks – serial data available, serial read
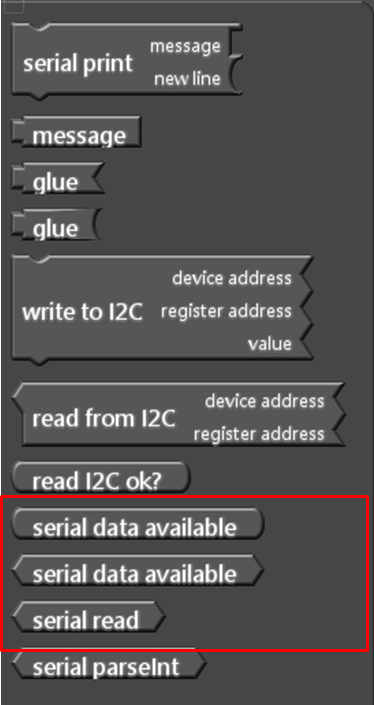
serial data available block description:
- The first block returns the Boolean value: whether there is a value that can be read.
- The second block returns an integer: how many value can be read.
serial read description: Read a byte.
- If there is no value to read, the block will be passed back with -1.
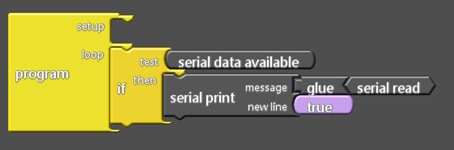
Example 2: If there is a value that can be read, read a byte and print it.
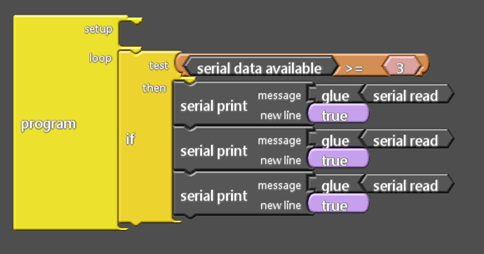
Example 3: If there are 3 values that can be read, read all 3 bytes and print them.
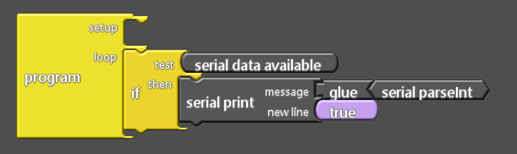
Serial Communication Blocks – Serial parseInt
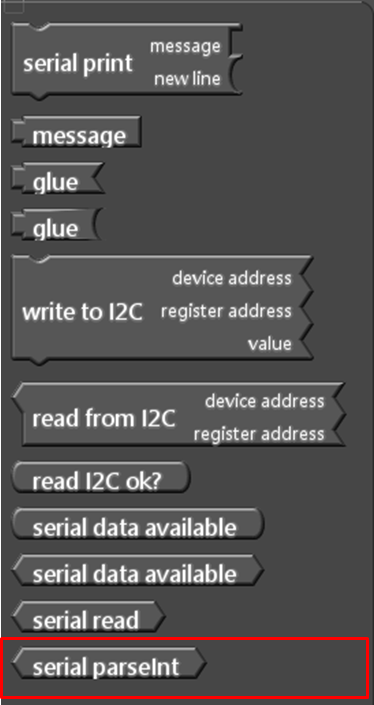
The serial parseInt block is to find the next available integer from the serial data that comes in externally.
Example: if there is a value that can be read, then read it out and print it as an integer, for example, if
the string passed is qwe548tt26rrr, we will get the number 548.
I2C communication blocks
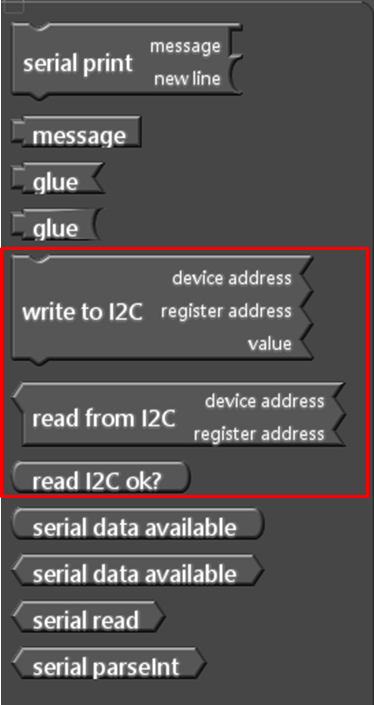
The data is transmitted from sensor to QEC, similar to serial communication but with 2 more parameters :
- device address: The unique address of the sensor
- register address: The address of the sensor’s internal registers ( users need to have the basic of I2C devices, it is recommended to refer to the Arduino website: https://docs.arduino.cc/learn/communication/wire).
Example: write 100 from register 0 of device address 12, then read a byte from register 9 of the same device and print it out.

3.3.8 Storage blocks
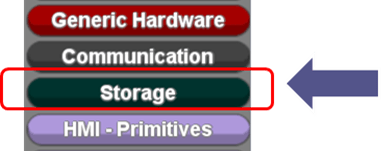
Storage blocks are to access data from flash memory, such as EEPROM and SD cards.
There are the following types of building blocks:
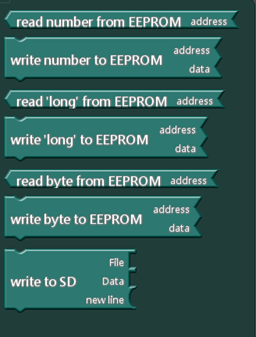
EEPROM blocks
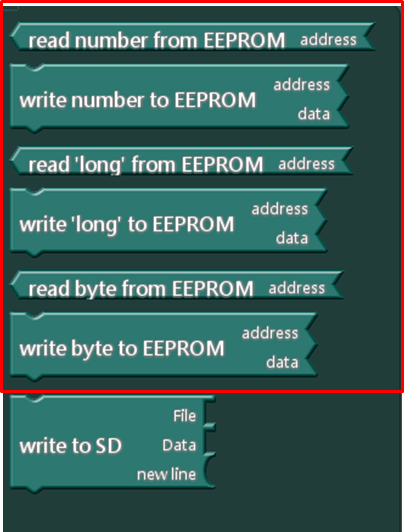
The EEPROM blocks are mainly used to read/write the data from EEPROM.
Read/write 2 bytes data.
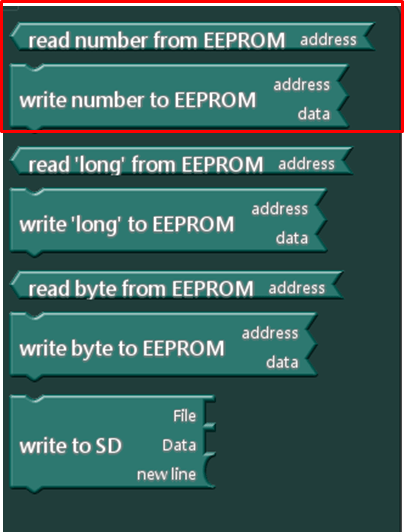
Write/read 2 bytes of data, example :
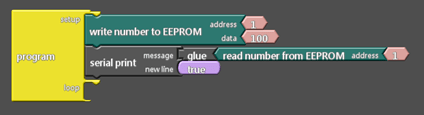
Write the data of 100 to address 1, read it back, and print it out (value range: -32768 ~ 32767).
Read/Write 4 bytes of data
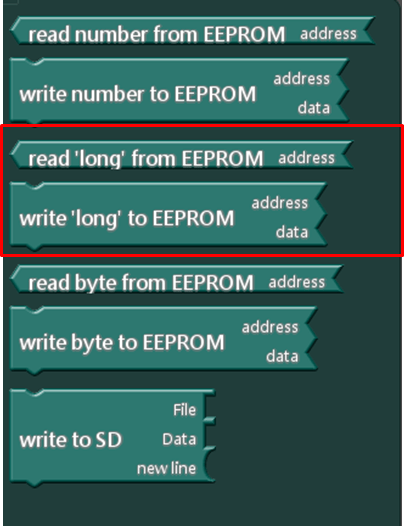
Read/Write 4 bytes of data, range -2147483648 ~ 2147483647.
The usage is the same as in the previous example, but the values are larger also needs more Bytes.
Read/write 1 byte of data
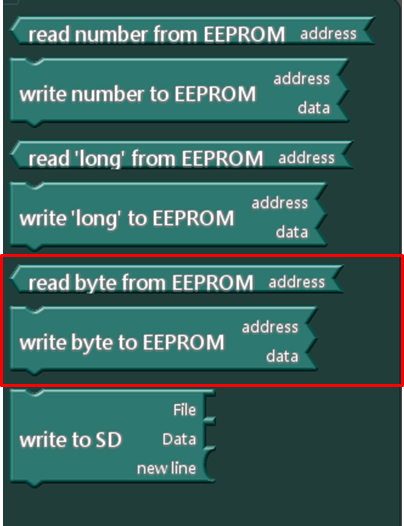
The usage is the same as in the previous example.
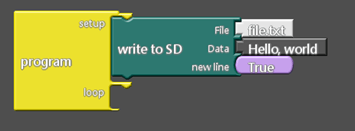
SD card block
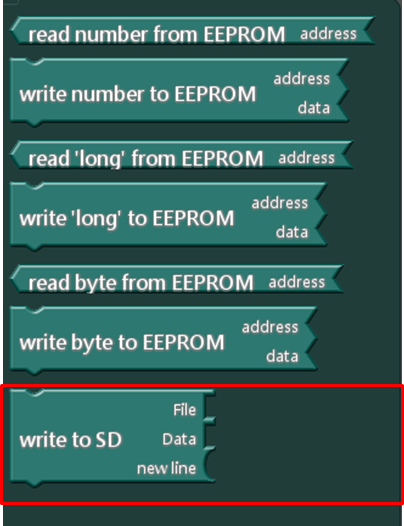
Write files to the SD card, for example: create a file.txt file on the SD card and write the “Hello, world” string (if the file already exists, it will be cleared and rewritten).
3.3.9 SCoop (Multitask) block
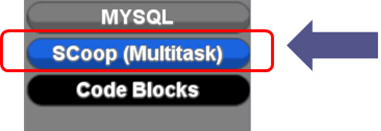
Scoop is a semi-manual multitasking block.
Advantages:
- You can use delay in multitasking without getting stuck
- You can turn on N multi-tasking in the background and run automatically.
The sub-program blocks will only run when they are called, but the multitasking task will run in the background without calling
Principle:
- Use delay/sleep to jump to the next task
There are the following types of blocks:
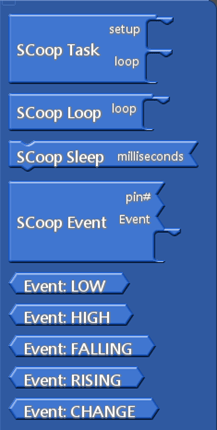
Scoop Task block
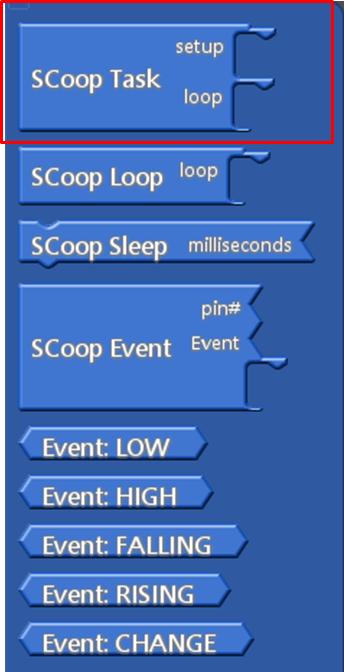
The Scoop Task block can open a new task, just like the program block.
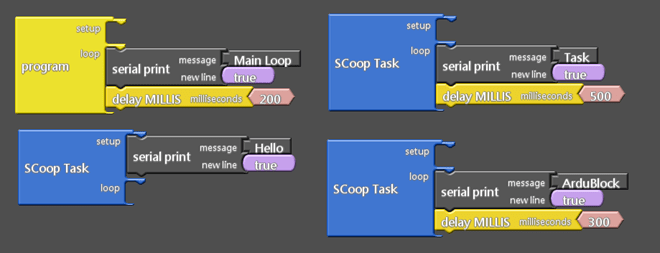
Multiple tasks can be opened, for example:
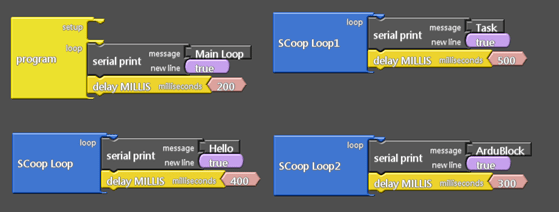
Scoop loop block
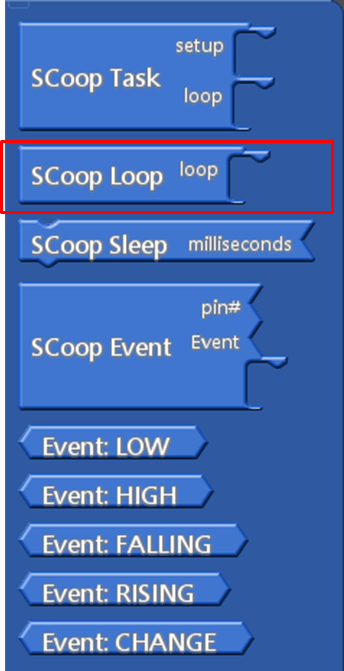
Scoop loop block can be used to create loop tasks, just like loop block. Multiple tasks can be opened, for example:
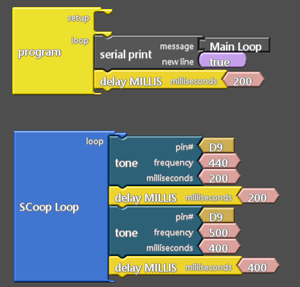
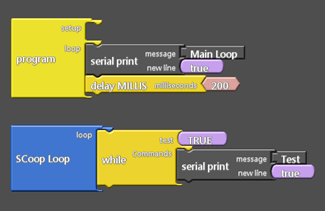
Example with the previous tone block:
In previous tone example, using delay will make the program stuck, here we rewrite the script with SCoop Loop. As below, the program will not get stuck, but also loop play the tones in the background.
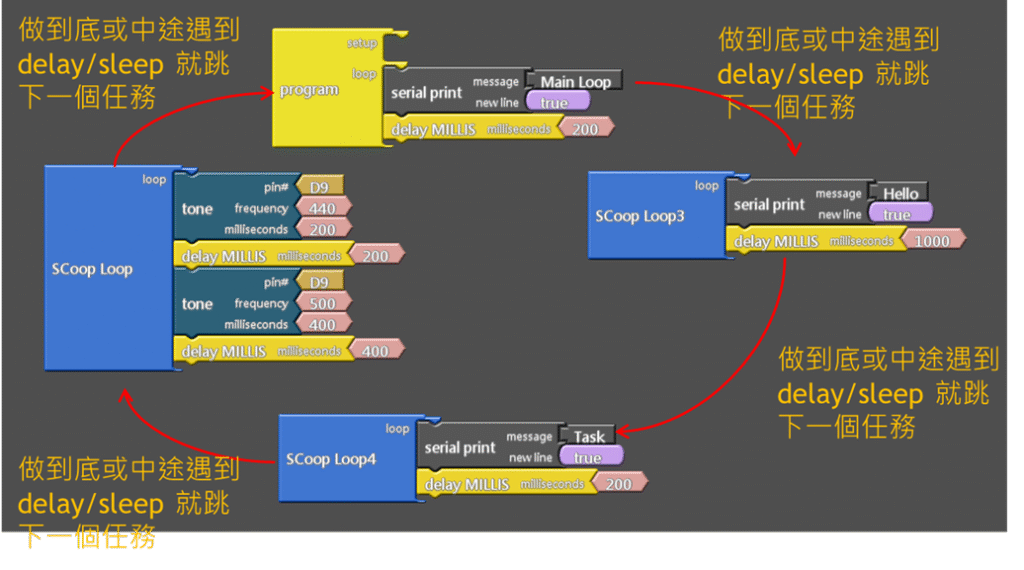
Scoop Sleep block

SCoop Sleep block has similar function as delay block, it will delay certain time and then jump to the next task.
Below is example with 3 of SCoop Loop tasks: After the first run, if the elapsed time does not exceed the assigned delay time, if will go for the next run; otherwise, it will continue from current task.
Scoop Event block
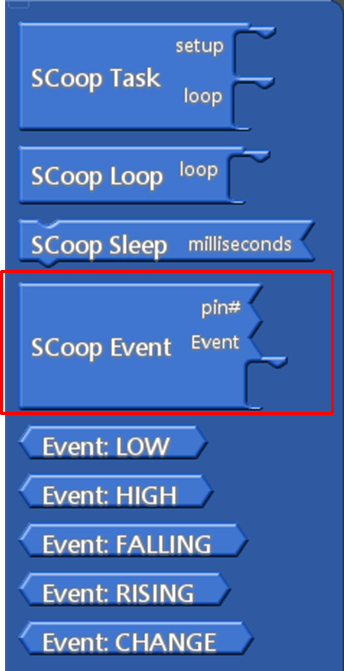
The Scoop Event block is if the pin# digital pin status as changed as Event, it will do the task.
For example, if pin 1 goes from LOW to HIGH, “Task” is printed.

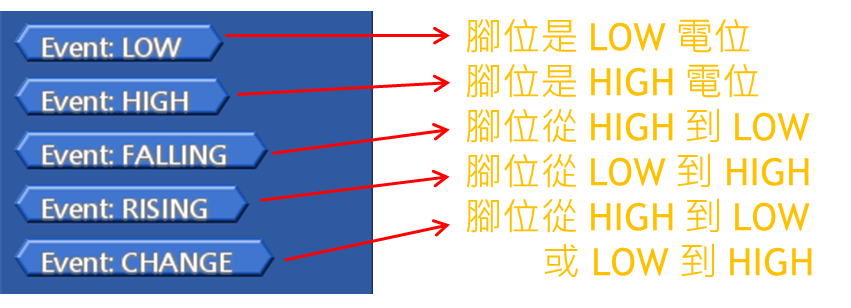
Event blocks
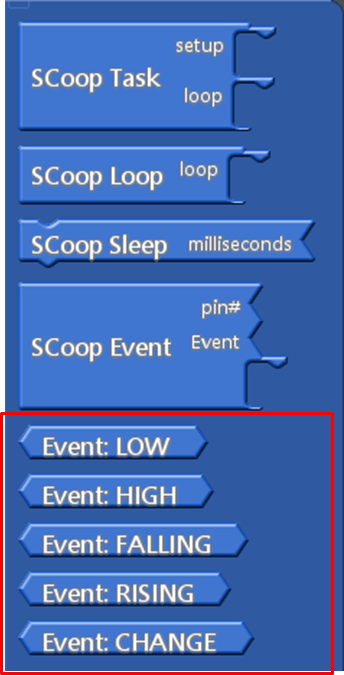
The Evant has the following 5 types.
Note : Multitask blocks use two way to switch to the next task, as below.
- The user actively calls delay/sleep
- The user does not call delay/sleep until the task ends. Then the library automatically calls the function that jumps to the next task (which the user does not see).
As it is not fully automatically, it is called “semi-manual” multitask. If you use the example below, you will still get stuck.
Because the task is neither ended nor called delay/sleep.
The text of the 86Duino reference is a modification of the Arduino reference and is licensed under a Creative Commons Attribution-ShareAlike 3.0 License. Code samples in the referenceSerial communication blocks – serial data available, serial readare released into the public domain.