2024.08.13, ArduBlock 1.0.
你可以下載 ArduBlock 使用手冊檔案。 這裡.
1. ArduBlock 介紹
1.1 什麼是 ArduBlock?
ArduBlock 是一種視覺化程式設計語言,透過拖曳積木的方式即可撰寫 Arduino 程式,大幅降低了 Arduino 程式開發的門檻。即使沒有撰寫程式的經驗,也能輕鬆建立功能強大的 Arduino 程式。 ArduBlock 由第三方開發者 David Li 與其他創作者開發,作為 Arduino IDE 的外掛套件,並於 2014 年發佈,一直維持至 2017 年 10 月。其原始碼已開源,可於 GitHub 下載並使用。(GitHub 下載: https://github.com/taweili/ardublock).
ArduBlock 的開發目標是讓沒有程式基礎的使用者也能快速上手 Arduino。透過直覺式的積木介面,使用者只需拖曳並拼接具有不同功能的積木,即可完成程式撰寫。每個積木都對應 Arduino 中的特定功能或指令,讓使用者能夠輕鬆理解並加以運用。

本文件將對這項強大的工具進行深入介紹,使您能夠了解其各項功能與特色。
主要有以下功能:
- Control
- Pins
- Test
- Math Operators
- Variables/Constants
- Generic Hardware
- Communication
- Storage
- 86HMI
- EtherCAT
- MySQL
- Scoop
- Code Blocks
1.2 Scratch 與 ArduBlock 的差異是什麼?
Scratch 是由 MIT 媒體實驗室的 Lifelong Kindergarten Group 在 2006 年推出的視覺化程式語言,旨在幫助兒童學習程式設計。 Scratch同樣是一個開源專案,使用者可以透過拖曳與堆疊預先設計的積木指令,完成動畫或遊戲的程式編寫。

然而,Scratch 本身並不直接支援 Arduino,也不內建 Arduino 積木。雖然有熱心玩家改造 Scratch 並加入 Arduino 積木,用以編寫 Arduino 程式,例如 S4A、S2A 等非官方軟體,但這些工具與 ArduBlock 仍有差異。
Wikipedia 介紹 https://en.scratch-wiki.info/
以下為 ArduBlock 與 Scratch 的差異比較表
| ArduBlock | Scratch | |
| 作者 | David Li 與開源社群 | MIT 媒體實驗室 |
| 目標族群 | 無程式基礎的 Arduino 玩家 | 無程式基礎的兒童或初學者 |
| 發佈年份 | 2014 年 | 2006 年 |
| 是否為 Arduino IDE 外掛 | 是 | 否 |
| 目標平台 | Arduino | PC |
| 產出結果 | 各類互動裝置 | 動畫或遊戲作品 |
| 原始碼 | 開源 | 開源 |
| 程式設計方式 | 拖放式 | 拖放式 |
1.3 為何要使用 ArduBlock
ArduBlock 是專為 Arduino 設計的,內建多種對應 Arduino 功能的積木。使用者只需完成積木的拼接,程式碼即可自動生成、編譯並一鍵上傳到 Arduino。 這對沒有程式基礎但想動手做的初學者非常友善。因此,許多老師也會在教學中使用 ArduBlock,以協助學生快速了解 Arduino 程式設計的基本概念。
總而言之,ArduBlock 是一款功能強大且易於使用的視覺化程式設計工具,非常適合沒有程式基礎的初學者使用。 透過直覺式的積木介面與強大的功能,ArduBlock 讓每個人都能輕鬆打造屬於自己的 Arduino 專案。
以下是 EtherCAT 的 CiA402 控制範例:

程式碼產生如下:

2. 安裝並啟動 ArduBlock
2.1 安裝 86Duino IDE
請從以下網址下載 86Duino IDE https://www.qec.tw/software/

下載完成後,請先將壓縮檔解壓縮,無需安裝任何額外軟體,直接雙擊執行 86duino.exe 即可啟動程式。

*注意: 若 Windows 跳出警告訊息,請點選 「其他資訊 (Other Information)」,再按 「仍要執行 (Continue)」 以繼續。


當 86Duino Coding IDE 500 開啟後,畫面將顯示如下所示。

2.2 啟動 ArduBlock
啟動 ArduBlock 有兩種方式:
點選 Tools → 找到 ArduBlock,或點擊下圖所示的圖示即可啟動。

點擊後,ArduBlock 便會啟動。

2.3 完成、程式碼產生與上傳
完成 ArduBlock 程式設計後,請使用 「程式碼產生並上傳 (Code Generation & Upload)」 按鈕,將程式碼產生並上傳至 QEC 主控器。

以下是 EtherCAT 的 CiA402 控制範例:

產生的程式碼如下:
3. ArduBlock 積木區介紹
3.1 使用介面介紹

在積木區中,包含以下類型的功能模組:
- Control
- Pins
- Test
- Math Operators
- Variables/Constants
- Generic Hardware
- Communication
- Storage
- 86HMI
- EtherCAT
- MySQL
- Scoop
- Code Blocks
3.2 積木類型
ArduBlock 中的積木主要分為三大功能類型:
- 程式起始積木 (Starting blocks)
- 一般功能積木 (General script building blocks)
- 數值積木 (Value blocks)

3.2.1 程式起始積木 (Starting blocks)

程式起始積木 (Starting block) 是程式 (主程式或子程式) 開始執行時所使用的積木。
其上下邊緣皆為平邊,因此無法與其他積木相連接。
這個 Program 以及 Loop 都屬於程式起始積木。

對應 Arduino 主程式的起始點:
- Setup
- 在進入主迴圈前執行。
- 只執行一次。
- 可以為空。
- Loop
- 會一直重複執行裡面的程式。
Program 積木

對應 Arduino IDE 中的 setup() 以及 loop() 函式。

- Setup:
當 86Duino 硬體開始執行 Sketch 程式碼(註1)時,會先呼叫 setup() 函式,用於初始化變數、設定腳位模式、啟動使用的程式庫等動作。setup() 只會在開啟或重置(Reset)後執行一次。
- Loop:
loop() 函式會在 setup()(完成初始化與變數初始值設定)執行後立即開始執行。loop() 會持續且反覆地執行,使程式能不斷運作並回應各種行為。您可以在 loop() 中撰寫程式邏輯,以控制 86Duino 硬體的動作。
Loop 積木

只需將程式撰寫在 loop()中, setup() 可以不包含任何內容。
Loop 以及 Program 皆屬於程式起始積木,兩者都會產生 setup() 與 loop() 程式碼。 Loop 或 Program 只能擇一使用,不可同時出現,否則會造成程式錯誤。
一般功能積木 (General script blocks)

上下邊緣具有凹凸結構。
可以與其他程式積木相互連接。

具有輸入值的程式積木(如下圖紅框所示)。

有些積木可以在其內部嵌入其他程式積木,例如 if 判斷積木。

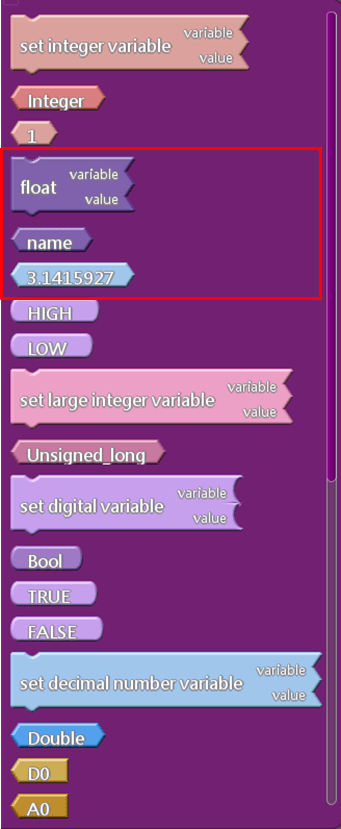
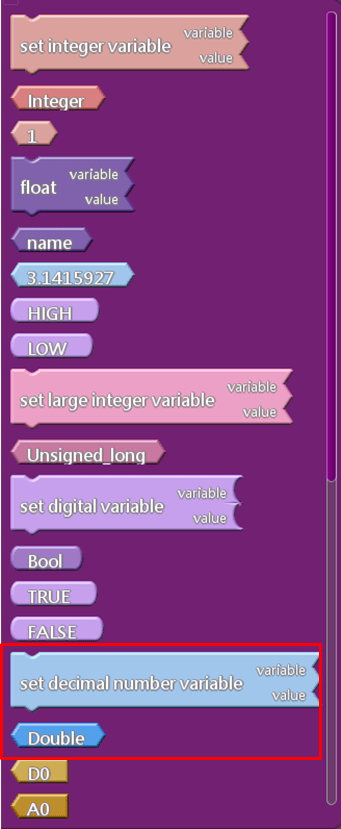
3.2.3 數值積木 (Value blocks)
總共有五種類型 :
- 整數 (integer)
- 浮點數 (FP, Floating-point number with decimal point.)
- 字串 (string)
- 字元 (characters)
- 布林 (True, False)
其形狀與顏色如下所示 :

3.3 基本積木介紹 (Introduction to Basic Blocks)

本章將重點介紹以下 9 類積木 :
- Control
- Pins
- Tests
- Math Operators
- Variables/Constants
- Generic Hardware
- Communication
- Storage
- Scoop (Multitasks)
3.3.1 Control 積木

Control 積木會被放置在最上層,它是程式設計中最基本、最核心的積木之一。
這些積木用來決定程式的基本敘述流程,例如 if 判斷、迴圈 (loop) 等控制結構。

If 積木

若測試條件為 真 (true),則執行 Then 區塊中的程式。
範例:
如果數位腳位 D2 的讀取值為 HIGH,
則在 PC 序列監控視窗(Serial Monitor) 中列印字串
「Pin 2 is HIGH」,並繼續執行下一步程式。

程式碼輸出:

if/else 積木

if/else 積木與 if 積木的功能相似,但 if/else 多了 else 區塊,可在條件不成立時執行另一段程式。也就是說,當 if 條件不為真時,程式會執行 else 區塊內的指令。
根據上述 if 積木範例,其 if/else 寫法如下 :

在上述範例中,若數位腳位 D2 的讀取值為 HIGH, 則在 PC 序列監控視窗 (Serial Monitor) 中列印字串 「Pin 2 is HIGH」,並繼續執行下一步。 若其讀取值不是 HIGH, 則列印字串「Pin 2 is LOW」,並同樣繼續執行下一步。
While 積木

檢查測試條件是否為 真 (true)。 當條件為 真 (true) 時,執行迴圈內的指令, 並持續重複執行,直到條件變為 假 (false) 時才離開 while 迴圈。 若在開始時,測試條件即為 假 (false), 則迴圈內的程式將不會被執行。
範例1 :

範例 2 : 無限迴圈。 由於測試條件始終為 真 (true), while 迴圈內的程式將會持續不斷地執行。 除非有必要,請避免撰寫此類程式。

do while 積木

do while 迴圈會先直接執行一次迴圈內的程式, 之後才判斷測試條件是否為 真 (true)。 若條件為 真 (true),則會再次執行迴圈內容。 若條件為 假 (false),則結束並離開 do while 迴圈。
範例 :

repeat 積木

將迴圈內的程式重複執行 N 次,其中 N 由輸入的整數值決定。
以下範例示範重複 5 次 在 序列監控視窗 中輸出字串「Hello」:

repeat and count 積木

除了可重複執行程式 N 次 之外, 還可以透過已定義的變數名稱得知目前已執行的次數。 例如,下列範例會依序輸出:1、2、3、4、5。

repeat between 積木

除了可以將程式重複執行 N 次 之外, 還可以自訂起始值 (start)、結束值 (stop) 以及遞增間隔 (steps of)。

範例1 : 列出1, 2, 3, 4, 5

範例2 : 列出 10, 8, 6, 4, 2, 0, -2

break 積木

在 while 或 repeat 迴圈中加入 break,可跳出當前迴圈,通常會與 if 積木搭配使用。
範例 1 : 在 repeat and count 積木中加入 break, 則程式只會列印 1 和 2。

範例 2 : 在 while 積木中加入 break。

delay 積木

此延遲(time-delay)積木在 Arduino 中非常常見,
執行時程式會暫停等待,在此期間不進行任何操作。
總共有兩種類型 :
- Delay Millis : 延遲 N 毫秒,例如輸入 1000 代表延遲 1 秒。
- Delay Micros : 延遲 N 微秒,例如輸入 1000 代表延遲 1 毫秒。

Milliseconds 積木

自系統啟動以來所經過的時間(以毫秒為單位), 可透過 Serial.print 將其輸出顯示。 範例如下:

透過 Milliseconds 積木,可以在不單純等待的情況下顯示訊息。 以下範例中,「go through 3 sec …」會每 3 秒輸出一次。

subroutine 積木

subroutine 積木並非多工積木,它只會在被呼叫時執行一次,而不會自行循環或持續運行。
使用方式:
- 將要執行的程式放入 commands 區塊中
- 為此子程序命名具代表性的名稱
- 在程式需要的地方,以該名稱呼叫子程序

注意:當程式規模較大時,使用 subroutine 積木 可以讓程式結構更加清晰、容易閱讀, 也更有利於日後維護——不論是交接給他人,或是多年後自行回頭查看程式。 其中一個關鍵點是:為子程序命名時,一定要使用具有明確意義的名稱。
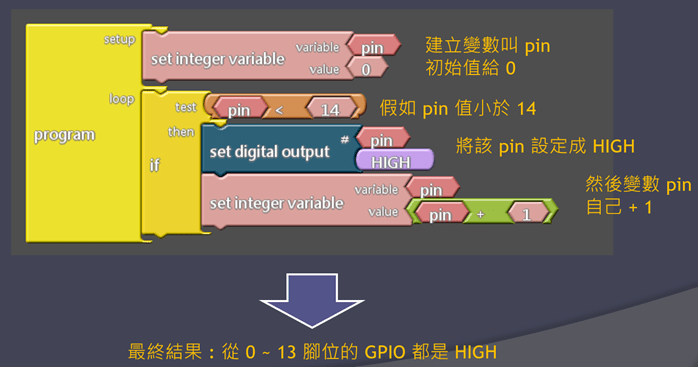
3.3.2 Pins 積木

這些積木用於操作 QEC-M-070T / QEC-M-090T / QEC-M-150T 上的各項 I/O 腳位。
腳位類型包含數位 I/O 與類比 I/O。


digital pin 積木

這個 digital pin 積木會讀取指定的數位 I/O 腳位, 並返回 HIGH 或 LOW。
不同型號的 QEC Master 具備的 數位 I/O 腳位數量有所不同,
其配置如下:
1. QEC-M-043 具備 3 組外部數位 I/O 腳位(如下方紅框所示)。

2. QEC-M-070T / QEC-M-090T / QEC-M-150T 具備 25 組外部數位 I/O 腳位(如下方紅框所示)。

3. QEC-M01 不具備外部數位 I/O 腳位。
範例 :

set digital output 積木

設定數位輸出積木用於將指定的數位輸出腳位設定為 HIGH 或 LOW。
1. QEC-M-043 具備 3 組外部數位 I/O 腳位(如下方紅框所示)。
2. QEC-M-070T / QEC-M-090T / QEC-M-150T 具備 25 組外部數位 I/O 腳位(如下方紅框所示)。
3. QEC-M01 不具備外部數位 I/O 腳位。
範例: 讓 D13 腳位上的 LED 每 1 秒 亮 / 滅一次。

analog input 積木

讀取 類比腳位 N 的電壓狀態(範圍 0 ~ 3.3V)。轉換解析度為 0 ~ 4095 ( 3.3V/4096≈0.0008V=0.8 mV 每單位 ,也就是說,每增加 1 的讀取值,電壓約增加 0.8 mV。)
可在 QEC Master 上使用的類比輸入腳位如下:
- QEC-M-043 不含類比 I/O 腳位。
- QEC-M-070T / QEC-M-090T / QEC-M-150T 具備 6 組外部類比 I/O 腳位。

QEC-M01 不含類比 I/O 腳位。
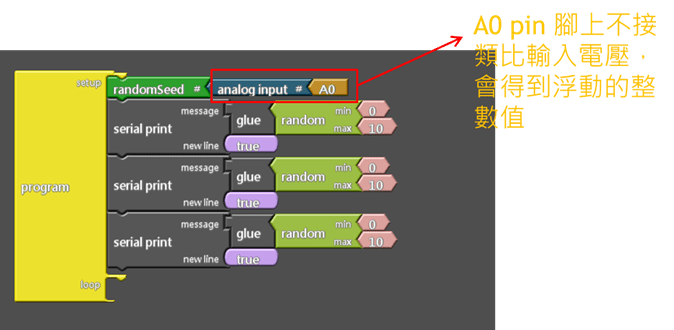
類比輸入讀取範例: 偵測 A0 腳位的電壓,若讀取值過低或過高,則列印警告訊息。

set analog output 積木

Set Analog Output (設定類比輸出) 積木 是利用 PWM 腳位 來模擬類比信號,你可以為第 N 號 PWM 腳位設定一個介於 0 ~ 1024 的數值,其數值對應的輸出比例為 0% ~ 100%。
此功能僅能用於具備 PWM 輸出功能的腳位,如下圖所示:

設定類比輸出的示例:腳位 D13 雖然是數位腳位,但同時也支援 PWM 功能,我們可以利用它來細微調整 LED 的亮度。

input pullup積木

Input Pullup(輸入上拉)積木 與 Digital Pin(數位腳位)積木 類似,不同之處在於該腳位會連接到 CPU 內部的上拉電阻。 換句話說,當該腳位未連接( 未定義狀態 )時,讀取的值將會是 HIGH,這是因為內部上拉電阻的作用所致。
toggle digital pin 積木

Toggle Digital Pin(切換數位腳位)積木 與 Digital Output(數位輸出)積木 類似,不同之處在於它會將該腳位的輸出狀態反轉。 它會先讀取腳位目前的狀態,然後將其反相(HIGH → LOW 或 LOW → HIGH),最後再寫回到該腳位。
範例 :
- 如果該腳位原本為 LOW,使用 Toggle Digital Pin 積木後會變為 HIGH
- 如果該腳位原本為 HIGH,使用 Toggle Digital Pin 積木後會變為 LOW
Tone 積木

上方第一個 tone 積木可用於產生 Do、Re、Mi…… 等音階聲音,只要將該數位腳位連接至蜂鳴器即可。
上方第二個帶有額外『 milliseconds 』參數的 tone 積木則可以設定聲音的持續時間。
範例 1:腳位 8 持續輸出 440 Hz 的音調。

範例 3:如果我想要編一首歌曲,而且需要使用兩個以上的 tone 積木,該怎麼做呢?
錯誤:

正確:

注意:使用 delay(延遲)積木會使程式暫停運作。解決方式是使用 SCoop(多工)積木,相關內容將在之後的章節中介紹。
範例 4:使用內建蜂鳴器來產生音調。
腳位 250 為內建蜂鳴器,如下例所示。

注意:在 QEC 中,當使用內建蜂鳴器產生音調時,同樣的音調也會同時輸出到 Audio-out。
no tone 積木

這個 no Tone 積木會立即停止該蜂鳴器腳位的聲音。
no tone 積木範例: 內建蜂鳴器會先輸出 440 Hz 音調 500 毫秒,之後停止發聲。

cpuTemperature 積木

這個 cpuTemperature 積木可以讀取 Vortex86EX2 CPU 的溫度。
cpuTemperature 積木範例: 將 CPU 的溫度列印出來。

3.3.3 Logic 積木

邏輯運算積木 ( Logic building blocks ) 用於比較運算、整數、浮點數、字串與字元。在程式中,常會使用且 (and)、或 (or)、非 (not) 等邏輯運算。

數值積木共有 5 種型態,其對應的形狀與顏色如下所示:
- 整數 (integer)
- 浮點數 (Floating-point number)
- 字串 (string)
- 字元 (character)
- 布林值 (Boolean)

Numerical comparison 積木

上面紅色圈選的部分依序為:
- 大於
- 小於
- 等於
- 大於或等於
- 小於或等於
- 不等於
數值比較範例:

Boolean comparison 積木

上面紅色圈選的部分依序為:
- 等於
- 不等於
布林值比較範例:

Character comparison 積木

上面紅色圈選的部分依序為:
- 等於
- 不等於
範例:如果 EtherCAT 鍵盤按下的按鍵為 A,則印出字串 " get A "。


Strings comparison 積木

上面紅色圈選的部分依序為:
- 左邊的字串等於右邊的字串
- 左邊的字串不等於右邊的字串
注意:大小寫視為不同字元。
範例:判斷從 get TextInput 取得的內容是否為 "Text";若相同,則輸出 " is same "。

Logical calculation – and 積木

and 積木有 2 個輸入與 1 個輸出,其輸入與輸出的布林值關係如下表所示:

範例:如果『Pin 2 為 HIGH』且『序列埠有資料可接收』這兩個條件都為真,則列印 “ OK ”。

Logical calculation – or 積木

這個 或 積木具有 2 個輸入與 1 個輸出,其輸入與輸出的布林值關係如下表所示:

範例:如果『Pin 2 為 HIGH』或『序列埠有資料可接收』任一條件為真,則列印 “ OK ”。

Logical calculation – not 積木

這個 not 積木具有 1 個輸入與 1 個輸出,其輸入與輸出的布林值關係如下所示:

範例:如果序列埠沒有可讀取的資料,則列印字串 “ Empty ”。

Logical calculation – is empty 積木

is empty 積木用來判斷字串是否為空。若字串為空則回傳 True,否則回傳 False。
範例:判斷 TextInput 的輸入是否為空字串;如果是,則列印 " This is empty string "。

Logical calculation – toInt 積木
toInt 積木是用於在字串轉換成數字後進行比較的積木,具有 2 個輸入與 1 個輸出。
- 輸入 1:要比較的字串,此字串會先被轉換為數字
- 輸入 2:用來比較的數字
- 輸出:回傳 True / False
範例:判斷從 HMI 的 TextInput 取得的字串,在轉換成數字後,是否與 NumberInput 的數值相同;若相同,則列印 “ is same ”。

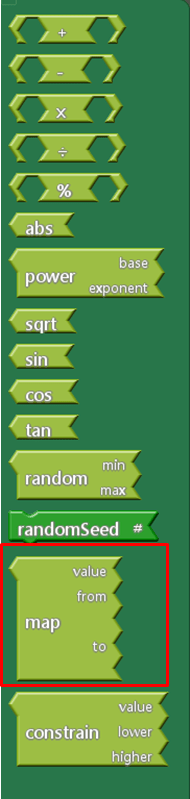
3.3.4 Math 積木

數學積木常用於基本運算,例如四則運算、三角函數、數值映射等用途。

Addition +, subtraction -, multiplication x and division ÷ 積木

基本四則運算積木可以用於整數與浮點數。
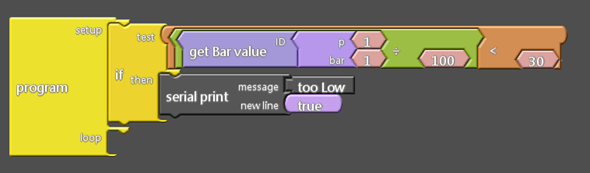
範例:若 Bar 的數值除以 100 後小於 30,則列印 " too low "。
Take the remainder % 積木
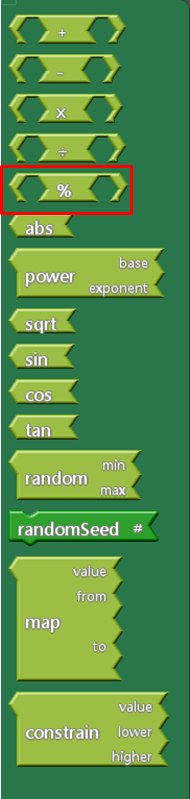
take the remainder 積木用來取得一個數字被除後的餘數。
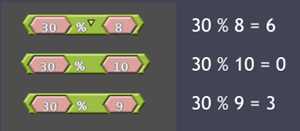
例如:30 % 8 表示 30 除以 8,共可整除 3 次,餘數為 6。
如下所示:30 = (8 × 3) + 6 → 餘數為 6;
30 = (10 × 3) + 0 → 餘數為 0;
30 = (9 × 3) + 3 → 餘數為 3。
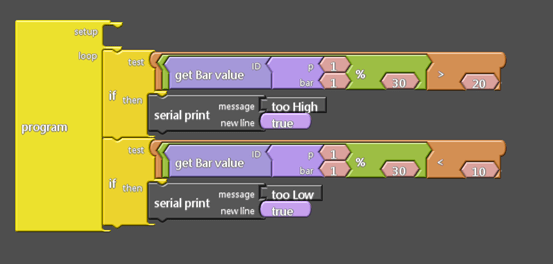
範例:如果 Bar 除以 30 的餘數大於 20,則列印 " too high ";如果餘數小於 10,則列印 " too low "。
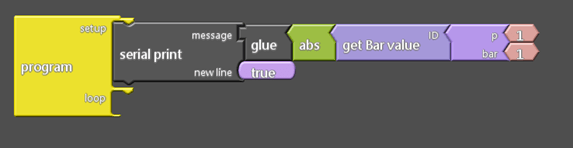
ABS 積木
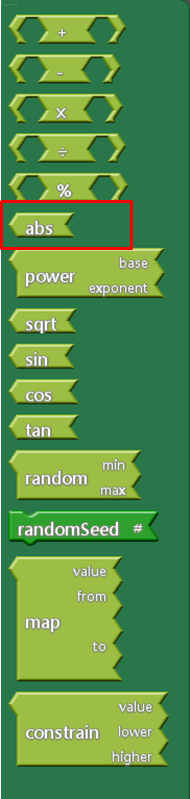
ABS 積木會取得一個數值的絕對值,將負值轉為正值,而正值則保持不變。
範例:列印 Bar 的絕對值。
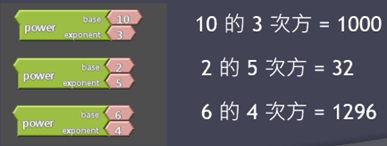
Power 積木
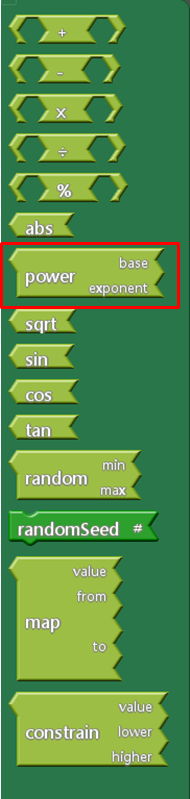
Power 積木用於計算 X 的 Y 次方,其中 X 為底數 (Base),Y 為指數 (Exponent)。

範例:
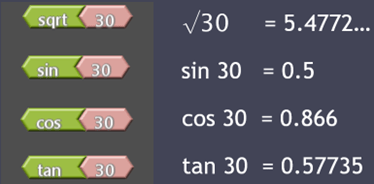
Square roots (Sqrt) and trigonometric (sin, cos, tan) 積木

範例:
random 積木
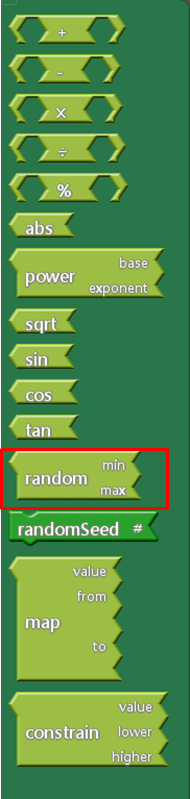
random 積木用於取得指定範圍內的隨機數值。
範例:取得一個介於 10 到 30 之間的隨機數。

randomSeed 積木
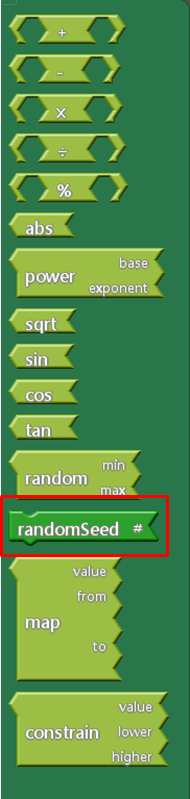
根據 randomSeed 積木的範例,假設所產生的隨機數序列為:11、25、22、18、12、29…… 如果重新啟動硬體並再次執行程式,你會發現仍然會得到相同的序列 (11、25、22、18、12、29……)。 這是因為產生的序列是由『偽隨機數產生器 』所生成的。 若 seed (種子) 值 不改變,則產生的隨機數序列也會保持相同。
範例:為了在每次開機時都取得不同的隨機數序列,需要讓 randomSeed 在每次啟動時都具有不同的數值。
map 積木
map 積木是做數值映射用的,它可以將目前的輸入數值,從原本所在的數值範圍,等比例對應到另一個不同的範圍中,並取得在新範圍中相對應的值。
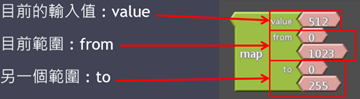
在 0 ~ 1023 的範圍中,512 代表 50%; 而在 0 ~ 255 的範圍中,50% 則對應到 127。
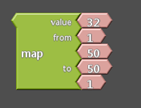
在 map 積木中,範圍的下限可以大於或小於上限,因此也可以用來將數值做反向映射。 例如在下列範例中,最終取得的數值為 18。
也可以處理負數,例如下列範例所得到的結果為 -18。
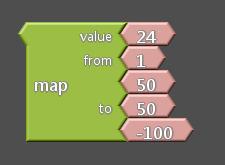
注意:內部採用整數運算,不會產生小數,且小數部分會直接截去,而不是四捨五入。
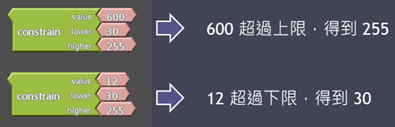
constrain 積木
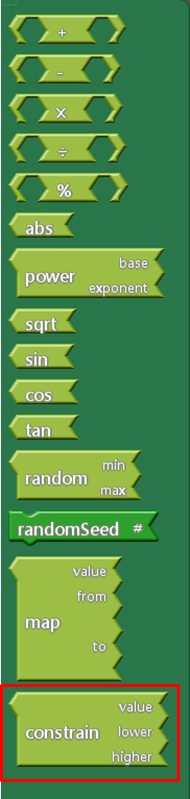
constrain 積木用來將數值限制在某個範圍內,例如:
3.3.5 Variables/Constants 積木
Variables/Constants 積木常用於設定變數與常數的值,例如布林值、數值、浮點數等。
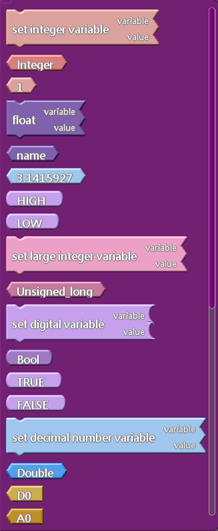

Integer variable 積木
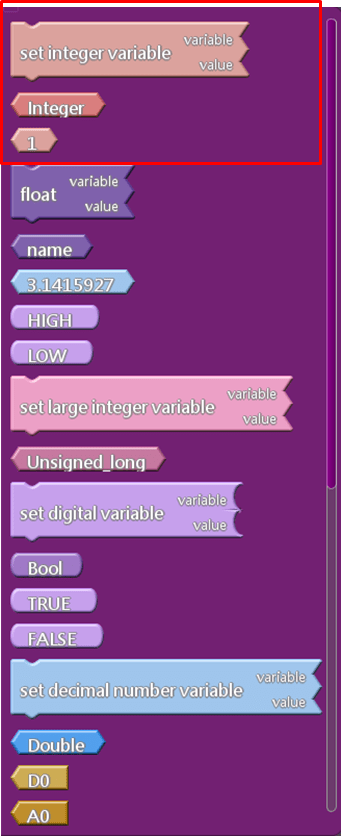
使用變數來儲存數值,如下所示:
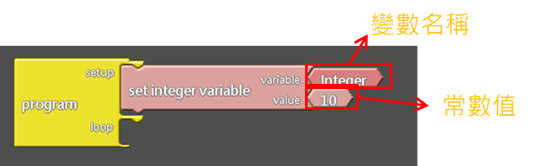
建立一個名為 Integer 的變數,初始值為 10。
腳本中的第一個積木會自動建立變數並同時進行賦值, 而第二個積木則只會進行賦值,不會建立變數。
範例 :
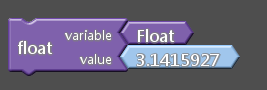
32-bit floating-point variable 積木
32-bit floating-point variable 積木的使用方式與 integer 積木相同。
Unsigned_long 積木
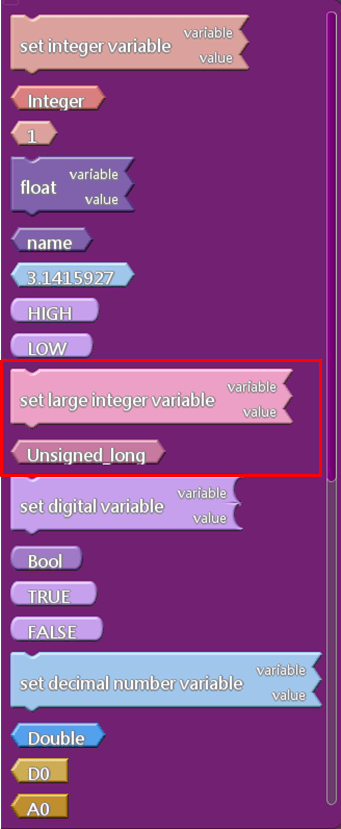
integer variable 積木的數值範圍為 -2147483648 ~ 2147483647。
unsigned_long 積木的範圍則為 0 ~ 4294967295。
其餘的使用方式與 integer 積木相同。
Boolean (Bool) 積木
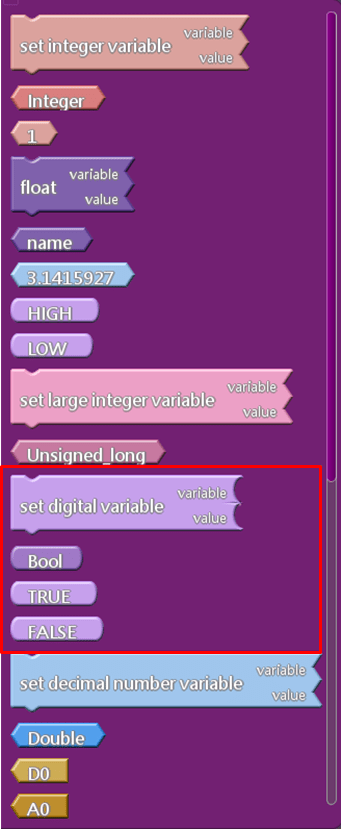
Bool block 積木的使用方式與 integer 積木相同。

64-bit floating-point variable 積木
64-bit floating-point variable 積木提供更高精度的浮點運算。其使用方式與 integer 積木相同。

set char variable 積木
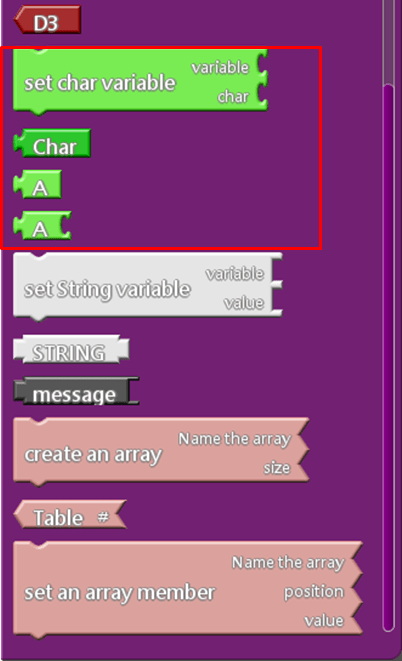
set character variable 積木使用方式與 integer 積木相同。

set String variable 積木
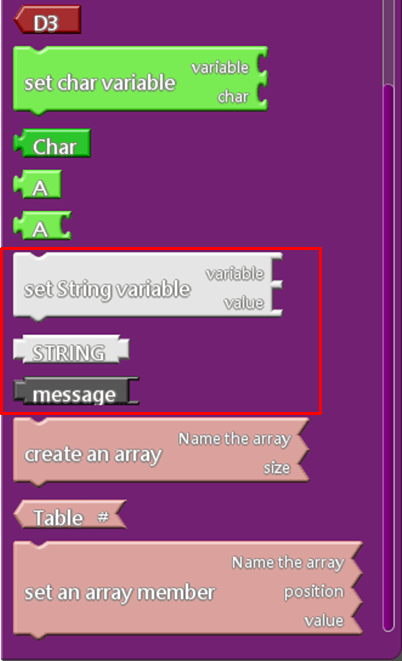
set String variable 積木使用方式與 integer 積木相同。

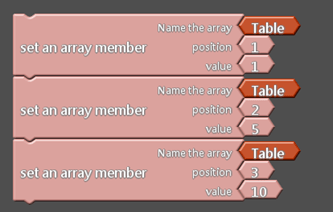
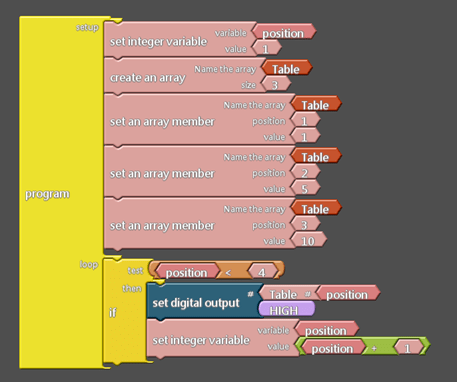
create an array 積木
create an array 積木用來組合多個數值。以下範例建立一個名為 Table、大小為 3 的陣列 (array)。
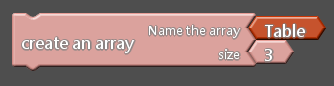
以 Table 陣列為例,其第 1、2、3 個位置的初始值分別為 1、5、10。
從陣列 (array) 中取出數值。
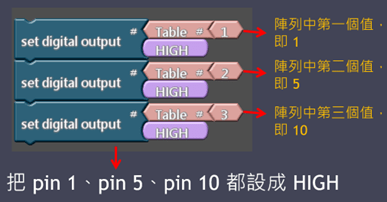
array variable 積木的使用範例。
Constant 積木
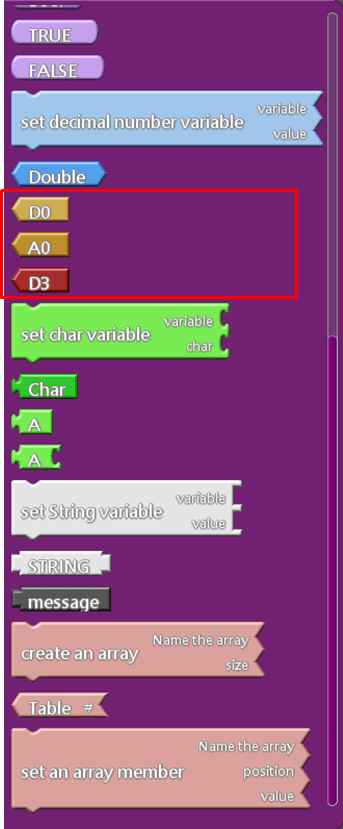
- D0 積木:數位腳位,可選範圍 0 ~ 31
- A0 積木:類比腳位,可選範圍 0 ~ 11
- D3 積木:PWM 腳位,可選腳位為 3、5、6、9、10、11、13
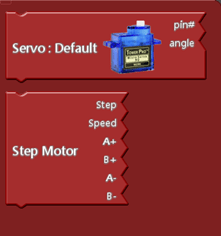
3.3.6 General Hardware 積木

General Hardware 積木用於一般硬體裝置的控制,例如伺服馬達與步進馬達。
目前支援以下類型的積木:
- Servo:伺服馬達 (預設)
- Step Motor:步進馬達
Servo motor (default, SG90,MG996GR) 積木
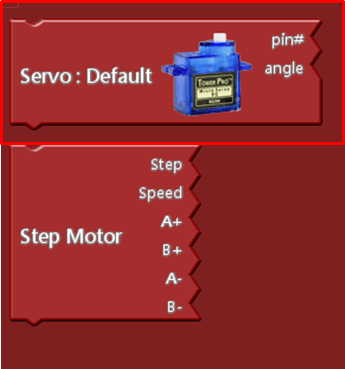
Servo Moter (Servo :Default) 積木可以控制 RC 伺服馬達在 0 ~ 180 度之間轉動。
範例:

Servo 積木也支援 SG-90 與 MG996R 等伺服馬達。

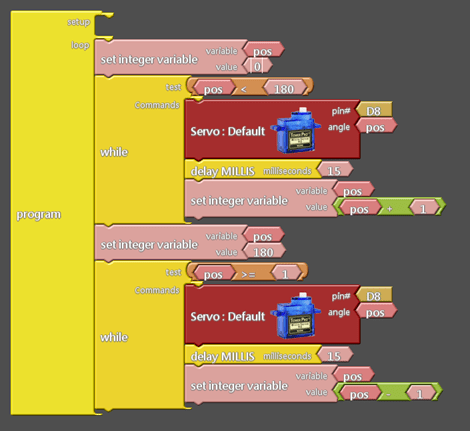
範例:伺服馬達從 0 度轉到 180 度,再從 180 度轉回 0 度。
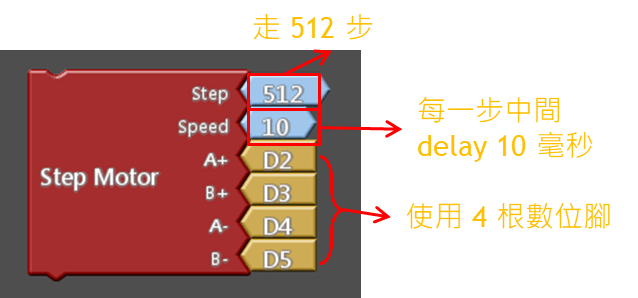
Step Motor 積木

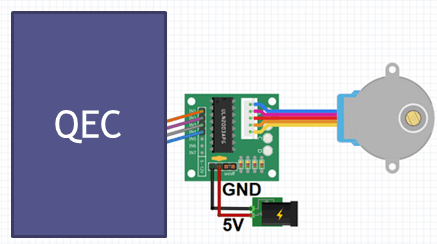
使用 Step Motor 積木時需要外接驅動器,其規格如下:
- 驅動器 : ULN2003
- 步進馬達:28BYJ-48
接線範例:
範例:
3.3.7 Communication 積木
Communication 積木常用於進行通訊功能,例如 Serial、Glue、I2C 等。
目前提供以下類型的積木:
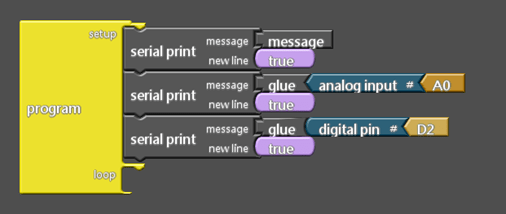
Serial communication 積木 – Serial print, message, glue
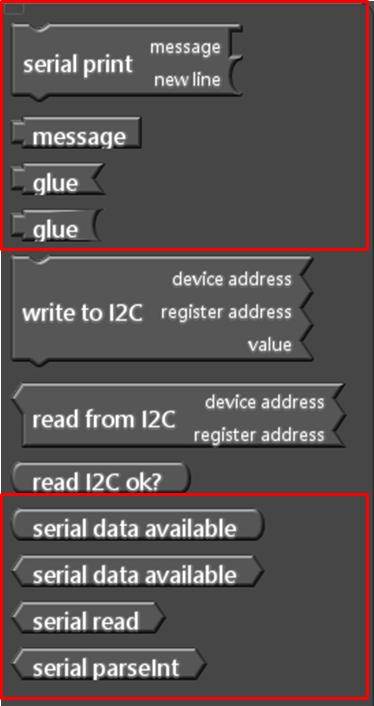
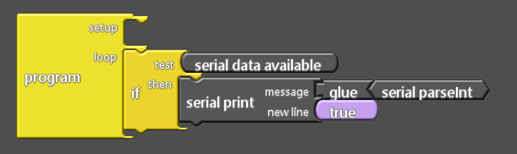
這些積木用於建立 QEC 與電腦 USB 端之間的通訊,包括:
- 上面紅圈為資料傳送積木
- 下面紅圈為資料接收積木
範例 1:資料傳送 列印字串 "message" ,以及 A0 與 D2 腳位的數值。
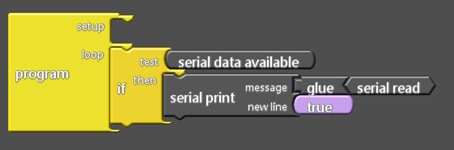
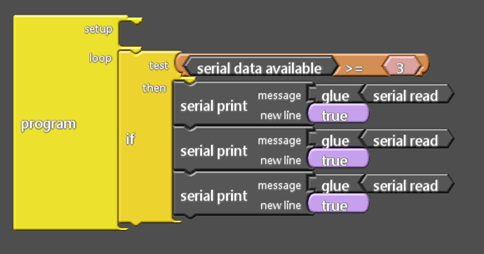
Serial communication 積木 – serial data available, serial read
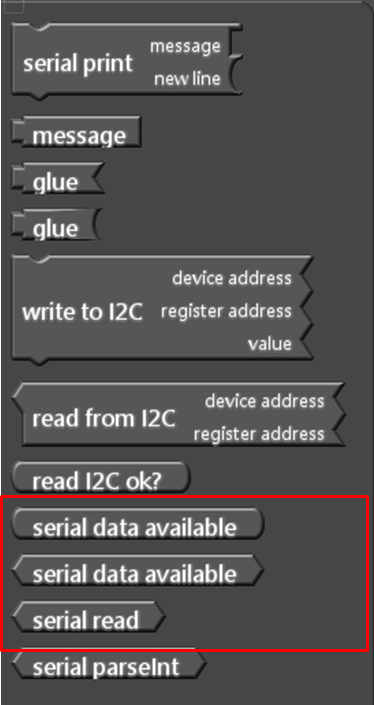
serial data available 積木說明:
- 第一個積木會回傳 布林值:用來判斷是否有可讀取的資料
- 第二個積木會回傳 整數:表示有多少筆資料可以被讀取。
serial read 說明:用來讀取 1 個位元組 (byte) 的資料
- 如果目前沒有資料可讀取,則此積木會回傳 -1。
範例 2:如果有資料可以讀取,則讀取一個位元組並將其列印出來。
範例 3:如果有 3 筆資料可讀取,則讀取這 3 個位元組並將它們列印出來。
Serial Communication 積木 – Serial parseInt
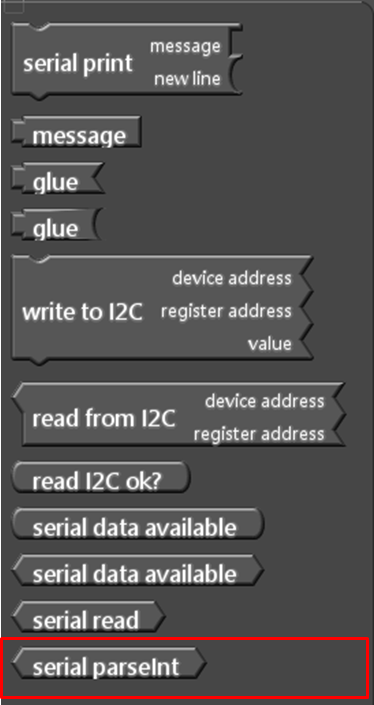
serial parseInt 積木用來從外部傳入的序列資料中,擷取下一個可用的整數。
範例:
如果有資料可讀取,則將其讀出並以整數方式列印。
例如外部傳入的字串為:qwe548tt26rrr
則我們會取得數字 548。
I2C communication 積木
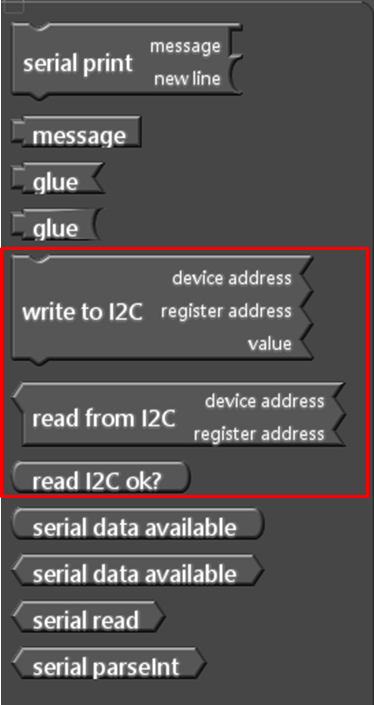
資料是從感測器傳送到 QEC,運作方式類似 Serial 通訊,但多了 兩個參數:
- device address(裝置位址):感測器的唯一位址
- register address (暫存器位址):感測器內部暫存器的位置 (使用者需要具備 I2C 裝置的基本概念,建議參考 Arduino 官方網站: https://docs.arduino.cc/learn/communication/wire).
範例: 將數值 100 寫入 裝置位址 12 的暫存器 0, 然後從 同一裝置的暫存器 9 讀取 1 個位元組的資料並將其列印出來。

3.3.8 Storage 積木
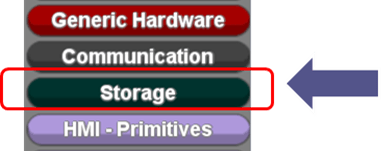
Storage 積木用來存取快閃記憶體中的資料,例如 EEPROM 或 SD 卡。
目前提供以下類型的積木:
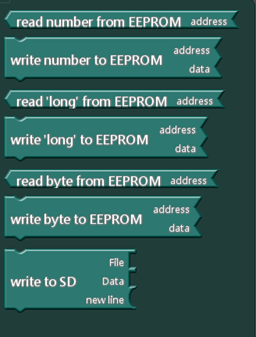
EEPROM 積木
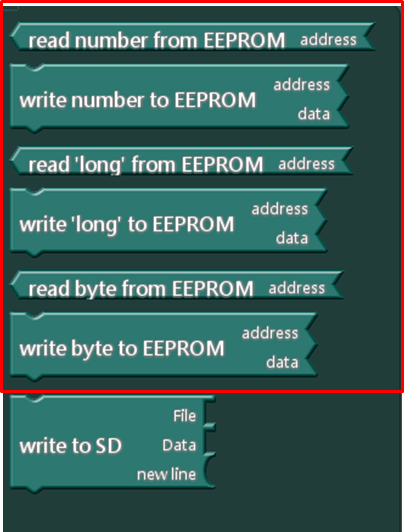
EEPROM 積木主要用來讀取 / 寫入 EEPROM 中的資料。
這些積木一次讀寫的資料長度為 2 bytes。
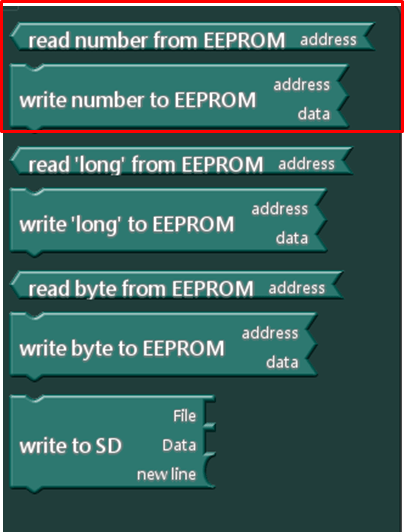
寫入 / 讀取 2 bytes 的資料,範例如下:
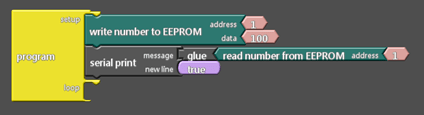
將數值 100 寫入位址 1,再將它讀回並列印出來 (可儲存的數值範圍為 -32768 ~ 32767)。
讀 / 寫 4 bytes 的資料
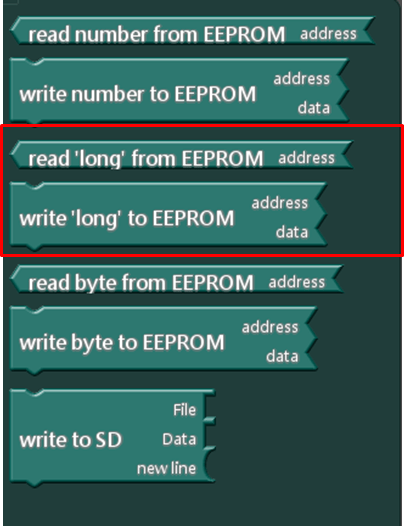
讀 / 寫 4 bytes 的資料,可儲存的數值範圍為 -2147483648 ~ 2147483647。
使用方式與前一個範例相同,只是數值範圍較大,因此需要更多的 Bytes 來存放。
讀 / 寫 1 byte 的資料
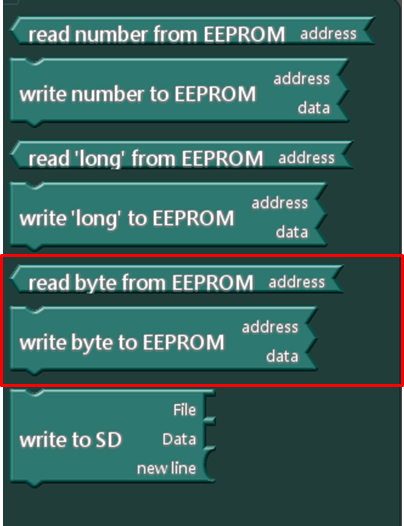
使用方式與前一個範例相同。
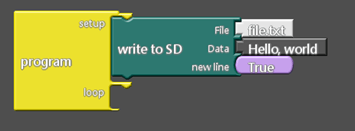
SD card 積木
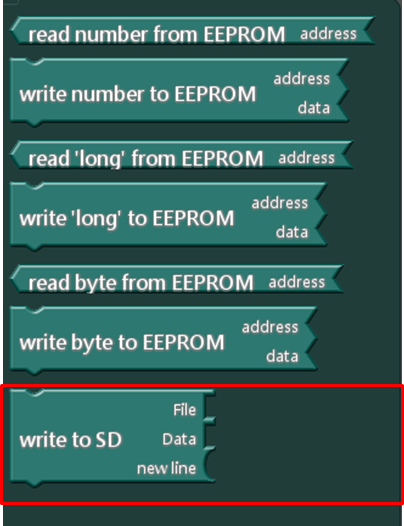
將資料寫入 SD 卡檔案的範例:在 SD 卡中建立一個 file.txt 檔案,並寫入字串 "Hello, world" (若檔案已存在,將會被清空並重新寫入)。
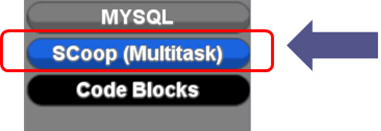
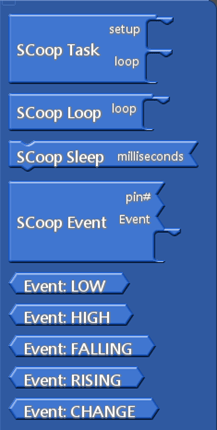
3.3.9 SCoop (Multitask) 積木
SCoop 是一種半自動的多工積木。
優點:
- 在多工狀態下也可以使用 delay,而不會造成程式卡住
- 可以在背景同時啟動 多個任務,並自動執行
一般「副程式積木」需要被呼叫才會執行,但 SCoop 的多工任務則會在背景自動執行
原理:
- 透過使用 delay / sleep 來切換到下一個任務進行執行
目前支援以下類型的積木:
Scoop Task 積木
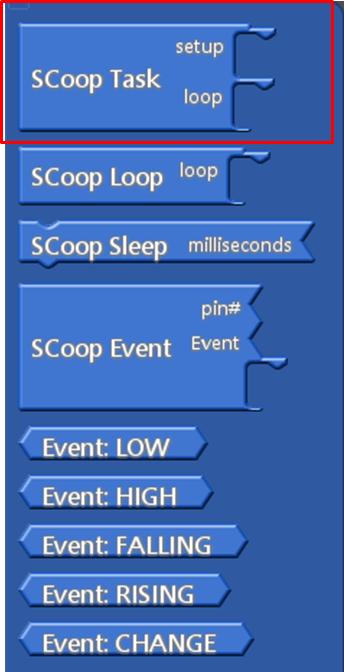
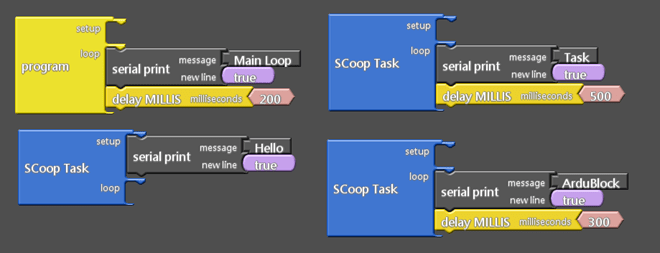
SCoop Task 積木可以開啟一個新的背景任務,作用類似於一個額外的程式區塊。
可以同時開啟多個任務,例如:
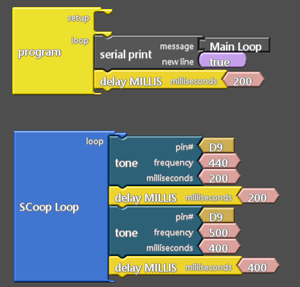
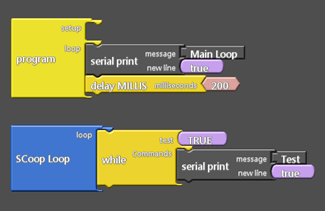
Scoop loop 積木
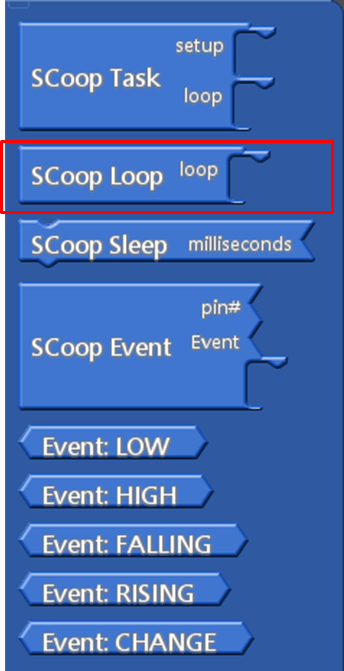
SCoop loop 積木可用來建立循環執行的任務,就像一般的 loop 積木一樣。 可以同時開啟多個任務,例如:
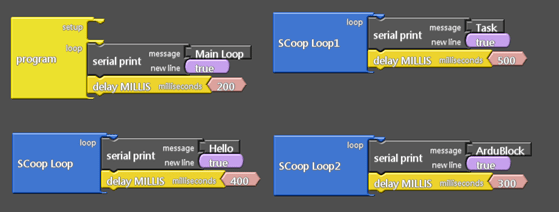
搭配前面的 tone 積木範例:
在先前的 tone 積木的範例中,如果使用 delay,程序會被暫停而造成卡住。 這裡我們使用 SCoop loop 重新改寫程式,如下圖:此時程式不會卡住,而且會在背景中持續循環播放音調。
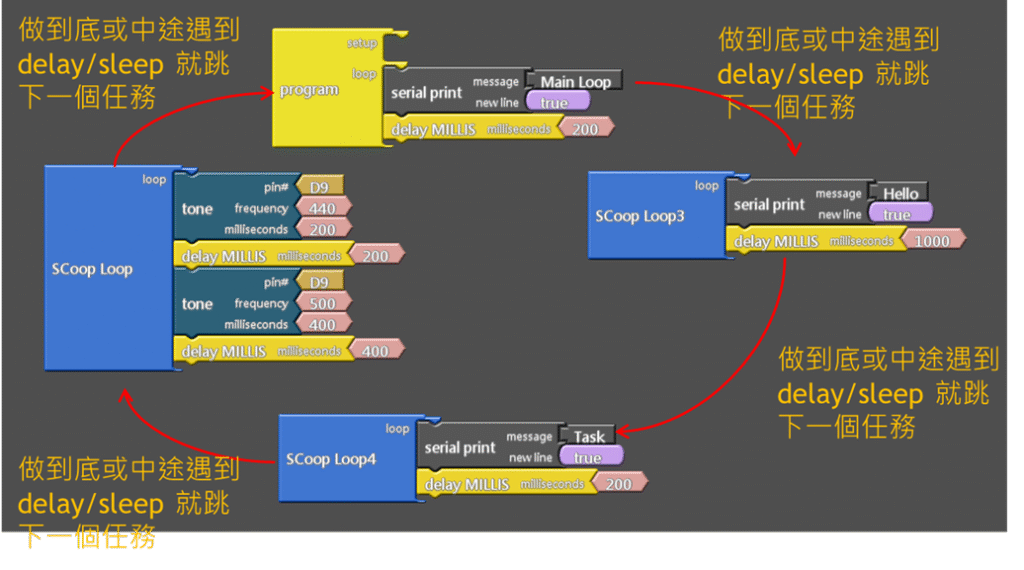
Scoop Sleep 積木

SCoop Sleep 積木的功能與 delay 積木類似,都會延遲一段時間,但它會在延遲結束後自動切換到下一個多工任務。
下面的範例包含 3 個 SCoop Loop 任務: 在第一次執行後,如果尚未超過指定的延遲時間,則會先跳到下一個任務; 一旦延遲時間到達,這個任務就會從當前的位置繼續執行。
Scoop Event 積木
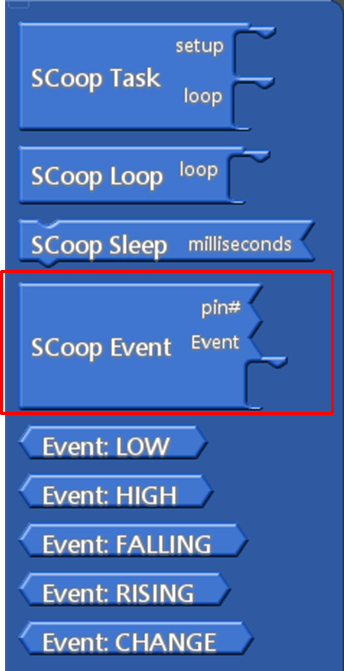
SCoop Event 積木會在指定的 數位腳位狀態發生變化 (Event) 時,執行對應的任務
範例:如果 腳位 1 的狀態從 LOW 變成 HIGH,則列印 " Task "。

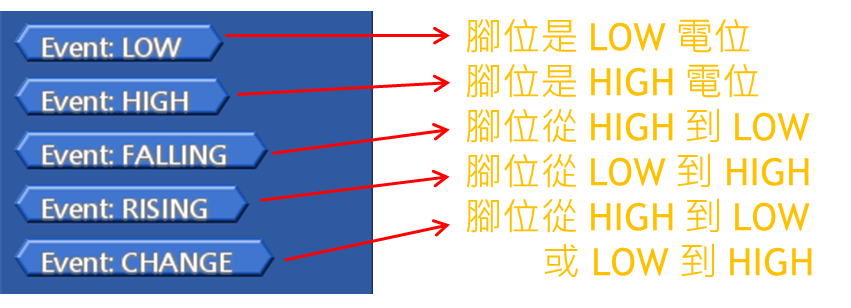
Event 積木
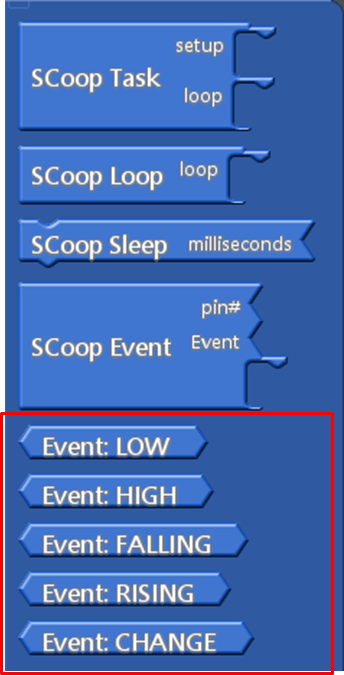
Event 積木共有以下 5 種類型:
注意:多工積木切換至下一個任務有兩種方式:
- 使用者主動呼叫 delay / sleep
- 使用者沒有呼叫 delay / sleep,而是任務執行結束後,程式庫會自動呼叫切換任務的函式 (這部分使用者看不到)
因為並非完全自動切換,所以稱為「半自動」多工。如果像下例這樣撰寫,程式仍然會卡住: 因為任務中沒有 sleep / delay 讓系統切換到下一個任務。
因為這個任務既沒有結束,也沒有呼叫 delay/sleep。
86Duino 參考文件的文字內容是基於 Arduino 參考文件進行修改,並依 Creative Commons Attribution-ShareAlike 3.0 授權條款提供。參考文件中所包含的程式碼範例 ( 例如:Serial communication 積木 – serial data available, serial read等 ) 則以 Public Domain 方式釋出。」