[Motion86]
Description
This page explains the explanation of the different motion methods on Motion86.
Motion method reference table
| Motion method |
|---|
| Linear motion |
| Arc motion |
| Circle motion |
| Spiral motion |
Linear motion:
When using the linear motion method to control the Machine, the machine will go straight to the target position, as shown in Figure 1:
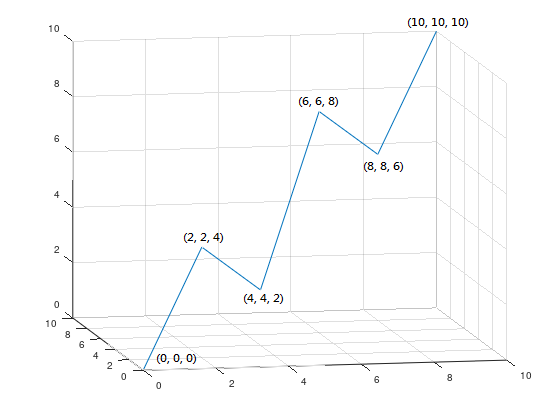
Its path can be reached with the following G-Code:
machine.gcode("G1 X0 Y0 Z0 F600");
machine.gcode("G1 X2 Y2 Z4 F600");
machine.gcode("G1 X4 Y4 Z2 F600");
machine.gcode("G1 X6 Y6 Z8 F600");
machine.gcode("G1 X8 Y8 Z6 F600");
machine.gcode("G1 X10 Y10 Z10 F600");
Or directly use the line function control:
machine.line(0, 0, 0, 600);
machine.line(2, 2, 4, 600);
machine.line(4, 4, 2, 600);
machine.line(6, 6, 8, 600);
machine.line(8, 8, 6, 600);
machine.line(10, 10, 10, 600);
Arc Motion:
When using the arc motion method to control the Machine, you can use two different ways to control the arc path:
- Center mode – that is to give the center and end position to calculate the path of the arc.
- Radius mode – that is to calculate the path of the arc given the radius and end position.
- Radian mode – that is, given the radii to calculate the path of the arc.
No matter which mode is used, you will need to choose the clockwise and counterclockwise directions, as shown in Figure 2 and Figure 3:

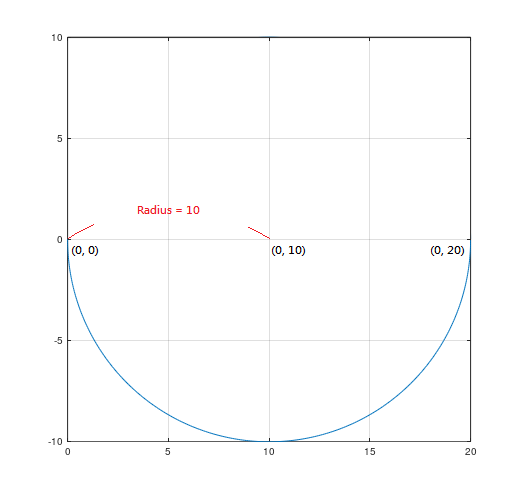
In G-Code, G2(CW) and G3(CCW) can be directly used as commands to distinguish directions.
As shown in Figure 2, the following G-Code can be used to achieve:
machine.gcode("G2 X0 Y20 I0 J10 F600");Figure 3 can be achieved by the following G-Code:
machine.gcode("G3 X0 Y20 I0 J10 F600");Or use the arcXY, arcYZ, arcXZ functions directly, as shown in Figure 2:
machine.arcXY(0, 10, 0, 20, false, 600);
Figure 3:
machine.arcXY(0, 10, 0, 20, true, 600);
When using the radius mode, when the angle is not equal to 180 degrees, 4 different paths will be generated, as shown in Figure 4:
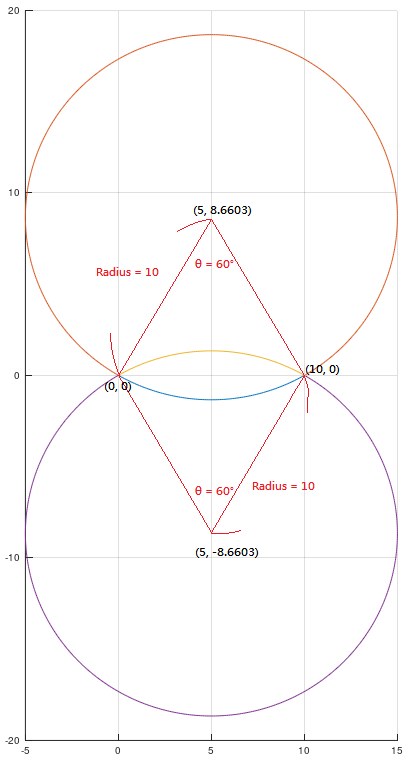
The radii of the upper and lower four arcs in Figure 4 are all 10, and the target positions are the same. Here, the sign of the radius needs to be used to determine the path.
To select arcs with angles less than 180 degrees, the radius is positive; to select arcs with angles greater than 180 degrees, the radius is negative.
For example, the yellow line in Figure 4 is clockwise and the angle of the arc is less than 180 degrees, which can be achieved by the following G-Code:
machine.gcode("G2 X10 Y0 R10 F600");Or directly use the overloaded method of arcXY, arcYZ, arcXZ functions:
machine.arcXY(10, 10, 0, false, 600);
The orange line is clockwise and the angle of the arc is greater than 180 degrees, which can be achieved by the following G-Code:
machine.gcode("G2 X10 Y0 R-10 F600");Or directly use the overloaded method of arcXY, arcYZ, arcXZ functions:
machine.arcXY(-10, 10, 0, false, 600);
The blue line is counterclockwise and the angle of the arc is less than 180 degrees, which can be achieved by the following G-Code:
machine.gcode("G3 X10 Y0 R10 F600");Or directly use the overloaded method of arcXY, arcYZ, arcXZ functions, and use the parameter revDir to control the direction:
machine.arcXY(10, 10, 0, true, 600);
The purple line is counterclockwise and the angle of the arc is greater than 180 degrees, which can be achieved by the following G-Code:
machine.gcode("G3 X10 Y0 R-10 F600");Or directly use the overloaded method of arcXY, arcYZ, arcXZ functions, and use the parameter revDir to control the direction:
machine.arcXY(-10, 10, 0, true, 600);
※ Note that no matter what kind of arc movement method, the target position may not be on the circle due to the wrong parameter setting, which will cause the machine to move unexpectedly.
In radii mode, arcXY_Theta, arcXZ_Theta, arcYZ_Theta can be directly used to control the movement of the Machine, and the diametric sign is used to determine the direction, as shown in the following example:
// Draw a 90 degree clockwise circle at 600 feed rate, center (10, 0)
machine.arcXY_Theta(10, 0, HALF_PI, 600);

// With a feed rate of 600, the center (10, 0), and a 90-degree counterclockwise circle
machine.arcXY_Theta(10, 0, -HALF_PI, 600);
Circle motion:
When using the circular motion method to control the Machine, the machine will circularly move to the target position:
When the current position of the arc movement overlaps with the target position, the Machine will be regarded as a circle to be drawn in a full circle.
If the G-Code parameter P is added, it can also indicate that several circles are to be circled, as shown in the following example:
// Two turns around the center f the circle (10, 0) at a feed rate of 600 to the target position (0, 0)
machine.gcode("G2 X0 Y0 I10 J0 P2 F600");
For counterclockwise movement, use G3, which is the same arc movement.
Or directly use the circleXY, circleYZ, circleXZ functions to draw a circle directly to the current position, and use the parameter revDir to control the direction:
// Circle the center (10, 0) at a feed rate of 600 and go around to the current position
machine.circleXY(10, 0, false, 600);
※ In the circle center and radius mode, when the origin and the target position are the same, there will be infinite solutions, and no movement will be performed in this case.
Spiral motion:
When using the helical motion method to control the Machine, the machine will reach the target position with helical motion on the three planes of XY, YZ and XZ, as shown in Figures 5, 6 and 7:
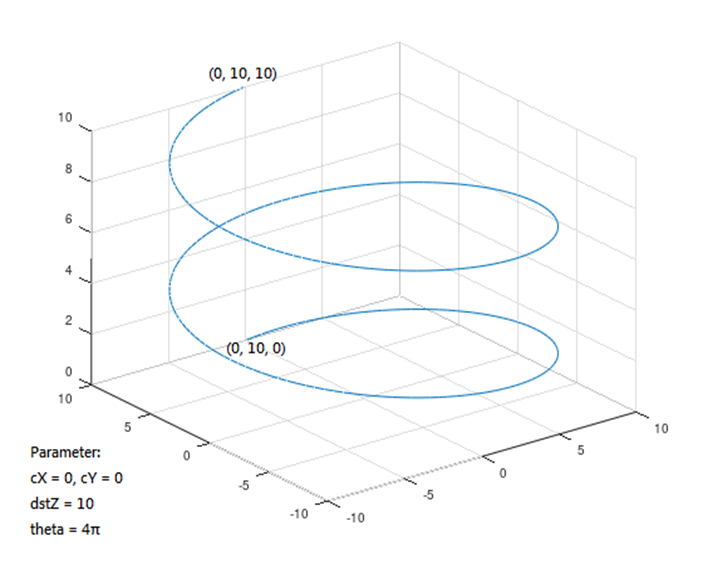

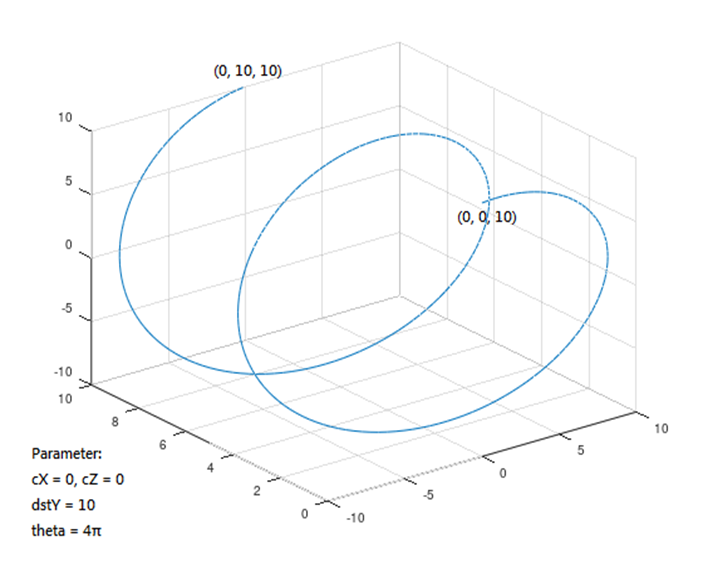
Helical motion can directly use helicalXY, helicalYZ, helicalXZ functions to determine the plane, and use the radius sign to determine the direction:
// Two revolutions to Z10 at a feed rate of 600, centered on circle (0, 0)
machine.helicalXY(0, 0, 10, 4 * PI, 600);

// Two revolutions to X10 at 600 feed rate, center (0, 0)
machine.helicalYZ(0, 0, 10, 4 * PI, 600);

// Two revolutions to Y10 at 600 feed rate, center (0, 0)
machine.helicalXZ(0, 0, 10, 4 * PI, 600);
See Also
- gcode ()
- arcXY ()
- arcXZ ()
- arcYZ ()
- arcXY_Theta ()
- arcXZ_Theta ()
- arcYZ_Theta ()
- circleXY ()
- circleXZ ()
- circleYZ ()
- helicalXY ()
- helicalXZ ()
- helicalYZ ()
Libraries Reference Home
The text of the 86Duino reference is a modification of the Arduino reference and is licensed under a Creative Commons Attribution-ShareAlike 3.0 License. Code samples in the reference are released into the public domain.