2025.07.11, 86EVA v2.1.
You can download the 86EVA User Manual file here.
1. Introduction
86EVA (EVA, EtherCAT-Based Virtual Arduino) is a graphical EtherCAT configuration tool that utilizes the ECAT Library in the 86Duino IDE.
One of the 86Duino development kits is the QEC master with features including:
- Automatically generated Arduino language (via EtherCAT-Based Virtual Arduino)
- Automatically scans for network devices.
- EtherCAT Master/Primary Settings:
- Set Master Object Name
- Set Cycle Time
- Set Redundancy Options
- Optional ENI file
- EtherCAT Slave/Secondary Settings:
- Set Secondary Object Name
- Set Slave Alias
- Slave I/O Mapping can be set
- Display secondary device information
- View internal information including:
- Voltage (V)
- Current (A)
- Temperature (C)
The 86Duino IDE ECAT Library is an Arduino development environment with a real-time operating system (RTOS) library that communicates with dedicated EtherCAT master devices.
It is a dedicated EtherCAT master communication layer solution that can communicate in real time with EtherCAT slave devices. The 86Duino IDE provides a wealth of Arduino application development profiles and interfaces (API) for programming operations.
2. Procedure
The 86EVA provides users with a low-code interface to develop groups of EtherCAT network buses with simple keystrokes and visual presentations.
Open 86EVA → Select the connected COM Port → Find devices that scan the EtherCAT network → personalization settings for EtherCAT devices → generate Arduino programs Style Code → Upload the code
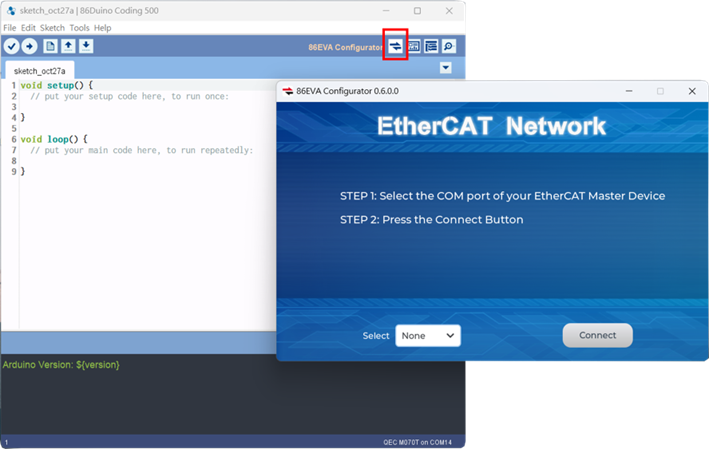
2.1 Open 86EVA
Method 1: Click on the shortcut button in the top-right corner (highlighted in red).
Method 2: Click the 86EVA (EtherCAT) Configurator button in the “Tools” menu (highlighted in red).
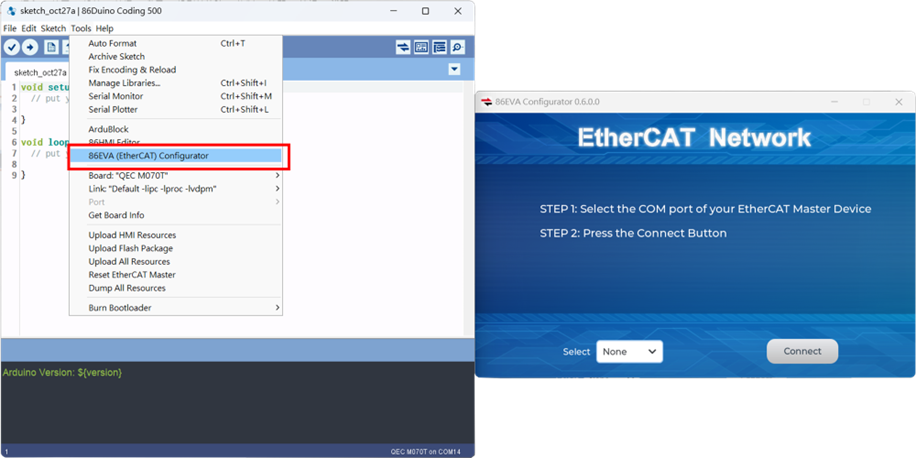
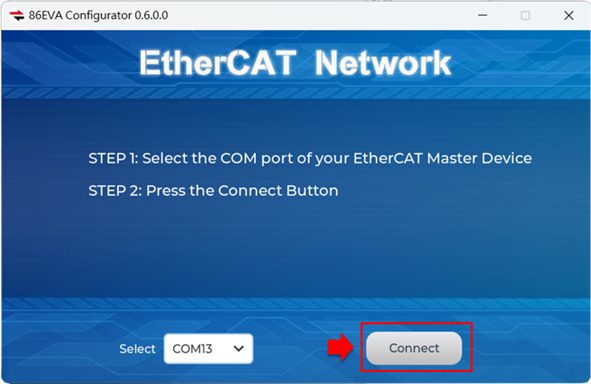
2.2 Select the Connected COM Port
After opening 86EVA, it automatically selects the COM port of the connected QEC master station by default. In this example, the COM port is COM13.
If you have connected multiple QEC master stations, you will need to click on the drop-down menu next to “Select” (highlighted in red) and choose the COM port used by the current QEC master station.
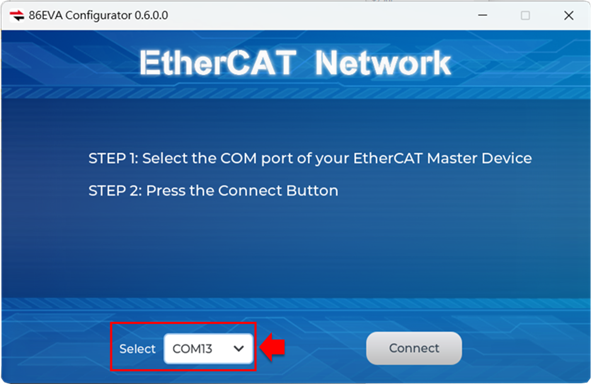
If you are using the COM port for the first time and are unsure about the location of the QEC master station’s COM port, please refer to this link for instructions on how to set it up.
2.3 Scan devices on the EtherCAT network
After selecting the correct COM port location, please click on the “Connect” button (highlighted in red).
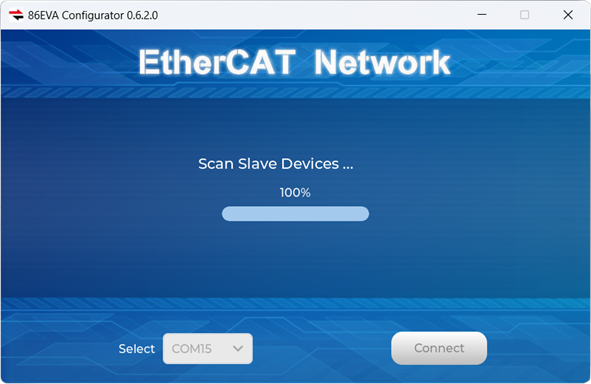
After clicking the “Connect” button, a scanning screen will appear.
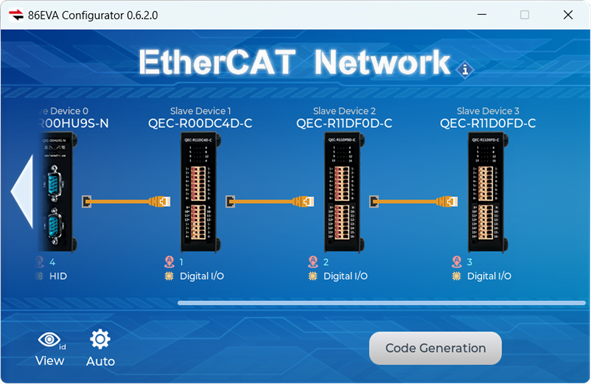
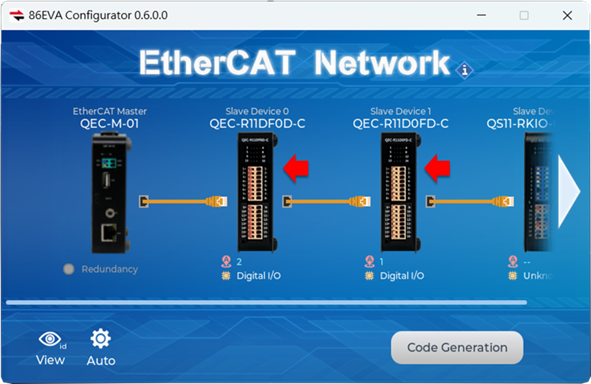
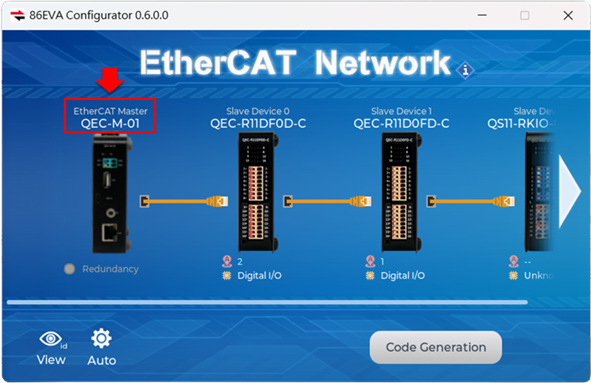
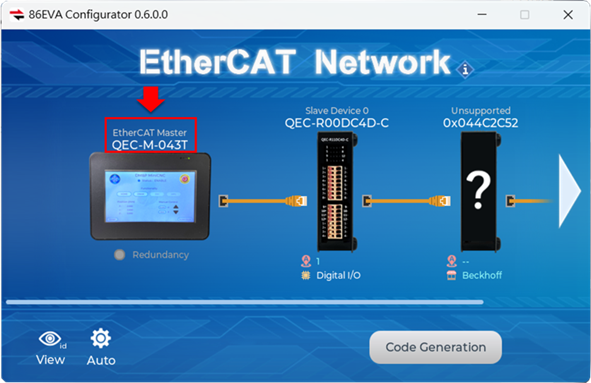
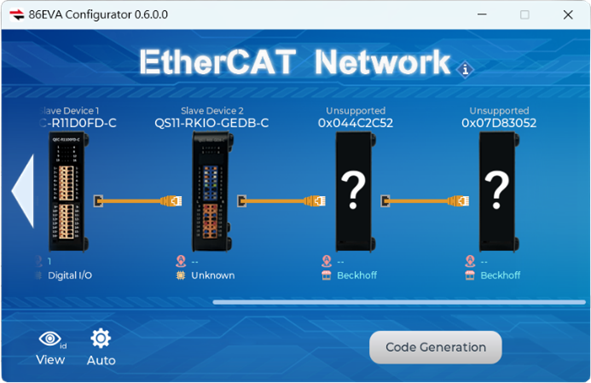
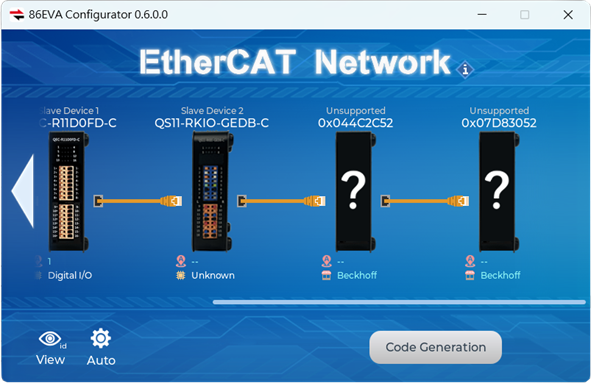
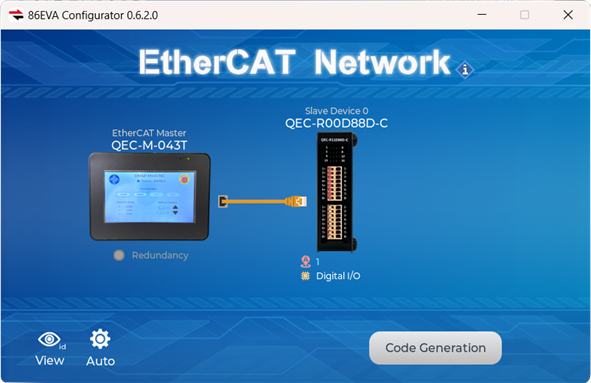
After the scanning process is complete, you will see one QEC master and all the EtherCAT slave devices currently connected to the EtherCAT network.
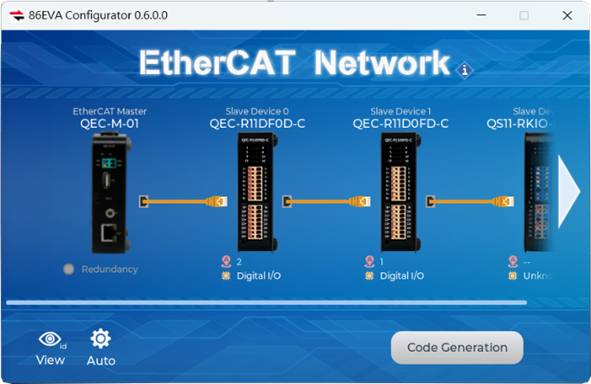
Note: In 86EVA, the scanning process will automatically identify EtherCAT slave devices from the DMP QEC series and display their images and related settings. If you connect the third-party EtherCAT slave devices, unknown EtherCAT slave module information will appear. For more details, please refer to Chapter 3.2.
2.4 Personalize settings for EtherCAT devices
Users can enter the setting page of an EtherCAT device by clicking on its product image.
EtherCAT Master
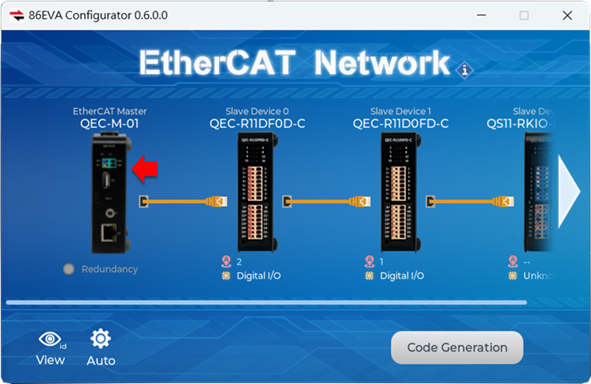
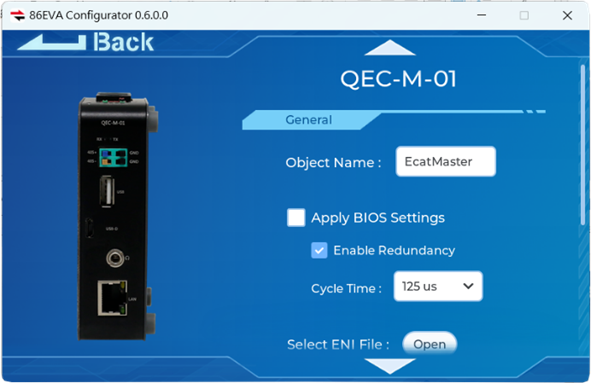
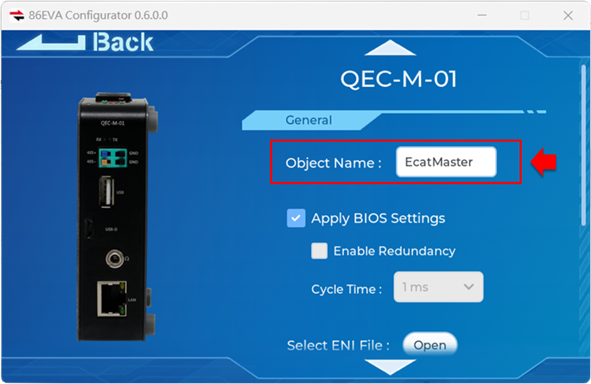
After clicking on the image of QEC master, you can personalize the setting through this page. For example, you can set the Object Name, Select the EtherCAT Cycle Time, Choose Redundancy Options, and Select ENI File functionality.
As shown in the example below using QEC-M-01.
For more details, please refer to Chapter 3.1.
EtherCAT Slave
In the settings of the EtherCAT slave device, you can find the information of the connected QEC EtherCAT slave devices such as: Supplier ID (Vendor ID), product identification number (Product Code), internal voltage, current, temperature, etc. The following can also be set: Object Name, Alias address, and I/O mapping.
QEC EtherCAT Slave
The EtherCAT slave devices of the QEC series will have complete product pictures, and users can enter the QEC slave by clicking on the picture of the QEC EtherCAT slave device.
The configuration page for the QEC slave modules.
After entering the configuration page, the user will first see the information of the EtherCAT slave device, such as the Vendor ID, Product Code, and Settable Object Name, and Alias address (see Appendix 1 for details of the Alias address).
Then there is instant information, such as voltage, current, temperature, etc., from the slave (which helps track the carbon footprint).
Finally, there is the configurable virtual Arduino pin mapping (see Appendix 2 for an introduction to the concept of virtual Arduino).
For details on QEC slave settings, see Chapter 3.2.1.
Non-QEC EtherCAT Slave
When 86EVA scans and detects a non-QEC EtherCAT slave device, it will display an unknown device image, marked with the “Unsupported” label.
After clicking on the image of the unknown EtherCAT slave device, you can access information about that specific device.
For more details, please refer to Chapter 3.2.2.
2.5 Generate Arduino code
After configuring all settings, click the “Code Generation” button (highlighted in red).

After clicking, the resulting and completion screen will appear, click OK to leave the program; If you do not click OK, you will leave the program after 10 seconds.
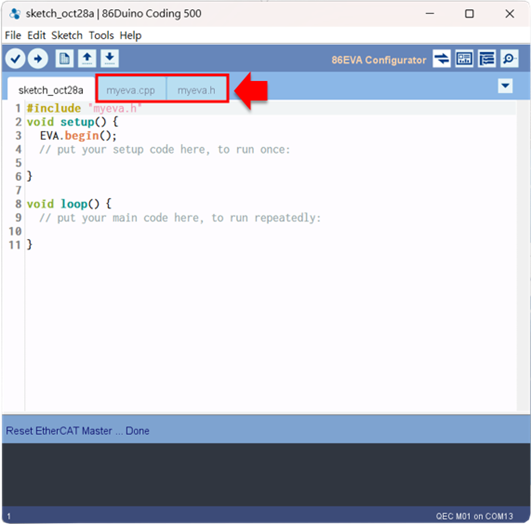
After completion, 86EVA will automatically generate configuration files and Arduino code, and generate two program files in 86Duino IDE.cpp Myeva and Myeva.h (highlighted in red), which allows users to access and add to their program.
2.6 Upload the code
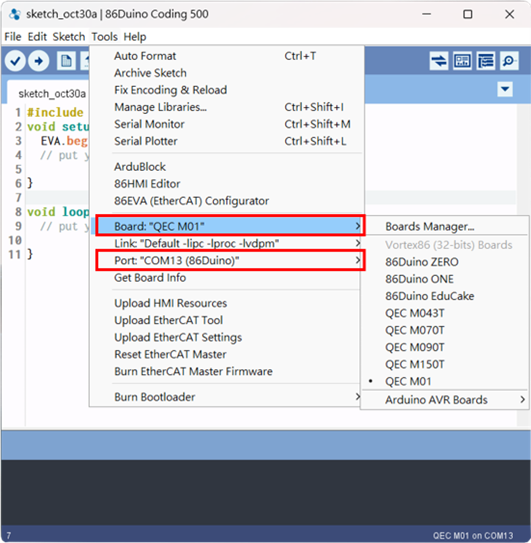
Please note that the generated configuration file and user program will be burned into the QEC master together using the “Upload” button. It is essential to press the Upload button to complete the configuration process; otherwise, the configuration settings made in 86EVA will be considered invalid.
Before uploading, please verify that the “Board” and “Port” settings are correct (highlighted in red).
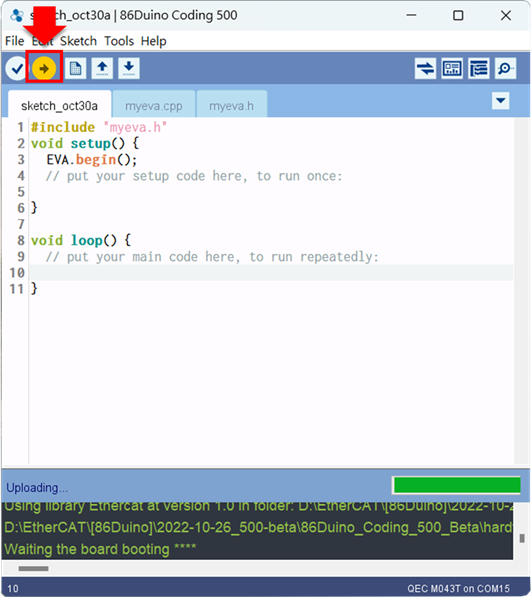
Click on the “Upload” button (highlighted in red) to upload the code.
Upload completed.
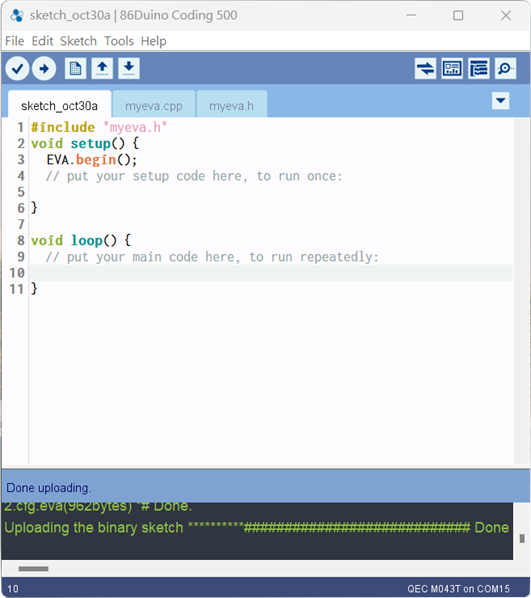
After the upload is completed, users can reopen 86EVA to scan the slave devices and check if the devices are running according to the previous configuration settings.
More detailed graphical development process for EtherCAT
86Duino IDE provides developers with a complete low-code development platform, which allows users to configure EtherCAT network parameters through 86EVA.
The Built-in HMI Editor (86HMI) is an HMI development software that is combined with the building block programming tool ArduBlock and allows users to develop EtherCAT systems with a small amount of programming quickly.
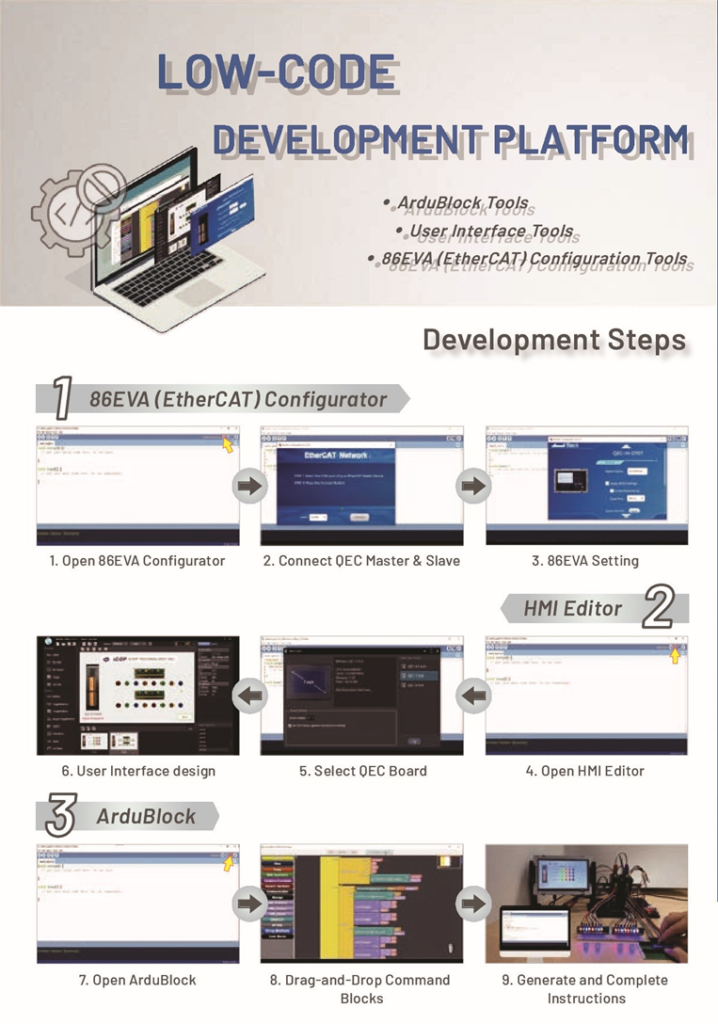
For further configurations, please refer to the user manual of the other tools.
3. EtherCAT Device Configuration
During setup, the personalization of the EtherCAT device is mentioned. We can divide EtherCAT devices into: QEC master and EtherCAT slave.
3.1 QEC Master Settings
The 86Duino IDE development environment is specifically designed for the QEC Master series, which includes QEC-M-01, QEC-M-043T, QEC-M-070T, QEC-M-090T, and QEC-M-150T. After connecting and completing the scanning process in 86EVA, users can view the information of the EtherCAT Master in graphical form (highlighted in red) along with the product image.
- QEC-M-01:
- QEC-M-043T:
General Settings:
You can set the EtherCAT Master’s Object Name, Apply BIOS Settings, Enable the EtherCAT Cable Redundancy option, set EtherCAT Cycle Time, and Select the ENI file if you need.
Object Name
Set the Object Name for the EtherCAT Master (highlighted in red). Once the configuration is completed, when the Arduino code is translated, this setting will be applied to the object name in the code.
Apply BIOS Settings
Choose whether to prioritize the pre-configured settings from the BIOS for the EtherCAT Master (highlighted in red).
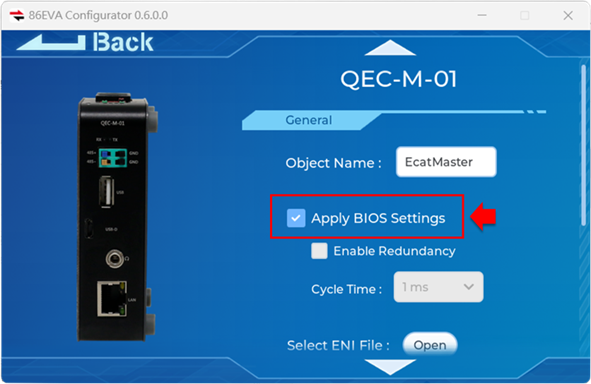
Note: Selecting this option will prioritize the pre-configured settings from the BIOS for the QEC Master.
Enable Redundancy
Choose whether to enable Redundancy for the EtherCAT Master (highlighted in red).

Set EtherCAT Master Cycle Time
Set EtherCAT master cycle times (highlighted in red) with cycle time options of 125us, 250us, 500us, 1ms, 2ms, and 4ms.
If you use this function menu to set the cycle time of the EtherCAT master, do not have Apply BIOS Settings selected, otherwise, the BIOS preset will be used instead.

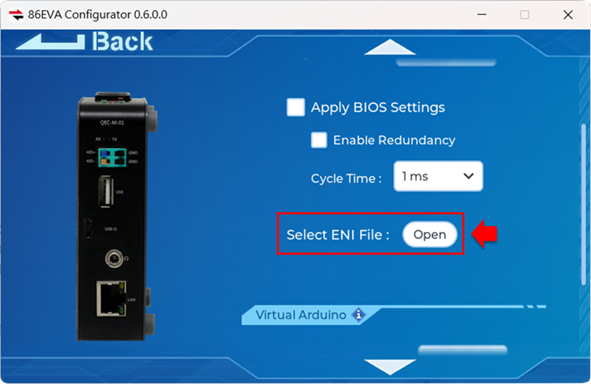
Select ENI File
Users can use this feature to select an existing ENI file (highlighted in red). When uploading the code, the selected ENI file will be automatically uploaded and applied to the program.
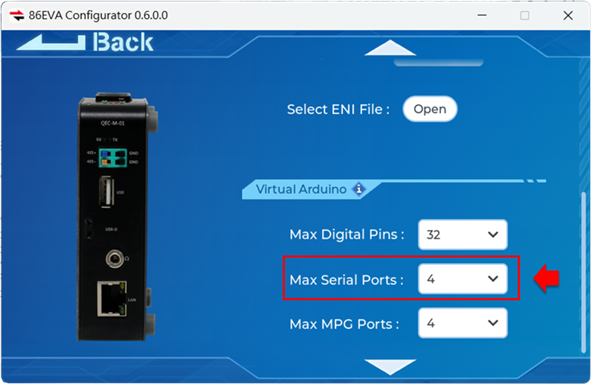
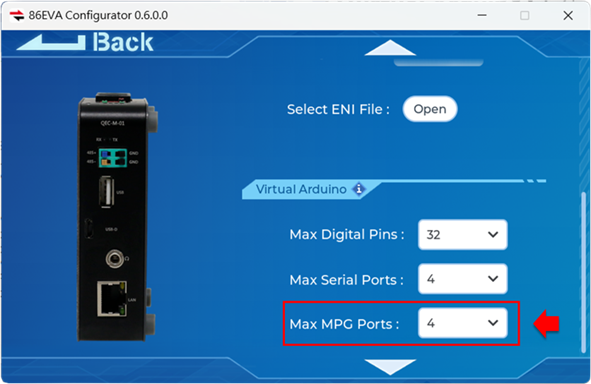
Virtual Arduino:
You can configure the maximum digital pins (Max Digital Pins), number of ports (Max Serial Ports), and number of MPGs (Max MPG) for a virtual Arduino.
Note: All values not listed have a default of 4.
Max Digital Pins
Set the max number of digital pins in the dropdown menu with options of 32, 64, 128 and 256 virtual pins (highlighted in red).

Max Serial Ports
Set the max number of serial ports in the dropdown menu with options of 4, 8, 16, 32 virtual ports (highlighted in red).
Max MPG Ports
Set the max number of MPG ports in the dropdown menu with options of 4, 8, 16, 32 virtual MPGs (highlighted in red).
3.2 EtherCAT Slave Information and Settings
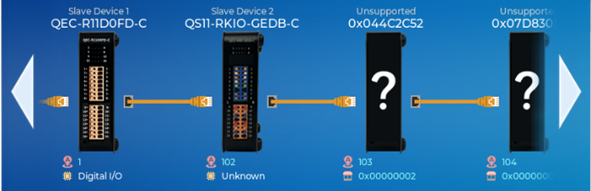
Above the EtherCAT slave device (highlighted in red), there are indications for the product name and the order of the connected EtherCAT slave devices.
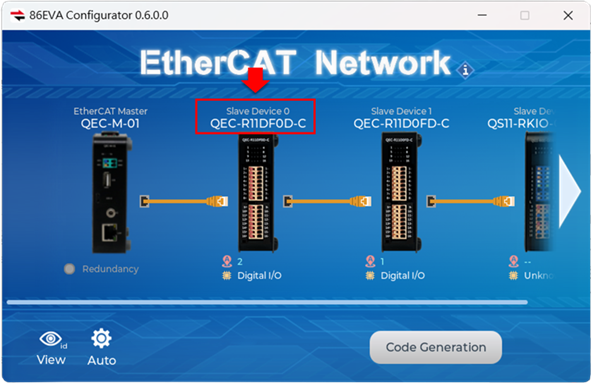
Below the EtherCAT slave device (highlighted in red), there are the Alias Address and the product type (in the case of non-QEC slaves, the vendor identifier will be displayed).
3.2.1 QEC EtherCAT Slave
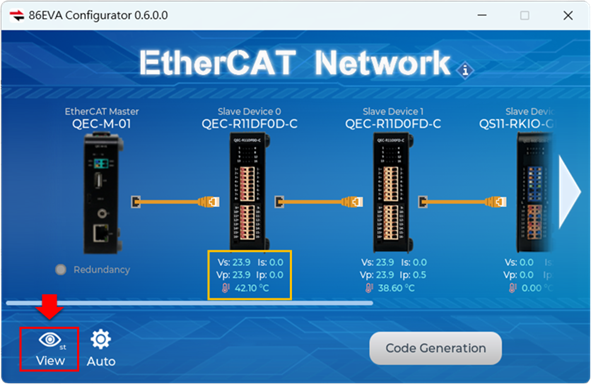
Click the “View” button in the lower left corner (highlighted in red)) to view real-time monitoring data, including voltage, current, and temperature (highlighted in yellow).
Click View again to switch back to the Alias Address overview.
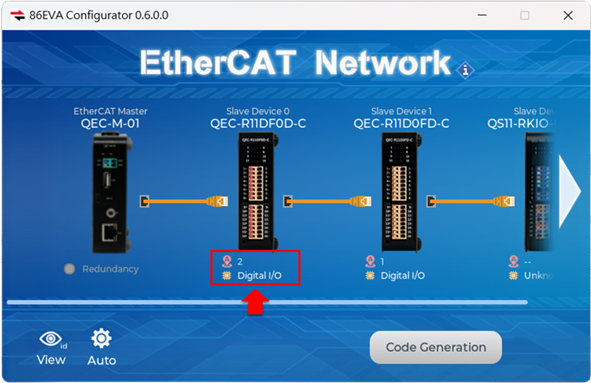
QEC-RXXD Series (EtherCAT Slave Digital I/O Module)
The QEC-RXXD series is an EtherCAT slave digital I/O module with 16 digital channels that can be configured as digital inputs or outputs.
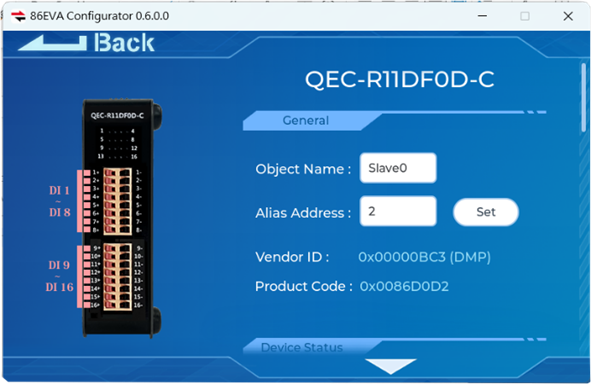
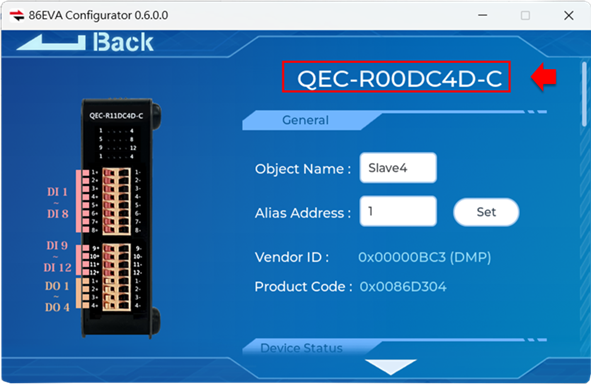
After clicking into the QEC slave device, the product name will be displayed.
The following functionality explanation will use the QEC-R00DC4D-N as an example.
General Settings
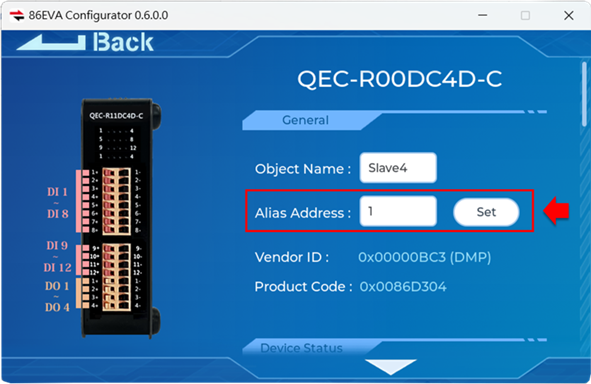
You can configure the Object Name and Alias Address for the QEC slave device, as well as obtain the Vendor ID and Product Code of the QEC slave device.
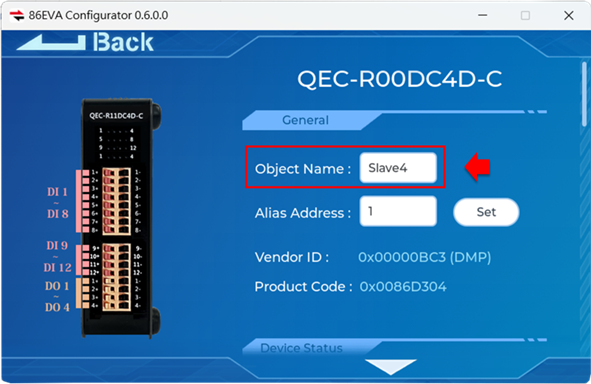
- Object Name:
Set the Object Name for the QEC slave device (highlighted in red). After setup, this configuration is applied to the object name of the code when the Arduino code is implemented.
- Alias Address:
The Alias Address is stored in the EEPROM and can be changed by the slave device application (Configured Station Alias address).
Set the Alias Address for the QEC slave (highlighted in red).

After setting the Alias Address, the program will automatically identify the QEC slave by this number. When the user’s QEC slave device changes in the EtherCAT network due to system requirements, the program will automatically adapt and will not require setting up of new configurations; If Alias Address is not set, the program will not automatically adapt to the new configuration. The default slave Alias Address is 0, and please set a number between 1 ~ 65535.
Note: Adapting to the new configuration refers to switching slave locations (no increase or decrease in the total number of slave devices). If a device is added or removed, the program will need to be reconfigured.
After the 86EVA scan of the slave device is successful, the Alias Address previously set by the slave is automatically read and displayed in this field. This field will return to the previous value if value input process is canceled or interrupted.
Pressing the Set button will write the Alias Address to the EEPROM of the EtherCAT slave; After closing 86EVA, please remember to restart the EtherCAT device.
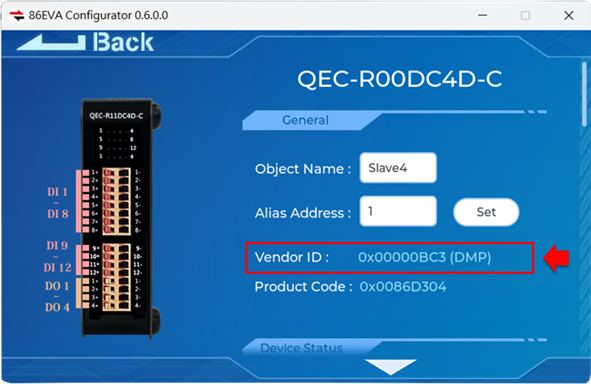
- Vendor ID:
Supplier ID of the QEC slave device (highlighted in red).
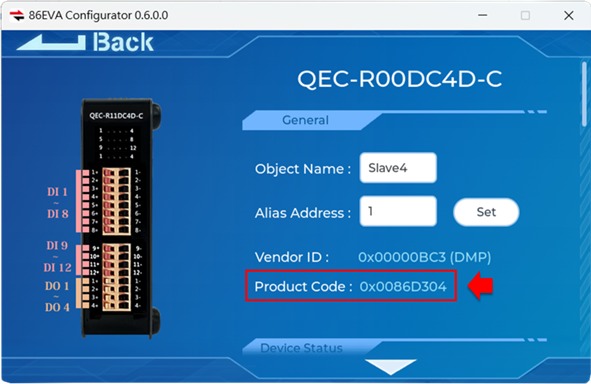
- Product Code:
QEC slave device product identification number (highlighted in red).
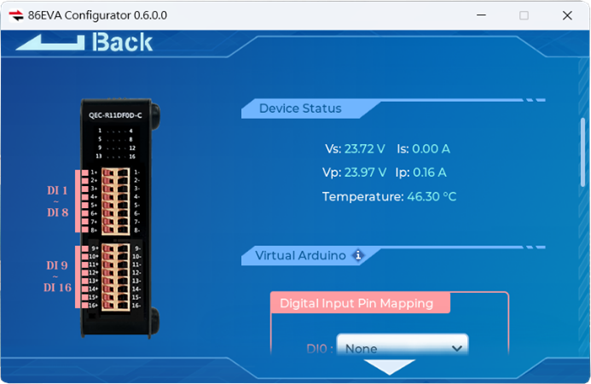
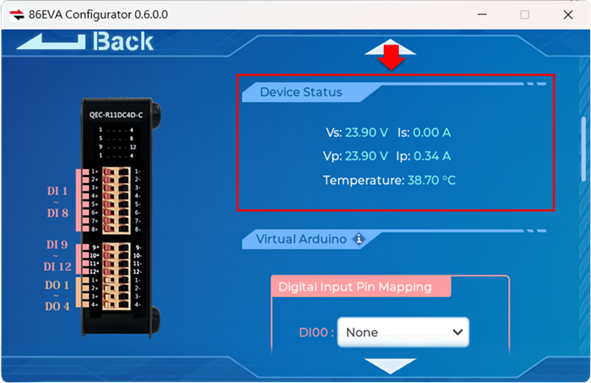
Device Status
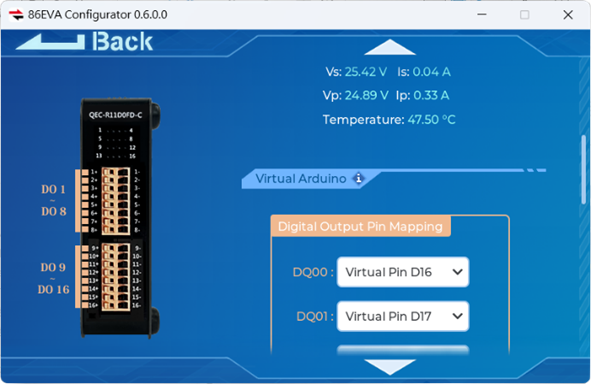
In the device status, you will be able to view real-time internal monitoring data including voltage, current, and temperature (highlighted in red).
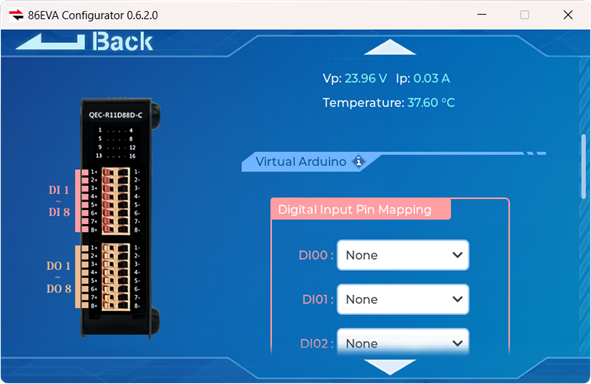
Virtual Arduino
In the virtual Arduino, you can set the number of digital input/output pins.
Taking QEC-R00DC4D-N as an example, there are 12 digital input pins and 4 digital output pins.
The user selects a virtual pin number, and the maximum number should not exceed the Max Digital Pins in the QEC master settings page.
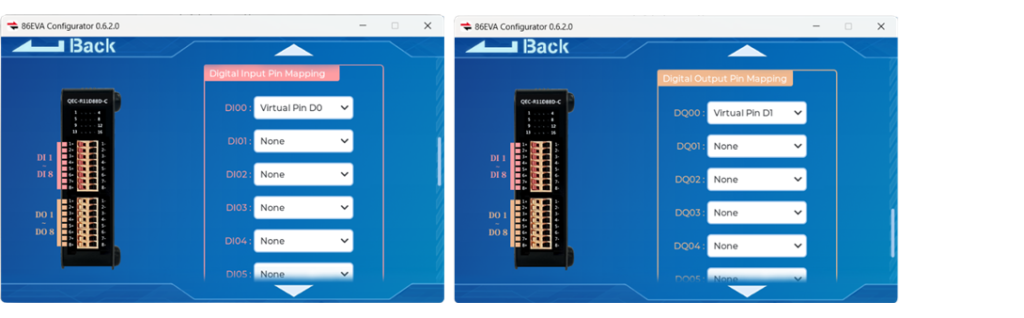
- Digital Input Pin Mapping (highlighted in red)
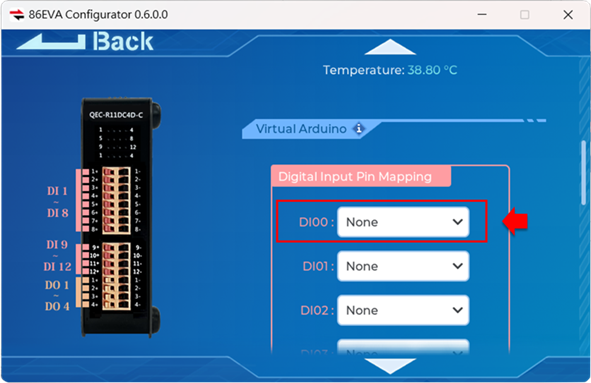
- Digital Output Pin Mapping (highlighted in red)
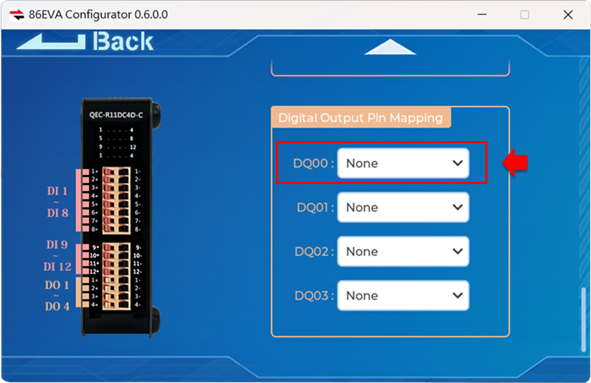
- Digital Input DQ11 pin and Digital Output DQ00 pin settings.
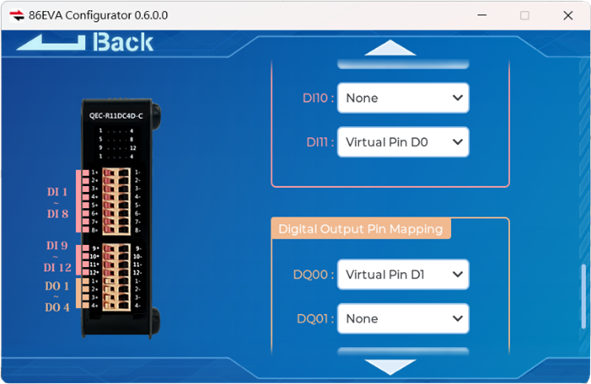
For detailed information about Virtual Arduino, please refer to Appendix 2.
QEC-RXXHU Series (EtherCAT Slave Gateway Controller (UART + MPG + Keypad +LCM))
The QEC-RXXHU series is an EtherCAT slave module that can support up to 2 sets of UART (RS232/RS485), 1 set of MPG handwheels, 1 Keypad, and 1 LCM display. QEC-RXXHU products with full functionality:
- QEC-R00HU5S-N (RS232 + MPG + Keypad + LCM)
- QEC-R00HU9S-N (RS232/485 + MPG + Keypad + LCM)
After clicking into the QEC slave device, the product name will be rendered. The following function description will use the QEC-R00HU9S-N as an example.

General Settings
The general setting function is the same as the QEC-RXXD series. Please refer to the General Settings of the QEC-RXXD series.
Device Status
The device status area is the same as the QEC-RXXD series. Please refer to the Device Status of the QEC-RXXD series.
Virtual Arduino
In Virtual Arduino, you can set the numbering of Serial Ports, MPG Ports, LCM Mapping, Keypad Mapping, and Buzzer Pins.
Taking QEC-R00HU9S-N as an example, you can set 2 Serial Ports, while the rest (MPG Ports, LCM Mapping, Keypad Mapping, and Buzzer Pin) are limited to 1 set.
Users can select a virtual pin number, and the maximum number will not exceed the maximum quantity set in the QEC Master setting page (Max Serial Ports and Max MPG Ports).
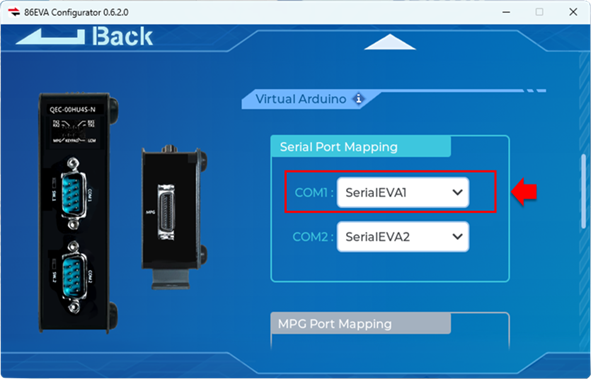
- Serial Port Mapping (highlighted in red), none selected:
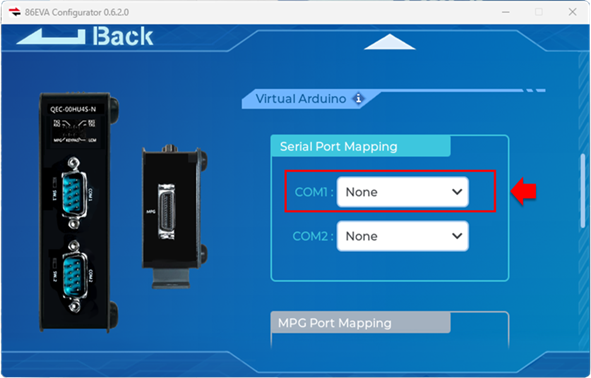
After making selections:
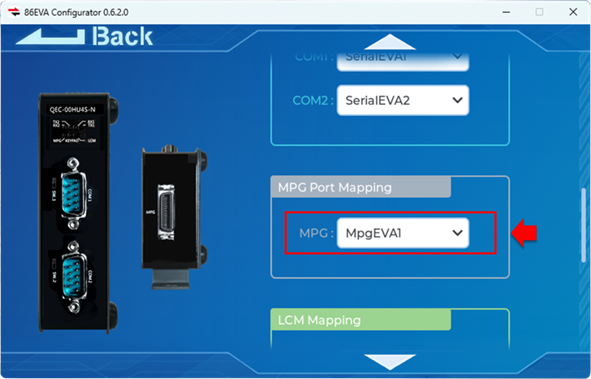
- MPG Port Mapping (highlighted in red), none selected:

After making selections:
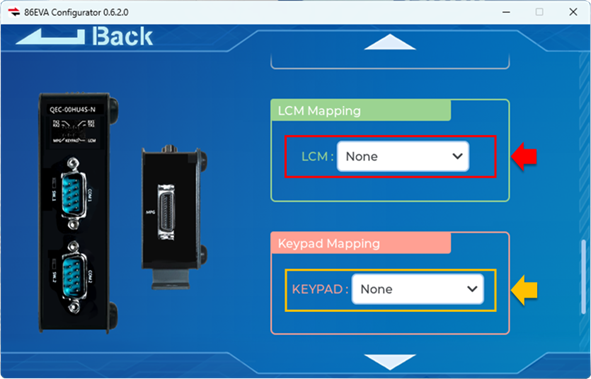
- LCM Mapping (highlighted in red) and Keypad Mapping (highlighted in yellow), none selected:
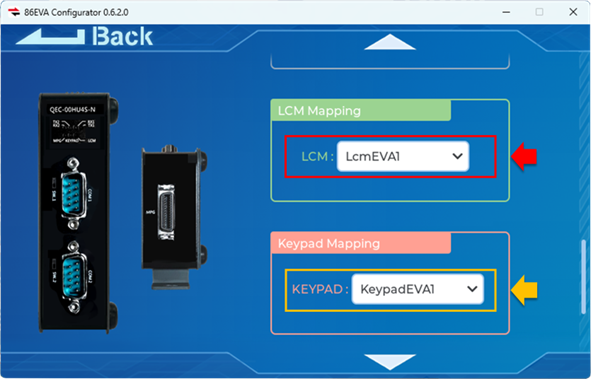
After making selections:
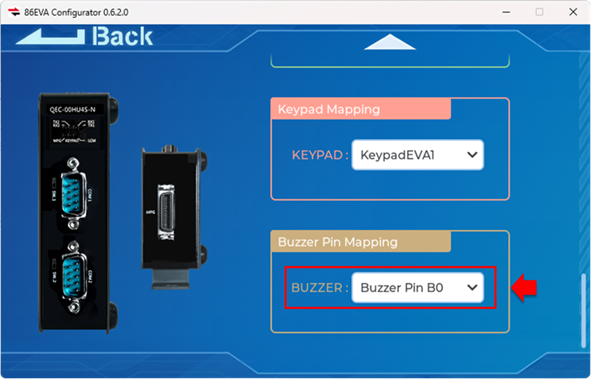
- Buzzer Mapping (highlighted in red), none selected:
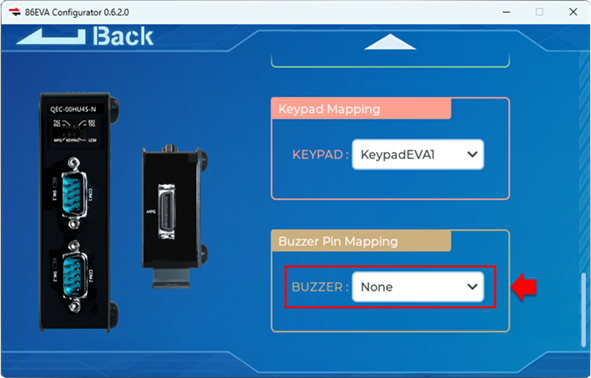
After making selections:
For detailed information about Virtual Arduino, please refer to Appendix 2.
3.2.2 non-QEC EtherCAT Slave
Other third-party EtherCAT slave devices in the 86EVA present an unknown QEC slave product image.
Go to the settings page, and you will see “Unsupported” (highlighted in red).
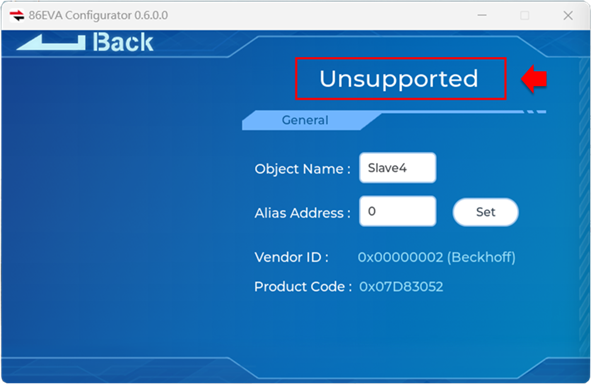
General Settings
The general setting function is the same as the QEC-RXXD series. Please refer to the General Settings of the QEC-RXXD series.
4. Advanced settings
In the 86EVA, in addition to the general settings, some advanced settings can be configured in this tool. This section will introduce how to adjust advanced settings.
4.1 Auto Set Alias Addresses of All Slave Devices
Click the “Auto” setting button in the lower left corner (highlighted in red).
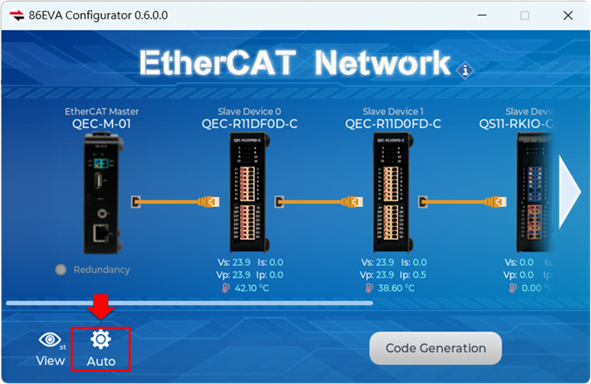
The “Auto Set Alias Address of All Slave Devices” and “Auto Set Digital Pin Mapping of the Virtual Arduino” buttons will appear. Users can click the upper button (highlighted in red) to automatically set the Alias Address on the current EtherCAT network.
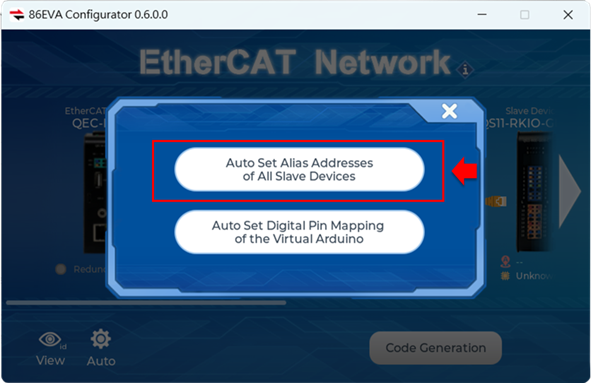
After clicking the “Auto Set Alias Address of All Slave Devices” button, if an EtherCAT device did not previously have an Alias Address set (Alias Address is 0), 1 set of Alias addresses starting from 100 will be set to each EtherCAT slave device in the order of sorting, which can be used for EtherCAT when there are many slave devices or quick setup is needed.
4.2 Auto Set Digital Pin Mapping of the Virtual Arduino
Click the “Auto” setting button in the lower left corner (highlighted in red).
Note: Virtual Arduino digital pins are only available for QEC-RXXD series products.

The “Auto Set Alias Address of All Slave Devices” and “Auto Set Digital Pin Mapping of the Virtual Arduino” buttons will appear. Users can click the button below (highlighted in red) to automatically set the virtual pin maps on the current EtherCAT network.
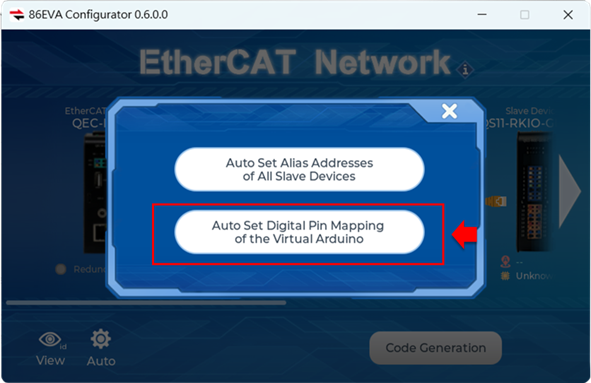
After clicking the “Auto Set Digital Pin Mapping of the Virtual Arduino” button a set of virtual pins starting from 0 will be set if used on QEC-RXXD devices that did not have previously set virtual pins.
Appendix
A1. Alias Address
Alias Address is a method of setting device aliases in EtherCAT and is usually used to find slave devices that have already been identified.
When setting the slave Alias Address, it is stored in ESI-EEPROM (ESI, EtherCAT Slave Information); Alias Address must be activated by the master and can be changed by the EtherCAT slave device.
If the node address matches the Alias address, the instructions for the corresponding node are executed.
How does it work on QEC?
After setting the Alias Address, the program automatically identifies the QEC slave with this number, and when the user’s QEC slave changes position on the EtherCAT network due to demand, the program will automatically adapt, and there is no need to upload a new configuration again; If Alias Address is not set, the program does not automatically adapt to the new group.
After the 86EVA scan is successful, it will automatically read the Alias Address previously set by the slave. The following figure shows the slave device that has not been set to Alias Address (highlighted in red).
The figure below shows the slave device with Alias Address set. The default slave Alias Address is 0. Please set a number between 1 ~ 65535.
Alias Address is displayed in the [Alias Address] field in [General] of the slave device; This field is canceled during the process of entering a value and will return after modifying the previous numerical value.
Pressing the Set button will write the Alias Address to the EEPROM of the EtherCAT slave; After closing 86EVA, please remember to restart the EtherCAT device.
Note: The device will adopt the new Alias Address upon restarting.
A2. Virtual Arduino
On a general Arduino board, the number, order, and function of the pins on it have been fixed and cannot be changed after manufacturing; The concept of Virtual Arduino is to simulate the EtherCAT network as a virtual Arduino, allowing for its pin number, order, and functionality to adjusted according to the user’s wishes.
Virtual Arduino is composed of various pins of multiple EtherCAT Slaves, and the various ports and pins on it come from different EtherCAT slave devices and connected to each other through the EtherCAT network.
Features Supported by Virtual Arduino
Currently, Virtual Arduino supports digital I/O, Serial Ports, MPG Ports, Keypad, MPG, and Buzzers, which can be found in the following QEC devices:
- QEC-RXXD Series (EtherCAT Slave Digital I/O Module): Digital I/O
- QEC-RXXHU Series (EtherCAT Slave Gateway Controller (UART + MPG + Keypad +LCM)): Serial Ports, MPG Ports, Keypad, MPG, and Buzzer
For detailed settings, please refer to each product introduction.
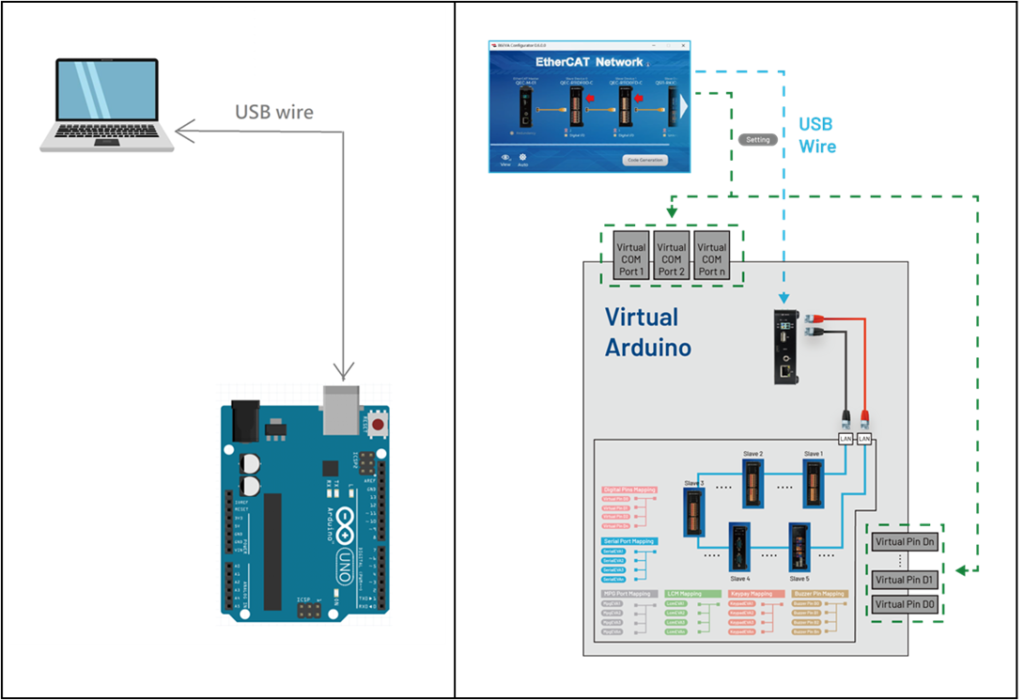
How do I use Virtual Arduino in the 86Duino IDE?
This section describes how to use the successfully configured Virtual Arduino Digital I/O PIN in the 86Duino IDE.
This example will be demonstrated using the QEC-M-043T (EtherCAT Master) with the QEC-R00D88D-C (EtherCAT Digital Input/Output Module), which has 8 Input contacts and 8 Output contacts.
For information on how to open the 86EVA tool, see Chapter 2.
First, click to go to the QEC-R00D88D-C device and set it up in Virtual Arduino. (For information and settings, see the QEC-RXXD series (EtherCAT Slave Digital I/O Module).
In this example, the DI00 of Digital Input Pin Mapping and DQ00 of Digital Output Pin Mapping are set to Virtual Pin D0 and Pin D1.
After setup, generate to Arduino code for this 86EVA setting, and click “Code Generation” (highlighted in red)

After completion, the user can use the EVA class (Class) in the main loop() of the 86Duino IDE (highlighted in red) to control the pins set in the 86EVA.
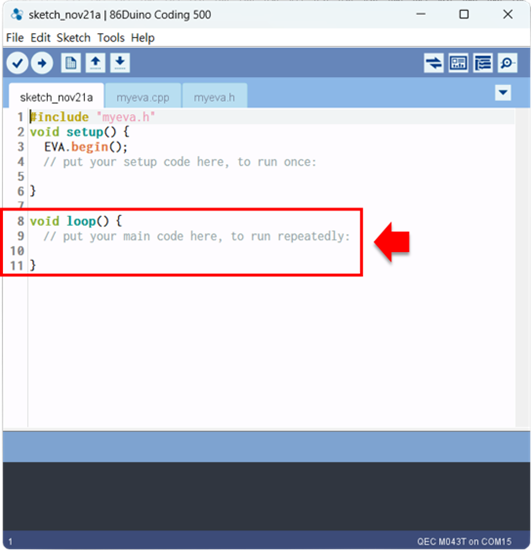
In this example, we use Virtual Digital D0 and D1, two virtual pins, which correspond to the DI0 pins (INPUT) and DQ0 pins of QEC-R00D88D-C (OUTPUT). We then read the D0 state and then set D1 to HIGH, the code is shown in the following figure.
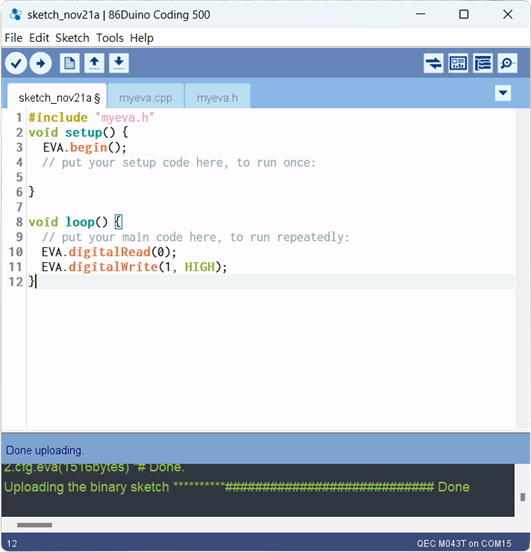
After uploading this code successfully, you can see the light of the DQ0 pin light up on the QEC-R00D88D-C.
Note: In loop(), EVA.digitalRead(0) represents the Virtual Pin 0 of the previously set Digital Input Pin Mapping; EVA.digitalWrite(1, HIGH) represents Virtual Pin 1 of the previously set Digital Output Pin Mapping.
Other Examples:
The user can print out the value read by Digital Input through the Serial Port, with the code as follows.
void setup() {
    Serial.begin(115200);
    EVA.begin();
}
void loop {
    Serial.println(EVA.digitalRead(0));
    EVA.digitalWrite(1, HIGH);
}
Users can apply Digital Output to the Arduino classic entry example, with the code as follows.
void setup() {
    EVA.begin();
}
void loop {
    EVA.digitalWrite(0, HIGH);
    delay(1000);
    EVA.digitalWrite(0, LOW);
    delay(1000);
}
The text of the 86Duino reference is a modification of the Arduino reference and is licensed under a Creative Commons Attribution-ShareAlike 3.0 License. Code samples in the reference are released into the public domain.