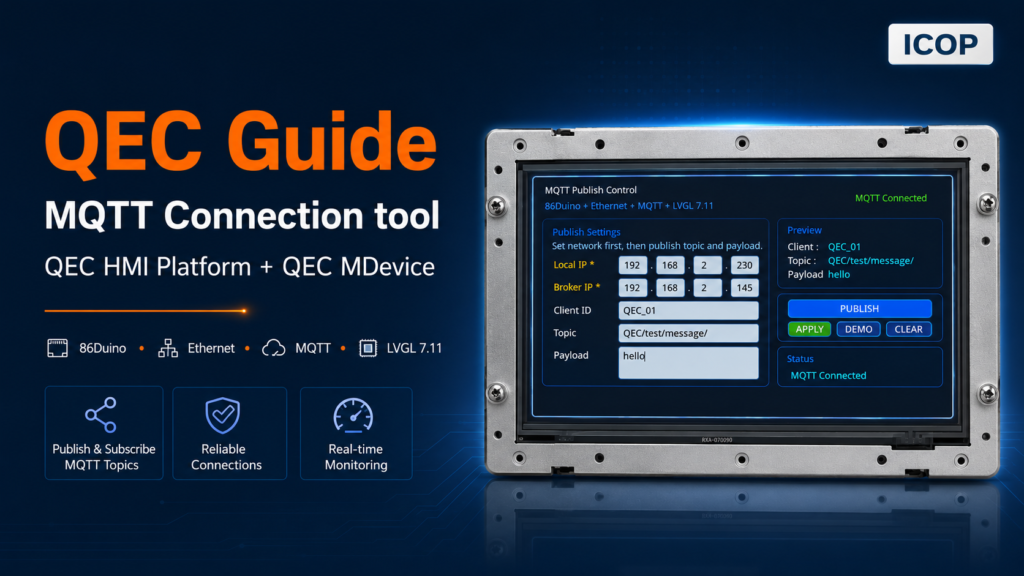
The QEC MQTT Publish Control is a graphical MQTT publishing tool that runs on the QEC platform (86Duino + 86HMI). Once powered on, you can edit the Local IP, Broker IP, Client ID, Topic, and Payload directly on the touchscreen, and then publish to any MQTT broker without recodeing.
1. At a glance
- Reconfigure Local IP, Broker IP, and Client ID from the touchscreen
- Publish any Topic/Payload pair in one tap, with live preview and visual status feedback
- Recover from transient broker drops automatically — the next publish reconnects and re-announces the device
2. Five demos, walking through a real bench session
2.1 Demo 1 — Auto-connect on boot, identify the device in seconds
First, power on the unit. Then setup() reads the default Local IP, Broker IP, and Client ID, calls Ethernet.begin(), and finally executes mqttConnectOnce(true).
Within a few seconds, the MQTT status badge in the header turns green and reads MQTT Connected. At the same time, the device publishes a retained announcement to QEC/test/device containing its Client ID and IP, so any subscriber sees the device come online without polling.
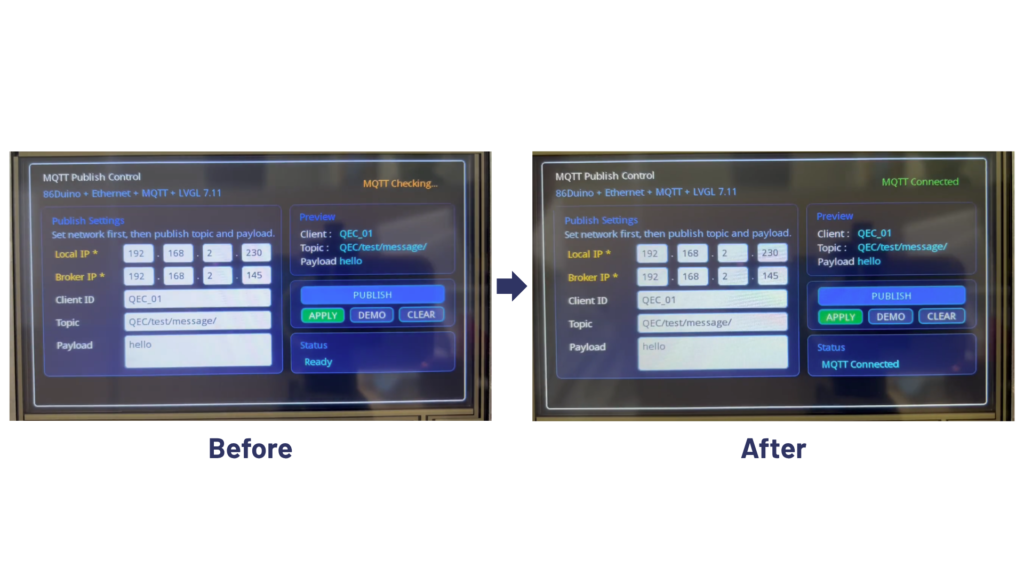
Before/After: At boot, the HMI header shows yellow MQTT Checking…. Once the Ethernet link is up and the broker handshake succeeds, it turns green MQTT Connected. At the same time, a retained device message, clientId=QEC_01, ip=192.168.2.230 is published to QEC/test/device.
2.2 Demo 2 — Re-target the broker without reflashing
Tap each Broker IP octet, type the new address. Optionally edit the Local IP and Client ID. Tap APPLY. applyNetworkSettings() disconnects the current session, re-runs Ethernet.begin() with the (possibly new) Local IP, points PubSubClient at the new broker, reconnects, and re-publishes the device info.
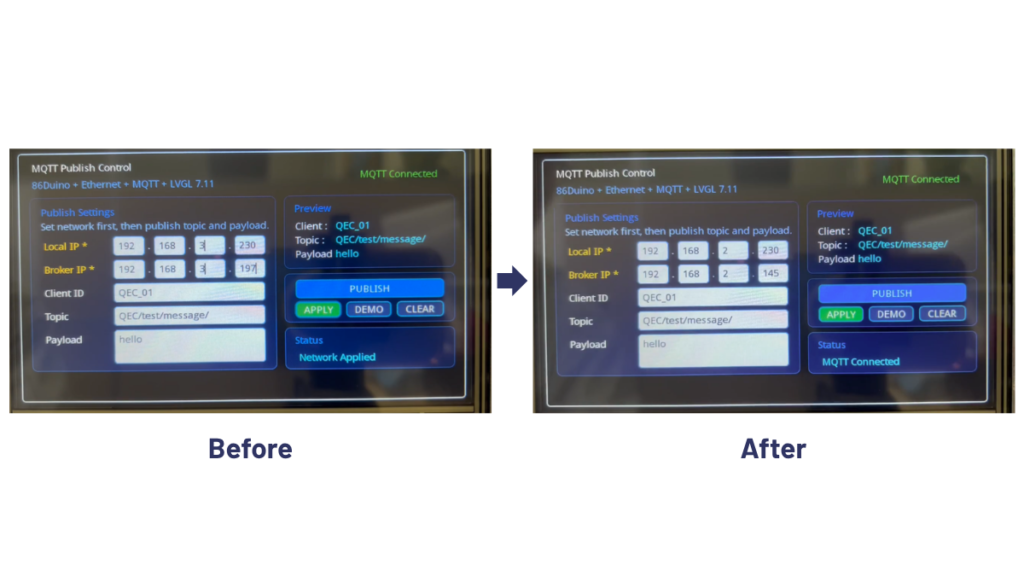
Before/After: Broker IP 192.168.2.145 rewritten to a different subnet on the touchscreen, APPLY tapped. MQTT status badge briefly flashes back to checking, then green again on the new broker.
2.3 Demo 3 — Publish a custom payload in one tap
With the network up, tap the Topic field, type a topic such as factory/line1/event. Tap Payload, type any string. The Preview panel mirrors both fields live as you type. Tap PUBLISH. publishSimpleMessage() reads the text areas, rejects empty topic or payload up front, calls client.publish(), and writes the outcome to the Status panel — Publish Success or Publish Failed.
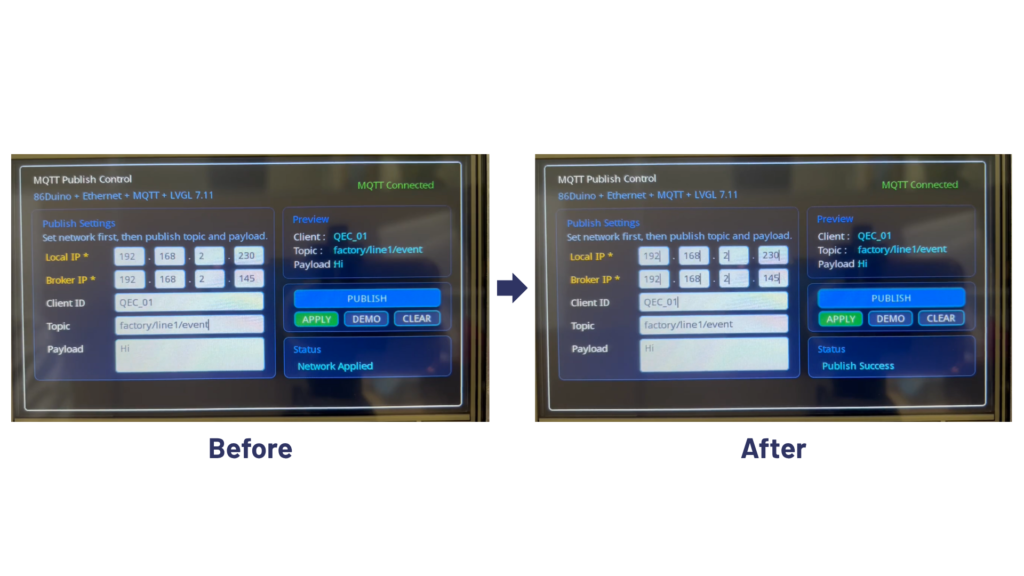
Before/After: Topic and Payload fields filled in, Preview panel matches.Tap PUBLISH. Status panel reads Publish Success. The message appears on any subscriber listening to the topic.
2.4 Demo 4 — Survive transient network drops automatically
When the broker drops the link or the cable is restarted, the next PUBLISH notices !client.connected(), shows MQTT Reconnecting… in the Status panel, calls mqttConnectOnce(true) to bring the session back, and re-publishes the retained device info before sending the user payload.
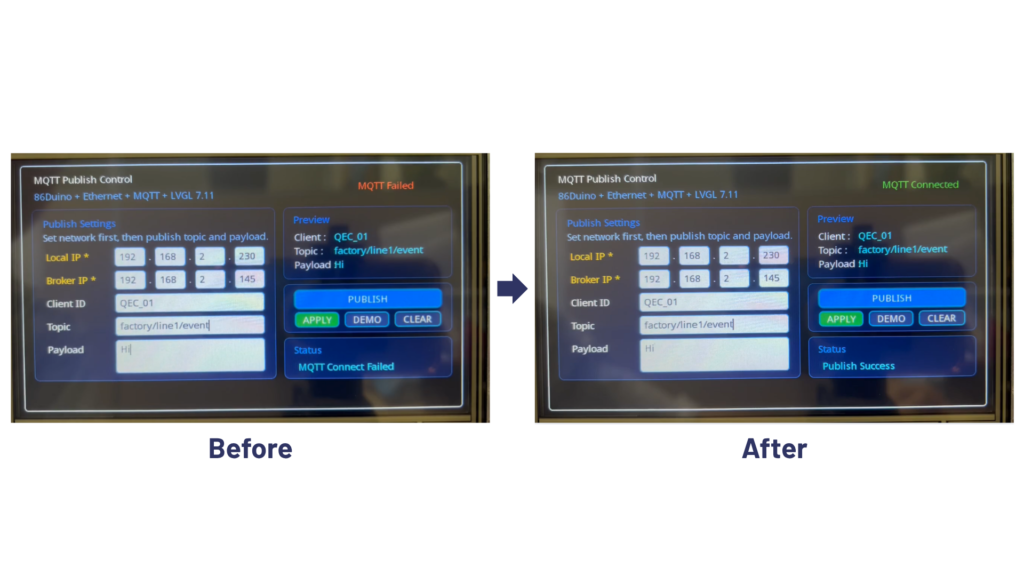
Before/After: MQTT status flips to red MQTT Failed after a cable yank, operator taps PUBLISH, badge returns to green and Status panel shows Publish Success on the same tap.
2.5 Demo 5 — Roll out a fleet with auto-unique Client IDs
Leave the Client ID field empty. Set a unique Local IP per unit. Tap APPLY. generateClientIdFromLocalIp() synthesises a unique Client ID of the form QEC_<a>_<b>_<c>_<d> from the Local IP and writes it back to the text area. Each device then announces itself on the retained QEC/test/device topic with both its Client ID and IP.
Subscribe once from any MQTT client and you have a live, self-maintaining fleet inventory — no device collides on the broker because each Client ID is provably unique by IP.
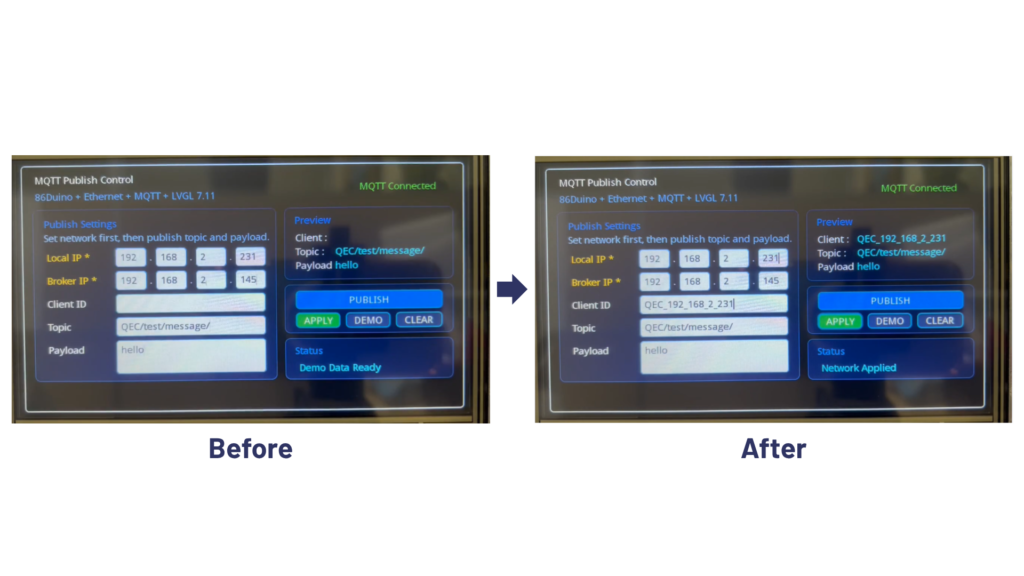
Before/After: Client ID left blank, Local IP set to 192.168.2.231, APPLY tapped. Client ID textarea now reads QEC_192_168_2_231.
3. Why does this save engineering time
- One firmware, flexible deployment. Local IP, Broker IP, and Client ID can be edited directly from the HMI, making the same firmware easier to adapt to different network setups.
- Clear HMI feedback. Key results such as MQTT Connected, Invalid Local IP, Topic Empty, and Publish Failed are shown directly on the screen.
- Faster publish testing. APPLY and PUBLISH are separated, so changing Topic or Payload does not restart Ethernet.
- Self-announcing device. Retained device info on QEC/test/device lets subscribers receive the latest device identity and IP after connecting.
4. What you need
| Component | Requirement |
|---|---|
| Main device | QEC platform (86Duino main unit + 86HMI panel) |
| Network | Standard Ethernet to a reachable MQTT broker (e.g. Mosquitto, EMQX, HiveMQ) |
| Broker | MQTT v3.1.1 broker on port 1883 |
| Libraries | Ethernet, PubSubClient, lvgl 7.11 |
| Optional | An MQTT client (MQTT Explorer, mosquitto_sub, etc.) to verify subscriptions |
5. Resources
- QEC platform overview (86Duino + 86HMI): Overview
- EtherCAT MainDevice sample code: Downloads
- Talk to engineering: Contact us
For more info and sample requests, please write to info@icop.com.tw, call your nearest ICOP Branch, or contact our Worldwide Official Distributor.