The SCoop Library is available from 86Duino Coding 500. It provides the API of the Simple Cooperative Scheduler for Arduino to access a light and simple environment for creating powerful multi-threaded programs or easy multi-tasking solutions.
There are lots of other alternatives from the best RTOS to the simplest “timer” or interrupt libraries around the World Wide Web. This one fits in between and looks easy to use and powerful enough for most of us. It is mainly inspired by the Java Thread library and uses a traditional switching context mechanism taken from other RTOS like ChibiOS or freeRTOS.
Let’s use it
Here is an example of how to use the SCoop library with a very basic sketch:
#include "SCoop.h" // create an instance of the scheduler called mySCoop

defineTask(Task1) // user definition of task1 object
volatile long count; // force any read/write to memory

void Task1::setup() {
	count=0;
};

void Task1::loop() {
	sleepSync(1000);
	count++;
};

defineTaskLoop(Task2) { // user quick definition of task2 object
	digitalWrite(13, HIGH);
	sleep(100);
	digitalWrite(13,LOW);
	sleep(100);
}

void setup() {
	Serial.begin(115200);
	mySCoop.start();
}
void loop() {
	long oldcount=-1; yield();
	if (oldcount!=count) {
		Serial.print("seconds spent :");
		Serial.println(count);
		oldcount=count;
	}
}
In the main sketch setup(), the instruction mySCoop.start() prepare the scheduler and launch each individual setup() method for Task2 and then for Task1 (reverse order compared to declaration).
In the main loop(), the code is printing any changes to the “count” variable.
You can create as many task objects as you need as long as the microprocessor will have enough resources to hold them in memory and execute them in an acceptable time for you.
Each Task has its own “stack” context in order to hold local variables and to call other functions while remembering return address. By default, the defineTask macro is creating an array of 150 bytes for each AVR task or 256 bytes for each ARM task, but this can be overridden by adding your own value as a second parameter to the defineTask macro. Example: defineTask(Task2,200) will provide the task with 200 bytes of dedicated local stack.
It is also possible to create a task without using the defineTask macro by just creating an instance of the SCoopTask object and calling a method later in the program to initialize your code and stack.
SCoopTask myTask; … myTask.init(…)
How tasks work in a sketch :
The Cooperative scheduler library is responsible for tasks and events management and is organized around a very simple function called yield().
This yield keyword (which sounds a bit weird for non-native English speakers) is part of the Arduino due Scheduler library. It has been recently introduced in the standard Arduino libraries as of build >1.5. It is also part of the pjrc teensy core. Some function like delay() are using it, and the principal loop() function in the Teensy core is now including a default call to yield() at the end of user code. yield is also used in Java programming and declared in the Java Thread library.
Basically, when your program is in a section of code where you have spare time, just call yield() and this will eventually go to the scheduler and switch to the next task registered in your sketch.
The scheduler will come back to the original code as soon as the other tasks also call the yield() function. Otherwise, the process is stuck in a task and the scheduler cannot take control back again! This is why the word Cooperative is important here, compared to other preemptive RTOS.
The big advantage of Cooperative multi-tasking is that all the existing libraries will be working well in a multi-tasking environment as they will not be interrupted by a preemptive mechanism, as most of the library does not accept reentrant calls (calling a function again before it is completed).
Task Objects in more detail:
Defining a task and providing a stack:
The main idea of this library which is illustrated in the example is to consider a task as an object having its own stack and methods like setup() and loop(), which are inherited from the SCoopTask framework.
To create a task, just use the defineTask or defineTaskRun macro which will generate the header code for your object.
By default, a stack (an array of bytes) will be created for this object with the number of bytes declared in the second parameter. If you omit the stack-size parameter, then the array is set to a default value (150 for AVR, 256 for ARM), which is very comfortable for doing some basic computing on couple of local variables and also to call some Serial.print functions for example.
If your code needs more local variables, or if it is calling a function that needs more space, then you have to anticipate this by allocating more stack-size in the declaration. Unfortunately, there is no easy way to calculate the maximum stack size needed, but the library contains a method called stackLeft() which will return the amount of memory in the stack that has not yet been used at this moment.
Once the task is declared, an object is created and the Arduino environment will automatically call the object “constructor” at the beginning of the program before entering in the main setup() or loop(). Therefore the object is automatically registered in a list of items that the scheduler will use later to start and launch each task (or events or timers) one by one.
You can declare a task yourself by instantiating the basic object SCoopTask and then calling the init(…) method with 3 parameters: address of the stack, size of the stack, and address of the function to be called instead of the loop() method, as in the below example. In that case, the defineStack macro can be used to facilitate the declaration of the stack array with some 8 bytes alignment needed for ARM platform:
SCoopTask myTask;
defineStack(mystack,128)
void mycode() { count+++; }
void setup() { myTask.init(&myStack,sizeof(mystack),&mycode); … }
The call to the init() method can also be grouped with the object declaration like this:
defineStack(mystack,128)
Void mycode() { count+++; }
SCoopTask myTask(&myStack,sizeof(mystack),&mycode); // implicit call to init()
Void setup() { … }
Starting a task:
Each task defined with the defineTask macro is expected to have its own setup() method. The scheduler will launch all the setup() of all tasks registered in the list with the command mySCoop.start(). The latest task registered will be launched first (reverse order compared to declaration in your sketch).
This command should be placed inside the main setup(). It will also initializes the Scheduler and reset the variables used for counting time. After this, each task is considered “RUNNABLE” for safely entering in their specific loop() method.
Running and leaving the task with yield()
Each task defined with the defineTask or defineTaskLoop macro is also expected to have its own loop() method. The scheduler will launch this method periodically as part of a whole scheduling process. The task code inside this loop() can be blocking forever if needed, as long as the yield() (or sleep) method is called somewhere, sometime.
The mechanism to enter in and to switch out from a task is organized by the scheduler with its yield() function. Calling the method yield() from a task will most likely switch to the next task in the list and return to the Scheduler when reaching the last one. Then the Scheduler will launch all pending timers or event (see later in documentation) and will restart launching the tasks one by one.
Once all the other potential tasks (and timers or events) have been executed, it will give the control back to the original task as if it was a simple return from the call to the yield() method. The execution just continues afterward.
It is recommended to systematically call yield() from the main Arduino sketch loop() by using mySCoop.yield(). This will force the loop to first launch all tasks and pending event/timer before executing its own loop() code. It is possible to change this behavior by setting a predefine variable called SCoopYIELDCYCLE to 0 at the beginning of the SCoop.h file, so that the Scheduler is always in control of the switching mechanisms. With this approach, the main loop() would be considered as a tower of control for all other piece of code and therefore the code inside the main loop() would have a better priority of execution as it would be executed between each task switching or event/timer launch.
Remark:
The SCoop library forces a call to yield() at the end of the user’s task loop(). If you implement your own looping mechanisms (e.g. while(1) { .. } inside the task loop()) then the program has to call the yield() method (or sleep) time to time somewhere in the loop.
The SCoop library overrides the original Arduino yield() weak function with the one declared by the scheduler library called mySCoop.yield(). So you can also use the simple word yield() everywhere in your program or included files. This also provides a mechanism to hook the standard Arduino delay() function, which is now calling the yield() function (only as of Arduino library >1.5), ensuring that the scheduler will always be under the control of the whole program.
Ending a task?
Not really, as the library allocates an amount of static memory for the stack, a task is not supposed to end once started! So it is up to the user to have code for stopping or starting, or waiting for events within the task loop(), eventually by using pause() and resume(). (see “Android scheduler” for dynamic tasks)
Method available in your task object:
Within the code of a task object, it is possible to call several methods inherited from the SCoopTask base object:
sleep(time): same behavior as the standard delay() function, but the spare time is used to give the control back to the scheduler immediately or to execute the other pending tasks.sleepSync(time): same function as sleep, but the time to sleep is synchronized with the previous call to a sleep() or sleepSync() function, enabling a strict periodic time handling (“no jitter”).sleepUntil(Boolean): just wait for the Boolean variable to become true (and then set it to false) and give the control back to the scheduler in the meantime. It is mandatory to use the volatile variable for this flag, as the status change will come from another task or from the main loop() program itself.sleepUntil(Boolean,timeOut): (as of V1.2) same as sleepUntil, but will return anyway after the given timeOut period. It can be used as a function in an expression and return false in case of timeout.stackLeft(): return a number of bytes never used in the task stack since the task was started.
This function can also be called from the main loop() in the Arduino sketch, outside of the task object context, by referencing it with the task object itself or with a global pointer:
void printstack(){
  SCoopEvent* ptr=SCoopFirstTask; // global library type and variable
  while (ptr) {
    Serial.println(reinterpret_cast<SCoopTask*>(ptr)->stackLeft());
    ptr=ptr->pNext;
  }
}

Void loop() {
  printstack(); … or … Serial.println(Task1.stackLeft());
}
Cross-task talking and Volatile
Nothing to do with chickens here. Due to compiler optimization, very often a variable is made local or uses a temporary register. In order to pass information across tasks or to use a variable in a multiple-thread program (e.g., one task is writing, and the other one is reading), we have to declare the common variable as volatile, which forces the compiler to read and write them into memory at each access.
To simplify variable declaration, the SCoop library predefines some types for int8,16,32 and uint8,16,32, and Boolean, preceding the original Arduino type name with a “v” and removing the “_t” like:
vui16 mycount; // exact same as volatile uint16_t mycount
vbool OneSecond = false; // exact same as volatile Boolean OneSecond
Timers
The library provides a complementary SCoopTimer object which can be used to create periodic actions which will be orchestrated by the Scheduler. You can instantiate as many timers as you need, and they can even be declared temporarily as a local object in a function or task. A timer doesn’t need a stack context as you enter; you leave from a timer in a single atomic yield() operation; they use the normal stack of the main Arduino sketch. Timers have to be fast as they cannot give control back to the scheduler in any case (the local yield() method is disabled). Timer looks like an MCU timer interrupts but with the possibility to call any of your existing functions or libraries from them without the risk of a system crash…
Defining a Timer:
The specific macro defineTimerRun can be used to declare your own timer object with 1 or 2 parameters. The first parameter is the name of your object; the second option is the period of the timer:
defineTimerRun(myTimer,1000){ ticSecond=true; countSecond++ } The code of this timer is implicitly attached to myTimer::run() method. It must be fast and non-blocking. The timer are registered in the same list as the tasks and, therefore, will be triggered by the scheduler during a call to yield(). Once the time elapsed since the last call has reached the defined period, the run() method is executed once.
If a timer needs time to complete (say some milli-seconds), it is suggested to use a Task instead, with the sleepSync() function at the very beginning of the loop() method and some calls to yield() or yield(0) in the blocking or slow section. This code will give the exact same behavior as a timer(1000) definition:
defineTaskLoop(myTimer,100) { sleepSync(1000); ticSecond=true; countSecond++ }Remark: In this example, we reduce the default stack size by forcing the value 100 with the second parameter, because the task loop() doesn’t need that much as it doesn’t call any other function and has no local variables. This is to be experimented case by case.
Starting and monitoring timer:
A call to mySCoop.start() will initialize all the timers registered and will enable them if the time period was provided as the second parameter of the defineTimerRun macro. If not, then this is up to the program to initialize this later with a call to the method schedule(time) (see below).
The following methods provide other means to modify or monitor the timers:
schedule(time): enable the timer and prepare it to be launched every “time” ms.schedule(time, count): same as schedule(time), adding a maximum number of execution.getPeriod(): return the value registered for the time period of this timer.setPeriod(): force a value for the time period.getTimeToRun(): return the time in ms before the next execution of the timer run() method.
Another way of declaring timer with predefined macros:
defineTimer(T1, optional period) gives the possibility to declare both a T1::setup() and a T1::run() method for this object, and this is useful if we want to add some setup code inside this object instead of writing them in the main setup(): this is not backward compatible with V1.1 as the setup() is now mandatory! please rework your program to use defineTimerRun() instead if you do not need setup().
defineTaskLoop(myTimer,100) { sleepSync(1000); ticSecond=true; countSecond++ }By extension 2 other macros can be used for defining timer class:
defineTimerBegin(event[,period]) and defineTimerEnd(event). See example 2 in the library as a showcase.
Events
The library provides a complementary object SCoopEvent which can be used to handle code to be executed by the scheduler upon an external event or trigger. As an example, it is possible to trigger an event from an interrupt (isr, signal), but the corresponding run() code will be executed only by the scheduler outside of the interrupt context. This enables to write of complex event handling and calling library functions without the criticality needed for coding hardware interrupts.
Like the SCoopTimer object, the SCoopEvent has no stack context and is expected to be as fast as possible in order to keep the scheduling fluent. If an event needs a lot of time to complete, then it should be declared as a permanent task, waiting for a volatile flag by using the sleepUntil() method.
Example of event declaration and usage:
defineEventRun(myevent){ Serial.println("trigger received"); }
isr(pin) { myevent.set(); } // or myevent=true;
The event object has only one public method to set the trigger flag:
set(): set the trigger flag to true. The event will be launched by the scheduler by calling yield().set(value): set the trigger value, if false, nothing happens. If true, then equivalent to set()
The event trigger flag can also be set directly by an assignment like “myevent=true”, as the library overloads the standard “=” operator for this object.
defineEvent(event) can be used to define both event::setup() and event::run() , as for timers. This is not backward compatible with V1.1! please use defineEventRun(event) instead, if you do not need setup().
By extension 2 other macros can be used for defining event classes:
defineEventBegin(event) and defineEventEnd(event). See example 2 in the library as a showcase.
Fifo / first in first out new in V1.1
The SCoop library provides a complementary object SCoopFifo and a macro called defineFifo which will provide nice support to manage first-in, first-out buffers for bytes, integers, long, or any type of structure data below 256 bytes. This can be very useful to exchange data between tasks, events,s or timers and another task with a producer-consumer or sender-receiver model in a synchronous way (no synchronization needed between tasks).
Here is an example of how to declare a fifo buffer of 100 integers and to use it between a timer doing analog sampling and a task using them for monitoring variation.
defineFifo(analogBuf,int16_t,100)

int16_t A,B;

defineTimer(anaRead,10) // read analog every 10ms
void anaRead::run() {
  A=analogRead(1); analogBuf.put(&A);
}

defineTaskLoop(task1) {
  while(analogBuf<32) yield(0); // wait for 32 items in the buffer

  int16_t avg=0;
  for (int i=0; i<32; i++) {
    analogBuf.get(&B);
    avg += B;
  }
  avg /= 32; yield();
  Serial.print("average analog value for 32 samples = ");Serial.println(avg);
}
The SCoopFifo also provides the following methods:
put(& var): add the value of the variable to the buffer. Return true if the result is successful or false if the buffer was already full.putChar(val)/putInt(val)/putLong(val): can be used to directly add a given value into the buffer without needing an intermediate variable.get(& var): take the older value from the buffer and store it in the variable passed. Return true if successful or false if the buffer was empty.flush(): empty the buffer and return the size of the buffer (number of items) as per declaration.flushNoAtomic(): same as flush, but doesn’t touch interrupts. Should not be used in conjunction with ISR.count(): return the amount of samples available in the buffer.
It is also possible to use the name of the object inside an integer expression which will return the same value as the method count().
Virtual timer/delay: SCoopDelay 以及 SCoopDelayus new in V1.2
The SCoop library now uses and provides a simple object to facilitate delays or timeout measurements with a class named SCoopDelay. This looks a bit like TimerDown (see later in the document).
The object can be declared with or without an auto-reload value. If not used, the reload storage variable will be hopefully automatically removed by the linker. If used then the timer/delay automatically starts.
Typical usage:
SCoopDelay time;
time = 10; while (time) yield(); // this launch yield() during 10ms
SCoopDelay t10seconds(10000);
If (T10seconds.reloaded()) { /* do something every 10 seconds */ }
Methods for SCoopDelay objects:
set(time): define the starting time for the delay. The delay will then start counting down to 0;get(): return the value of the delay. if delay is elapsed, the result is 0.add(time): add a certain amount of time to the delay.sub(time): subtract a certain amount of time to the delay.
These 4 methods can also be transparently used by directly using the SCoopDelay object in an expression like x=delay or delay=x or delay+=x or delay-= x. thanks to operator overloading.
elapsed(): return true if the delay is elapsed.reloaded(): same as elapsed, but automatically restart the delay with the reload value if defined.setReload(time): predefine and attach a reload value to the object. Same as if provided during object declaration.getReload(): return the value of the reload parameter attached to the object.reload(): add the reload value to the SCoopDelay object.initReload(): set the SCoopDelay object with its reload value.
All the values are defined in int32 as defined by the SCDelay_t variable at the beginning of SCoop.h file.
By extension, a SCoopDelayus object is also provided by the library, which is the same but using parameters in microseconds. The values are int16 for AVR or int32 for ARM, as defined by the micros_t variable at the beginning of the SCoop.h file.
Time Counters:
The SCoop library provides 2 powerful objects, totally independent of the scheduler, to handle time counting up and down. The time base for a tic count can be specified from 1 ms up to 30 seconds (int16). There are no limitations on the number of timers that can be declared.
- TimerUp: will provide an object counting time from 0 to a maximum amount to be defined in the object declaration (can be 0). Once the maximum is reached, the counters go back to 0, and it is possible to monitor the rollover event with the rollOver() method in order to start an action. Example:
#include <TimerUp.h>
TimerUp counterMs(0); // do nothing, need further initialization
TimerUp myMillis(1000); // will count up from 0 to 999 every 1ms
TimerUp mySeconds(3600,1000); // will count from 0 to 3599 every 1000ms
…
void loop() {
  if (myMillis.rollOver()) {
  	Serial.print("one more second elapsed")
  }

  if (mySeconds.rollOver()) {
  	Serial.print("one more hour elapsed")
  }
}
The object can also be used directly in an expression or assignment.
TimerUp myTime(1000);
…
void loop() {
if (skip) && (myTime > 500) { mytime = 800; } // will read and force timer
The value set during the declaration for the rollover can be modified later on with the method setRollOver(timeMax).
TimerDown provides another type of powerful object counting down from a maximum value to 0. Once the down counting reaches 0, the counter definitely keeps the value 0 until the program force it to another value. For example:
#include <TimerUp.h>
#include <TimerDown.h>
TimerUp tic(100,10) // count up from 0 to 99 every 10ms
TimerDown msLeft(0); // will count down every ms
TimerDown secondsLeft(3600,1000); // count from 3599 to 0 every 1000ms
…
void loop() {
  while (secondsLefts) {
    if (tic.rollOver()){
    	msLeft=1000; // restart this counter
        Serial.print(secondsLeft);
        Serial.print(" seconds and ");
        Serial.print(msLeft);
        Serial.println("ms before end");
      }
  }
}
In addition, the method below can be used for TimerUp and TimerDown objects:
Init(time, timeBase): initializes the counter with a given timemax and a given time base. As an example counter.init(5,1000) will initialize the counter (up or down) with the value corresponding to 5 seconds. if it is a TimerUp then it will count from 0 to 4. If it is a TimerDown, it will count from 5 to 0.set(time): forces a new value in the counter. This is equal to assigning a value like counter=100;reset(): just forces the counter to 0. Also, clear the rollover flag for TimerUp objects.get(): return the value of the timer. A timer can also be read directly within an integer expression like x=counterMs;pause(time): the timer will keep its actual value until it is resumed.resume(): if the timer was paused, then it is resumed and starts counting again from this value.
Library compilation option:
It is possible to edit the files named TimerUp.h and TimerDown.h and to change some values in the first lines inside the #define statement, which will impact the compilation pre-processing
As an example, time-based handling can be disabled in order to make the library more compact. Then the default time base is the millisecond. It is also possible to change the name of the original object class TimerUp (or TimerDown) by your own object name like for example TimeCounter, if preferred.
It is finally possible to force the method parameter as “int” instead of “long”, but the internal timing computation remains in 32bits mode. (remark: for ARM, int is still 32bits!)
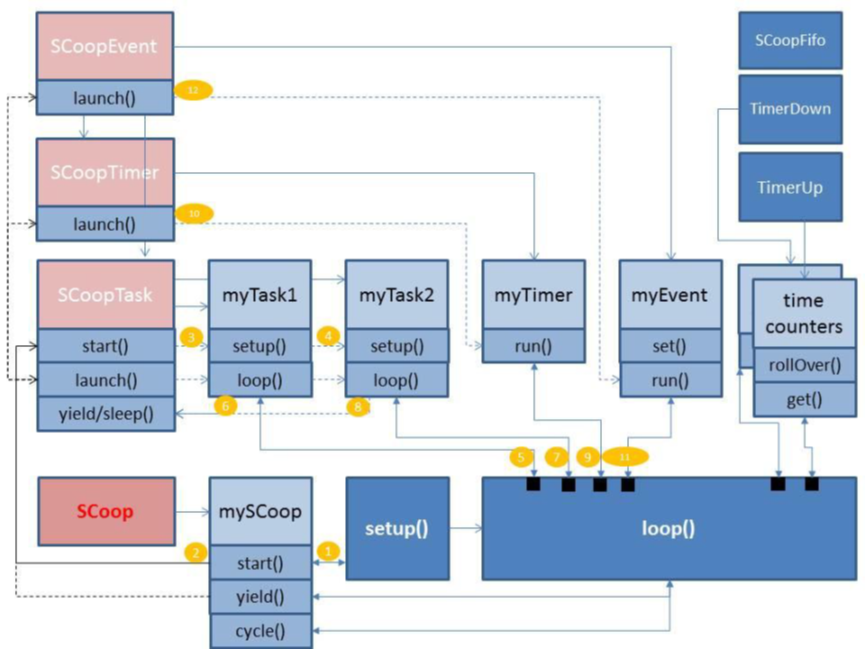
More technical things
This picture represents the objects classes an some instances and how this works together with the standard setup() and loop() function in the Arduino sketch. This aims to illustrate the explanation given in previous chapters:
Simple Cooperative Scheduler for Arduino® ARM & AVR Aka « SCoop », more details or resources see 這裡.
函式庫參考主頁面
86Duino 參考的文本是根據 知識共享署名-相同方式分享 3.0 許可證,部分文本是從 Arduino 參考 修改的。 參考中的代碼示例已發佈到公共領域。