This tutorial works with QEC-M-043T, which includes the switch button to control MySQL connection and send simple data by the switch button of the UI interfaces to the MariaDB database. This project is a simple data gathering and storage program.
Prerequisites
You must have configured a server, database and server-side scripting language to process the simple data type. We’ve configured a Debian 9 machine to run a MariaDB server in this tutorial.
Reference: https://www.digitalocean.com/community/tutorials/how-to-install-the-latest-mysql-on-debian-9
Goals
このチュートリアルでは、以下をおこないます :
- Database Configuration
- Import the related library (Ethernet, MySQL and LVGL)
- Ethernet setting steps
- MySQL (MariaDB) connection
- LVGL UI interface
Required Hardware and Software
This tutorial will focus on getting data from the user interface into our database and then displaying the data on the local machine.
Database Configuration:
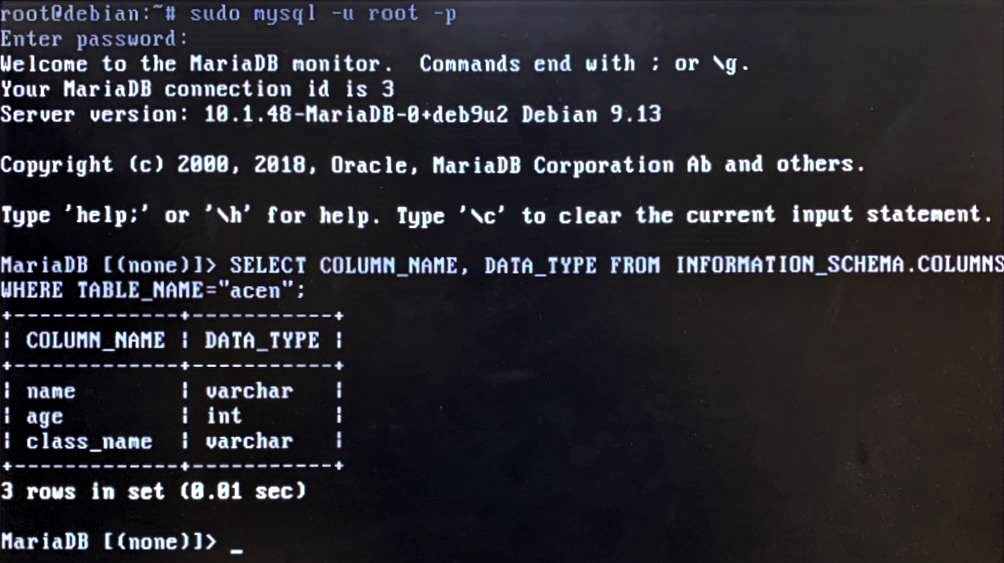
For this project, I created a database named “test” and a table in that database named “acen”. We want to record three things in this database: name, age and class name. So, we need three fields that I’ve named: name, age and class_name. This is what it looks like in the text mode Debian 9:
You can use the script below for MariaDB to create the database “test” and table “acen”.
/* Create Database */
CREATE DATABASE test;
/* Create Table */
CREATE TABLE acen (
name varchar(30),
age int(11),
class_name varchar(30)
);
Start to send data from QEC-M-043T to MySQL (MariaDB) Server
If this is your first time running 86Duino sketch files, we suggest you check out how to set up the QEC-M-043T for 86Duino before proceeding.
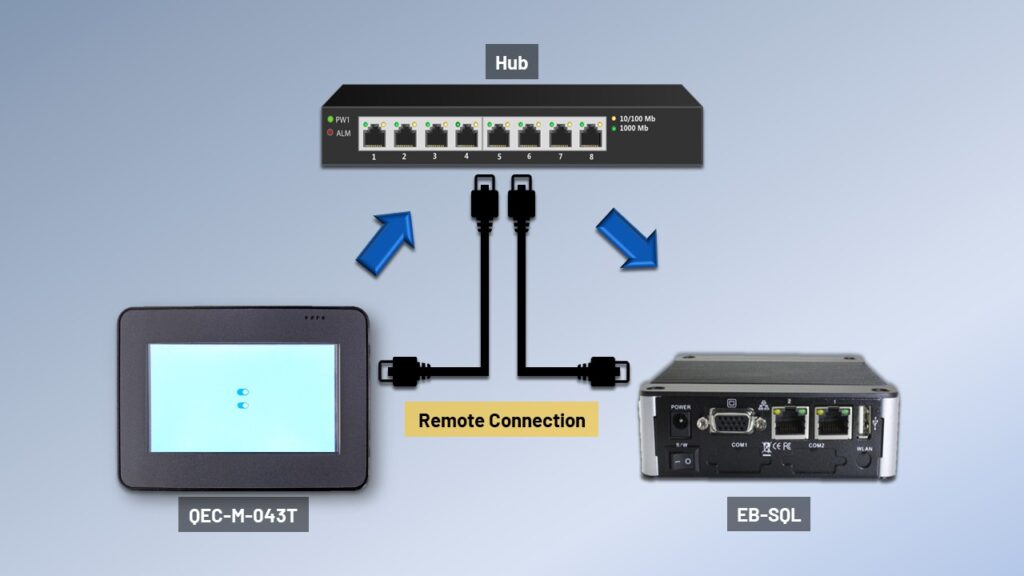
Step 1. Check if the device is connected correctly
QEC-M-043T and EB-SQL need to join the same network.
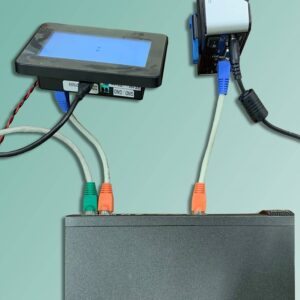
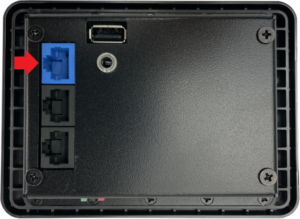
Note: The Giga Lan on QEC-M-043T is with a blue connector.
Step 2. Open 86Duino IDE.
The 86Duino IDE can be downloaded from the official website. (https://www.qec.tw/software/)
Step 3. Copy the code given below into the editor.
// Import the Related Libraries
#include <Ethernet.h>
#include <MySQL_Connection.h>
#include <MySQL_Cursor.h>
#include "lvgl86.h"

byte mac_addr[] = { 0xDE, 0xAD, 0xBE, 0xEF, 0xFE, 0xED }; // MAC Address

IPAddress server_addr(192,168,2,130);  // IP of the MySQL *server* here
char user[] = "root";              // MySQL user login username
char password[] = "roboard";        // MySQL user login password

// Sample query
char INSERT_SQL[] = "INSERT INTO test.acen (name, age, class_name) values ('acen', 34, '405')";

EthernetClient client; // Ethernet Client
unsigned long t = 0;
MySQL_Connection conn((Client *)&client); // MySQL Connection

static void event_handler1(lv_obj_t * obj, lv_event_t event)
{
    if(event == LV_EVENT_VALUE_CHANGED) {
        Serial.println("Recording data.");
        MySQL_Cursor *cur_mem = new MySQL_Cursor(&conn);
        cur_mem->execute(INSERT_SQL);
        delete cur_mem;
    }
}

lv_obj_t *sw2;
int sw_state = 0; // 0: OFF, 1: ON
static void event_handler2(lv_obj_t * obj, lv_event_t event)
{
    if(event == LV_EVENT_VALUE_CHANGED) {
        if (lv_switch_get_state(obj)) {
          if (conn.connect(server_addr, 3306, user, password)) {
            Serial.println("SQL Connection Success.");
            delay(1000);
            sw_state = 1;
          } else
            Serial.println("Connection failed.");
        } else {
          Serial.println("SQL Close.");
          conn.close();
          sw_state = 0;
        }
    }
}

void setup() {
  Serial.begin(115200);
  while (!Serial); // wait for serial port to connect
  lv86_init();

  Ethernet.begin();
  Serial.println("Connecting...");
  if (conn.connect(server_addr, 3306, user, password)) {
    delay(1000);
  }
  else
    Serial.println("Connection failed.");
  t = millis();

  lv_obj_t *sw1 = lv_switch_create(lv_scr_act(), NULL); // This switch is for insert data
  lv_obj_align(sw1, NULL, LV_ALIGN_CENTER, 0, -30);
  lv_obj_set_event_cb(sw1, event_handler1);

  sw2 = lv_switch_create(lv_scr_act(), NULL); // This switch is for the Database Connection status
  lv_obj_align(sw2, NULL, LV_ALIGN_CENTER, 0, 30);
  lv_obj_set_event_cb(sw2, event_handler2);
}


void loop() {
  conn.handleData();
  lv_task_handler();
  if (sw_state == 1 && !conn.connected()) {lv_switch_off(sw2, LV_ANIM_OFF); sw_state = 0;} // Auto judge the connection, close switch if disconnected
  if (sw_state == 0 && conn.connected())  {lv_switch_on(sw2, LV_ANIM_OFF);  sw_state = 1;} // Auto judge the connection, open switch if connected
}
Step 4. Verify that the information is different
We need to have the correct IP Address, MySQL (MariaDB) account, Ethernet connection, etc. That can connect with the database. Please give a double-check of all information about your script.
/*
  1.	MAC Address
  2.	Server IP Address
  3.	MySQL (MariaDB) account (username and password)
  4.	MySQL command
*/
byte mac_addr[] = { 0xDE, 0xAD, 0xBE, 0xEF, 0xFE, 0xED }; // MAC Address

IPAddress server_addr(192,168,2,130);  // IP of the MySQL *server* here
char user[] = "root";              // MySQL user login username
char password[] = "roboard";        // MySQL user login password

// Sample query
char INSERT_SQL[] = "INSERT INTO test.acen (name, age, class_name) values ('acen', 34, '405')";

EthernetClient client; // Ethernet Client
unsigned long t = 0;
MySQL_Connection conn((Client *)&client); // MySQL Connection
Step 5. Upload your sketch!
Hit the right arrow button (upload) next to the upload button. After the code uploads, you should see two switches on the user interface.
- The switch on top is the data insert button, and the QEC-M-043T will transfer the data after you open the switch.
- The switch on the bottom is the MySQL connection, and you will see it pull on after you open the QEC-M-043T.
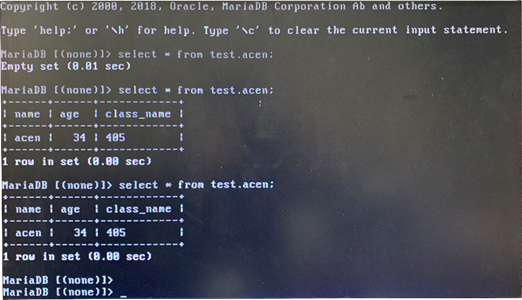
We can use the SQL language to check the data with the EB-SQL.
SELECT * FROM test.acen;
チュートリアル完了です
If you can find data in your database, which means you have successfully collected your first data into the database using the QEC-M-043T.
Stay tuned for more projects from QEC!
Feel free to comment if you have any questions/problems!
86Duinoリファレンスのテキストは、Arduinoリファレンスを改変したもので、Creative Commons Attribution-ShareAlike 3.0ライセンスに基づいてライセンスされています。リファレンス内のコードサンプルはパブリックドメインとして公開されています。